This blog explains how you can create or update an employee in Employee Central using OData APIs. To keep it simple, I will create an Employee with minimum possible fields.
The graphic below outlines the different Employee Central entities needed for employee creation, along with the corresponding minimal fields per entity, which are listed directly under the entity name.

The order in which you create the required minimum entities is critical. It should be in following order: User -> PerPerson -> EmpEmployment -> EmpJob -> PerPersonal as listed in graphic above.
The following table links the UI portlets with the respective OData entities.
| UI name | OData Name |
| N/A | User |
| Biographical Information | PerPerson |
| Employment Details | EmpEmployment |
| Job Information | EmpJob |
| Personal Information | PerPersonal |
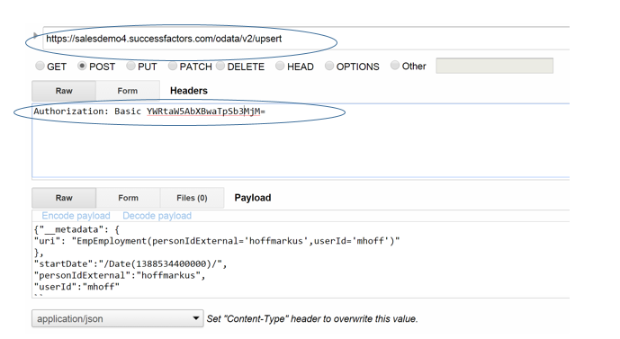
For this example I am using Advanced Rest Client Application, which can be installed as a chrome extension/app. This application provides an easy way to call the OData API. Once you have installed this app, you have to perform following basic steps before executing any OData query:
1. In the top URL text box provide your OData url in the following format:
https://<SF URL>/odata/v2/upsert, you can find further information about your ODATA API endpoint here: About HCM Suite OData APIs – SAP Library.
2. For this example we will use the basic authorization, in order to use the basic authorization you have to use following format:
Authorization: Basic <Base 64 encoded (“user@company:password”)>, for example, please refer to the graphic below:

In the next steps, I will provide the ODATA request for all the entities to create an employee. You can use these examples directly or extend it as per your requirement in order to create an employee in EC.To see the ODATA data dictionary for your company instance, please goto Admin Tools->OData API Data Dictionary.
1. User: After doing the above mentioned steps you can directly start with creation of user entity, by entering the following details in the payload section of Rest client
{
“__metadata”: {
“uri”: “User(‘mhoff’)”
},
“username”: “markushoff”,
“status”: “Active”,
“userId”: “mhoff”
}}
If the user is successfully created you should get a response back with the status OK and editstaus as INSERTED or UPSERTED, this behaviour will remain same for all the entities.
2. PerPerson
Similarly to user creation you can create perPerson by entering the following minimum details:
{
“__metadata”: {
“uri”: “PerPerson(‘mhoff’)”
},
“personIdExternal”: “hoffmarkus”,
“userId”: “mhoff”
}}
3.EmpEmployment
The next step will be to create EmpEmployement, here you need to enter the start date, userID and PersonIDExternal
{“__metadata”: {
“uri”: “EmpEmployment(personIdExternal=’hoffmarkus’,userId=’mhoff’)”
},
“startDate”:”/Date(1388534400000)/”,
“personIdExternal”:”hoffmarkus”,
“userId”:”mhoff”
}}
Note: PerPerson will only appear in query after EmpEmployement is created
4. EmpJob: For creating EmpJob you will execute the following request, please note that fields below may change based on your own data-model configuration:
{“__metadata”: {
“uri”: “EmpJob”
},
“jobCode”:”ADMIN-1″,
“userId”:”mhoff”,
“startDate”:”/Date(1388534400000)/”,
“eventReason”:”HIRNEW”,
“company”:”ACE_USA”,
“businessUnit”:”ACE_CORP”,
“managerId”:”NO_MANAGER”
}
}
5. PerPersonal: For creating the PerPersonal one needs following information:
{ “__metadata”:{
“uri”:”PerPersonal(personIdExternal=’hoffmarkus’,startDate=datetime’2014-01-01T00:00:00′)”},
“personIdExternal”:”hoffmarkus”,
“gender”:”M”,
“firstName”:”Markus”,
“lastName”:”Hoff”
}
After successfuly calling the APIS for all the entities, you should be able to see the employee directly in the EC UI portlets.


