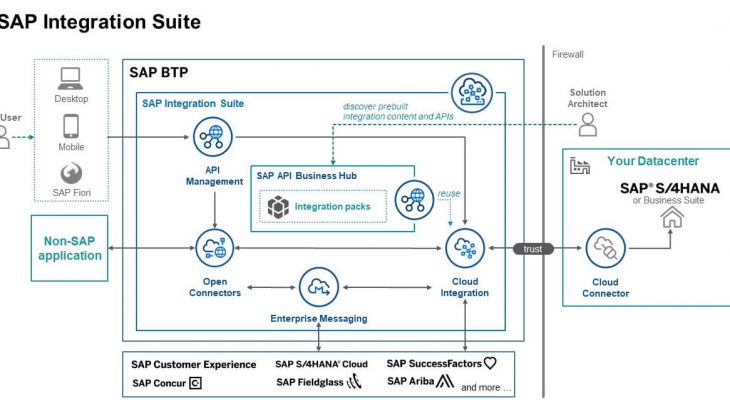
This blog post is an attempt to explore different integration capabilities within SAP Business Technology Platform (BTP) focusing on scenarios for customers and partners who are building integrations on SAP BTP federating data from SAP S/4HANA On-Premise and Non-SAP systems.
Disclaimer: The content here is originally curated for a customer workshop with technical hands-on to enable them get familiar on the capabilities around SAP BTP involving SAP Integration Suite, SAP Cloud Connector, SAP S/4HANA APIs, which I decided to publish here as a blog for the benefit of broader audience. I do acknowledge that the knowledge on this blog is derived out of own explorations but as well different other SAP learning offerings like Learning Journeys, OpenSAP tutorials, other blog post and video tutorials which I cited here as a reference. My sincere gratitude to all of those authors.
Here I am covering the following Technical steps and Demo scenarios, feel free to skip the ones which you are already familiar.
- SAP Business Technology Platform (BTP) Set-up
- SAP Cloud Connector Set-up
- Exercise 1: Building a Sales Order Fiori Application federating the data from S/4HANA On-Premise system to Cloud (SAP BTP)
- SAP Integration Suite – API Management (S4H Sales Order API)
- SAP Integration Suite – Open Connector (Slack API)
- SAP Integration Suite – Cloud Integration (iFlow)
- Exercise 2: Using Integration Suite to design an Integration Scenario which notifies Sales Managers on the daily Sales Order value via Slack
- Connecting Exercise 1 & Exercise 2
- SAP Integration Suite – Integration Advisor (Designing the MIGs and MAGs)
- Exercise 3: Using Integration Advisor to do mapping guidelines between different standards of Sales Order Scenario
- Bonus: Enabling Principal Propagation with X.509 Certificate
It’s going to be a long hands-on blog post, so let’s roll up your sleeves and get started!
SAP Business Technology Platform (BTP) Set-up:
If you are completely new to the BTP world, then first you need an account with SAP BTP. You can get one for free immediately.
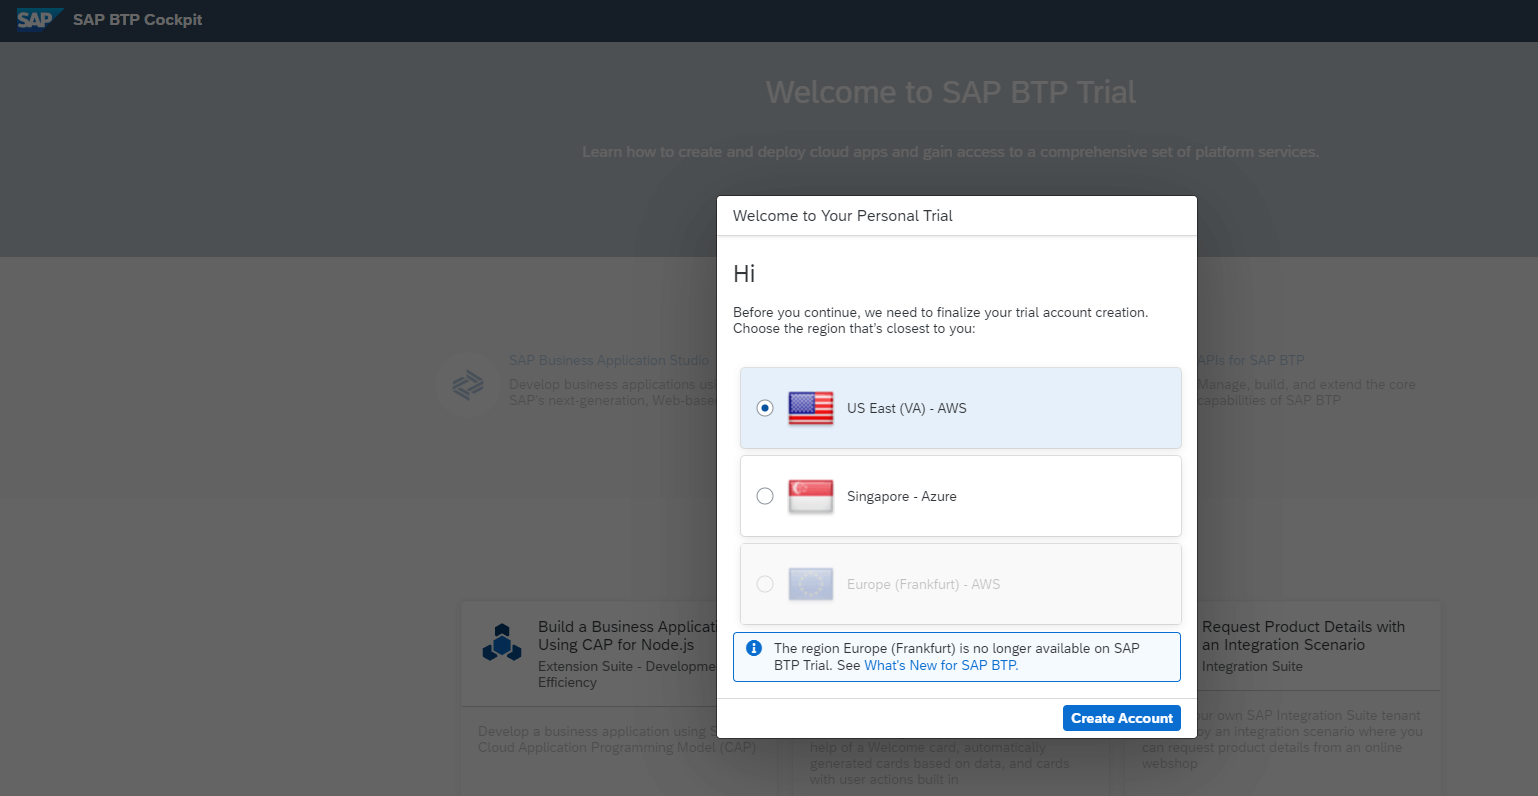
Create a Business Technology Platform(BTP) Trial Account going to https://cockpit.hanatrial.ondemand.com/, I have created an instance in US East (VA) – AWS region as I am aware all the required services are available here.
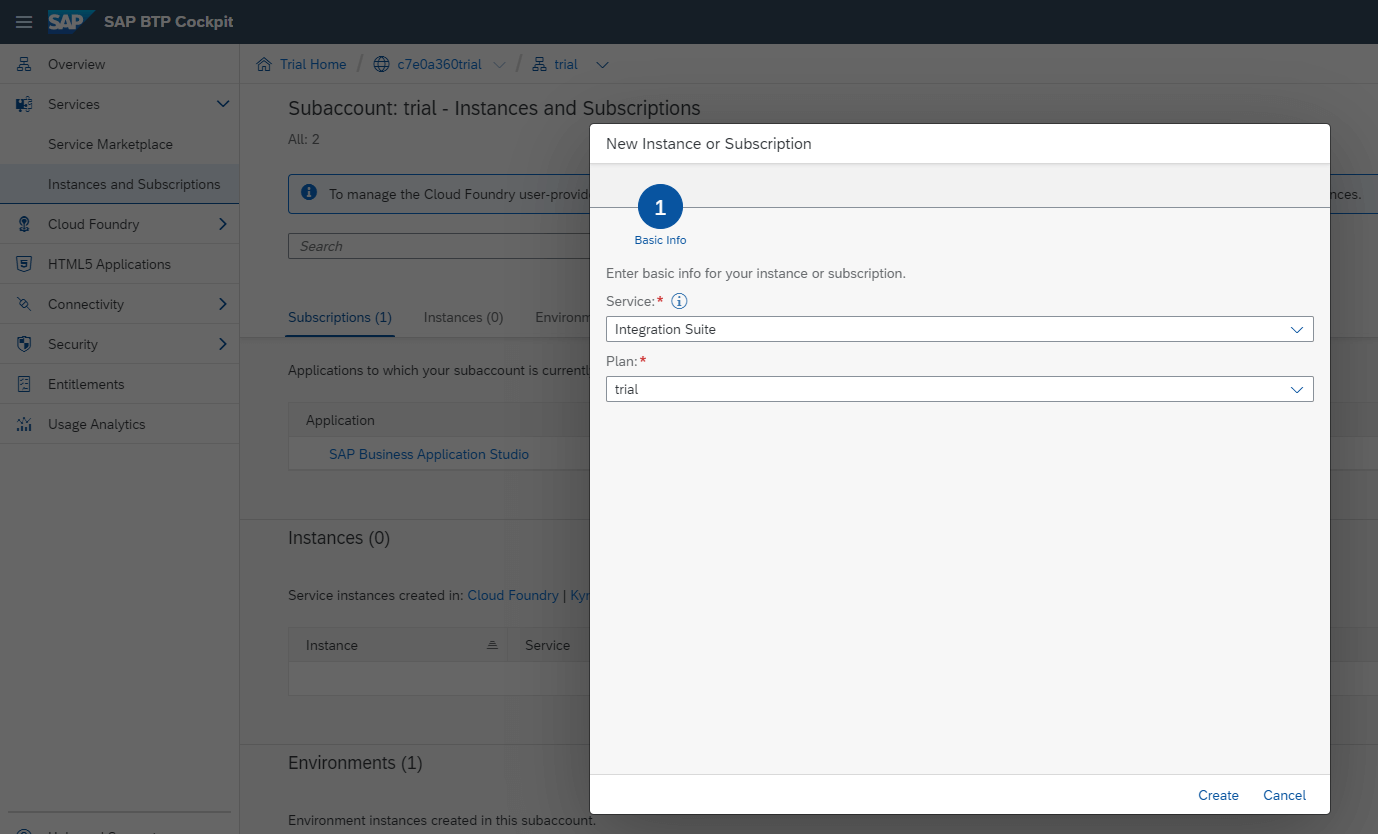
Once the trial account set-up is completed, get into your Subaccount ‘trial’ and create an instance for Integration Suite Service under ‘Instances and Subscriptions’.
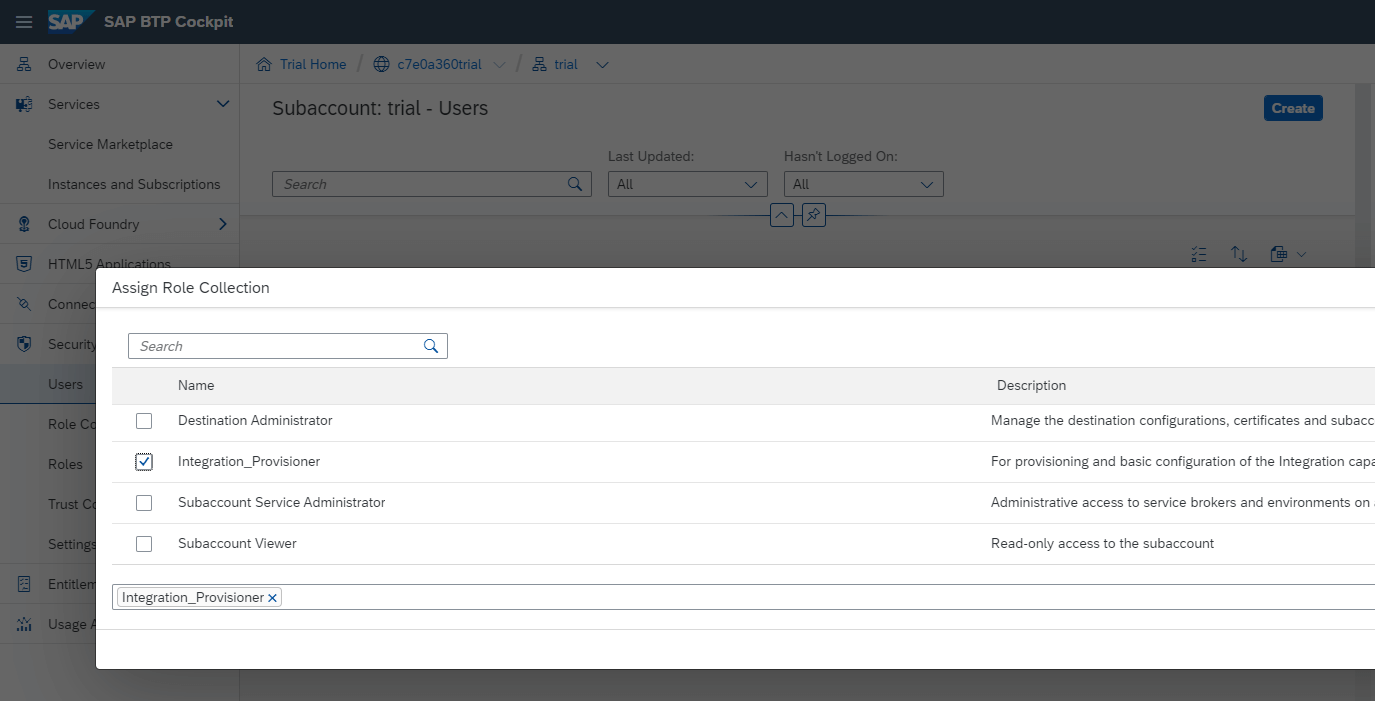
Once done, assign the Role Collection ‘Integration_Provisioner’ to the user (you) under the Security -> Users -> select user -> Assign Role Collection.
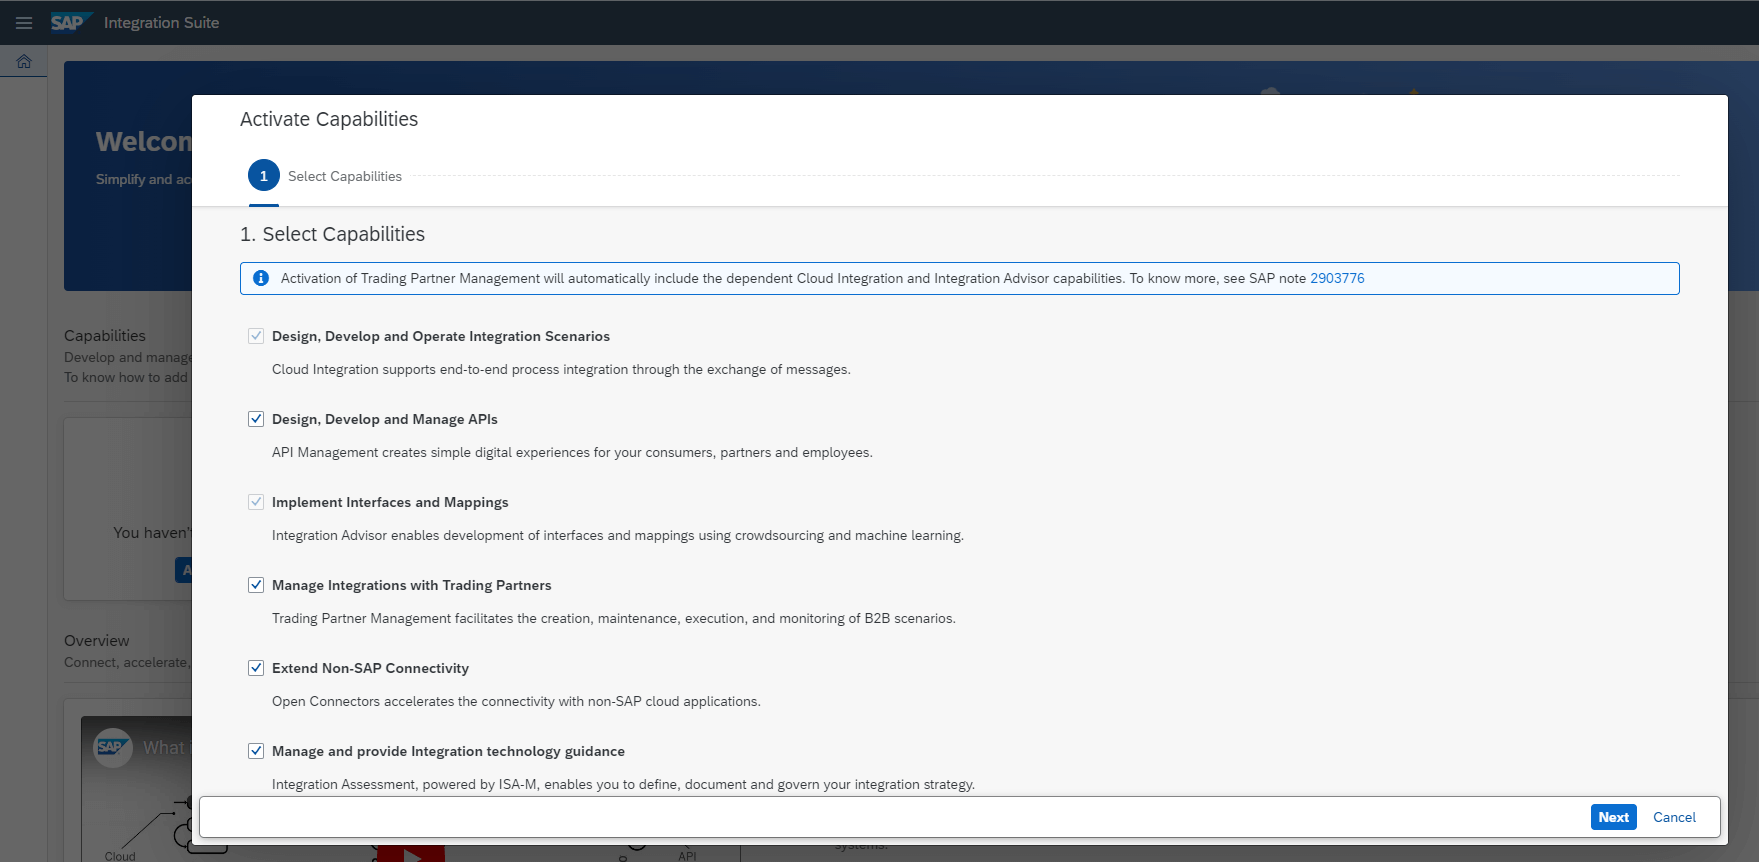
Now go back to the Instances and Subscription, click on the Integration Suite to open the Integration Suite Application home. Now add the capabilities which you need for your integration scenario. I have selected all the following capabilities (this may take upto an hour to activate the same).
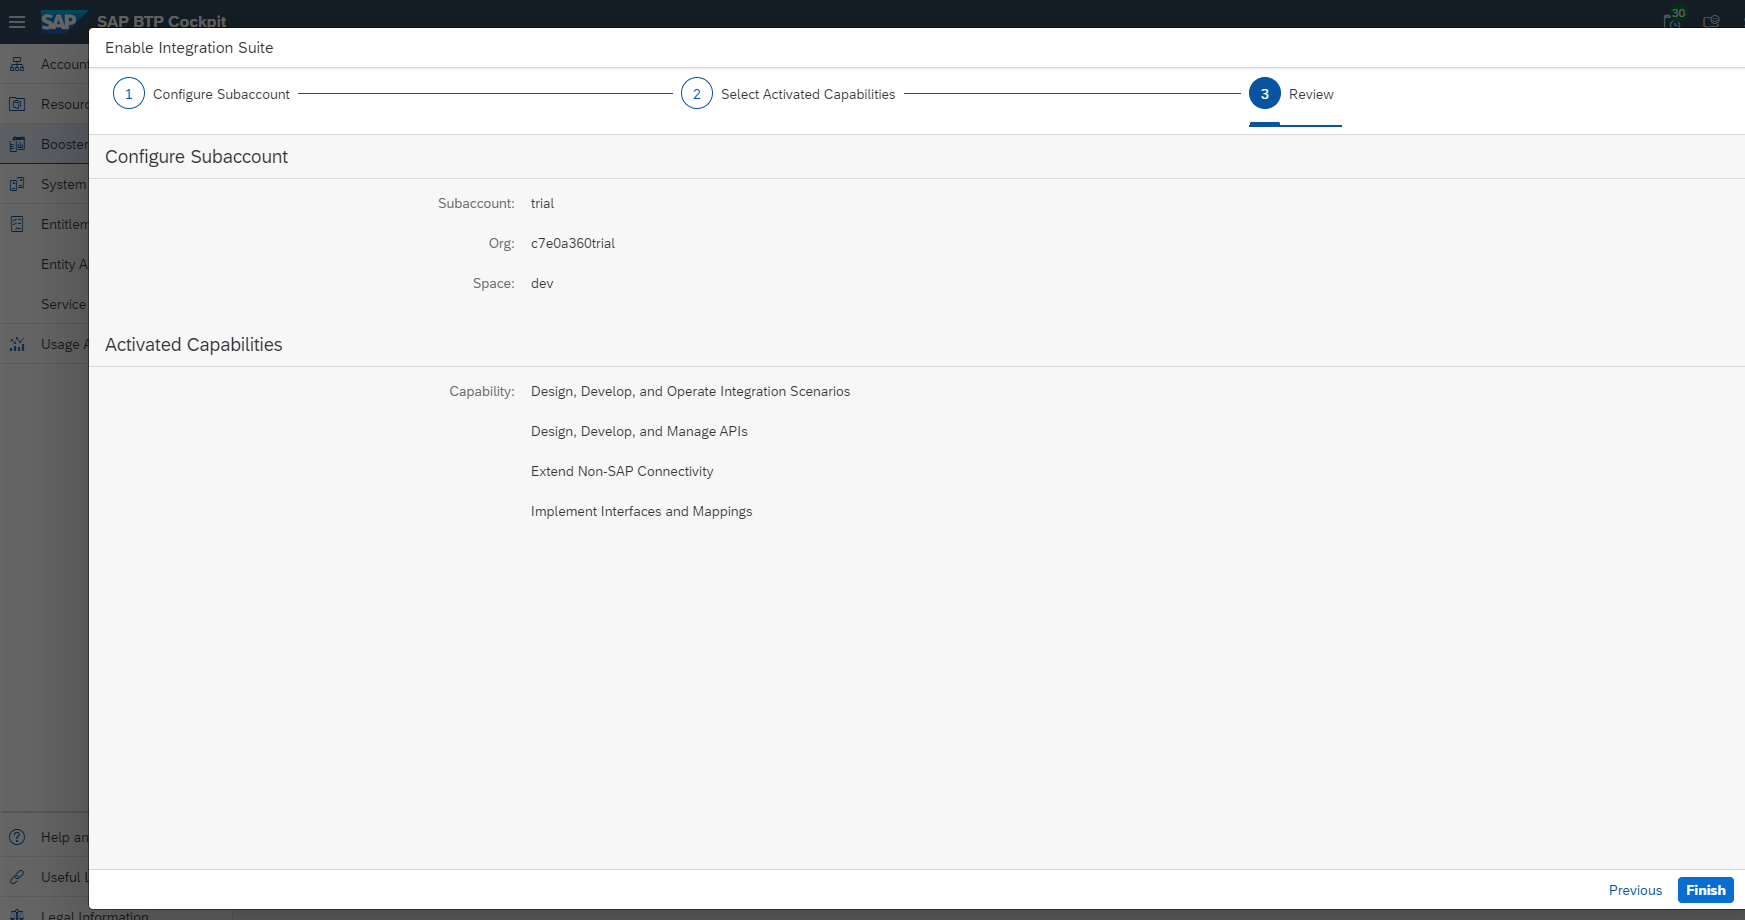
Once successfully activated, move back to the BTP Cockpit, run the Booster – Enable Integration Suite on your Subaccount to activate the necessary roles.
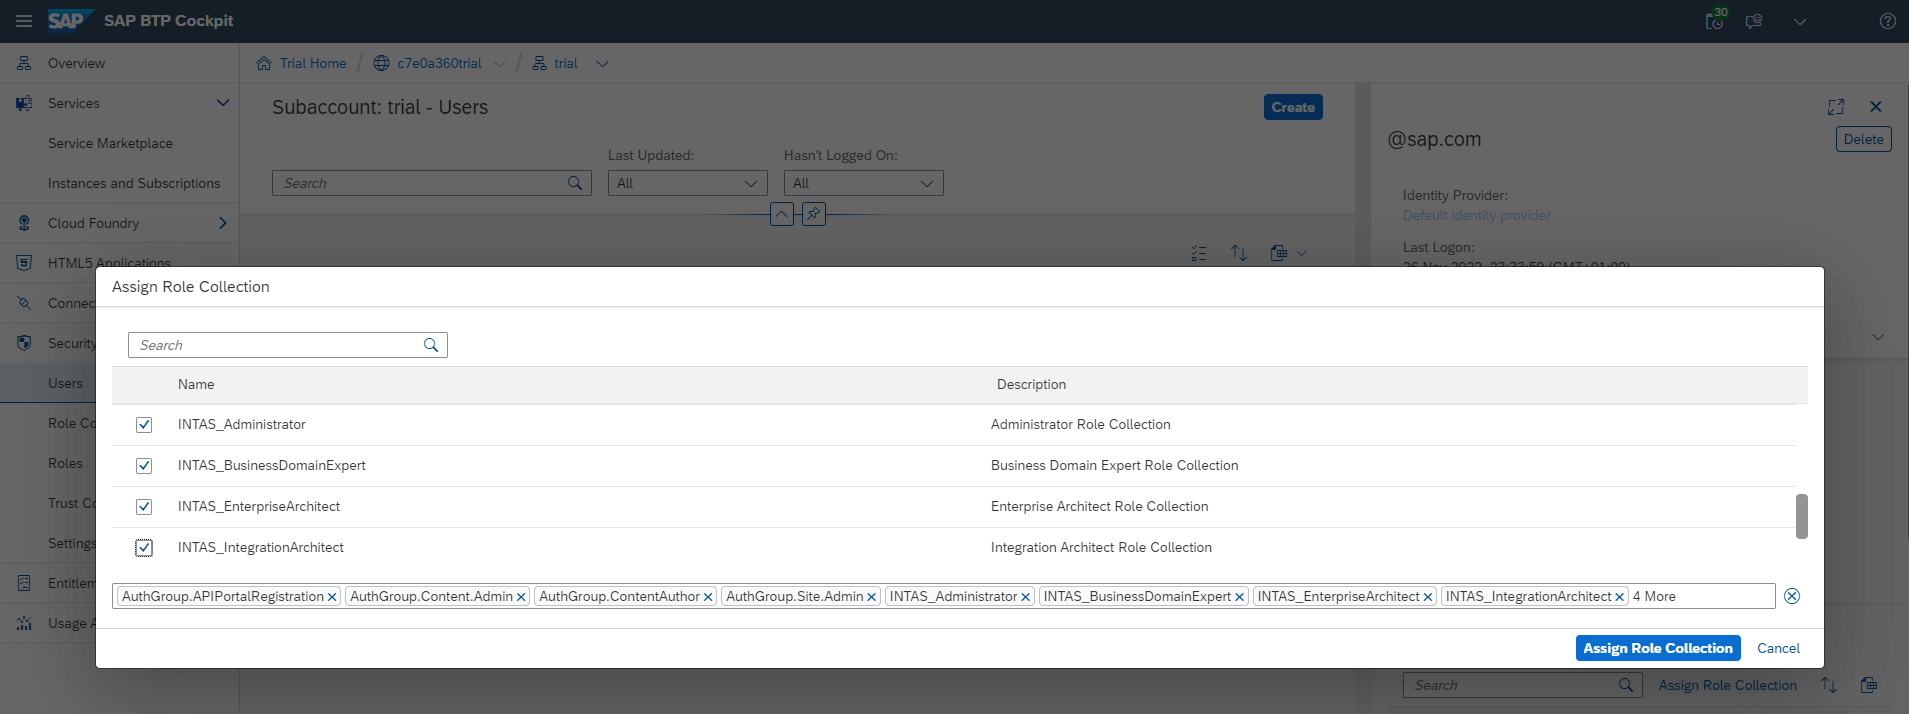
Assign the newly created Role Collections which are relevant for the Integration Suite capabilities to the user (you 😉 ).
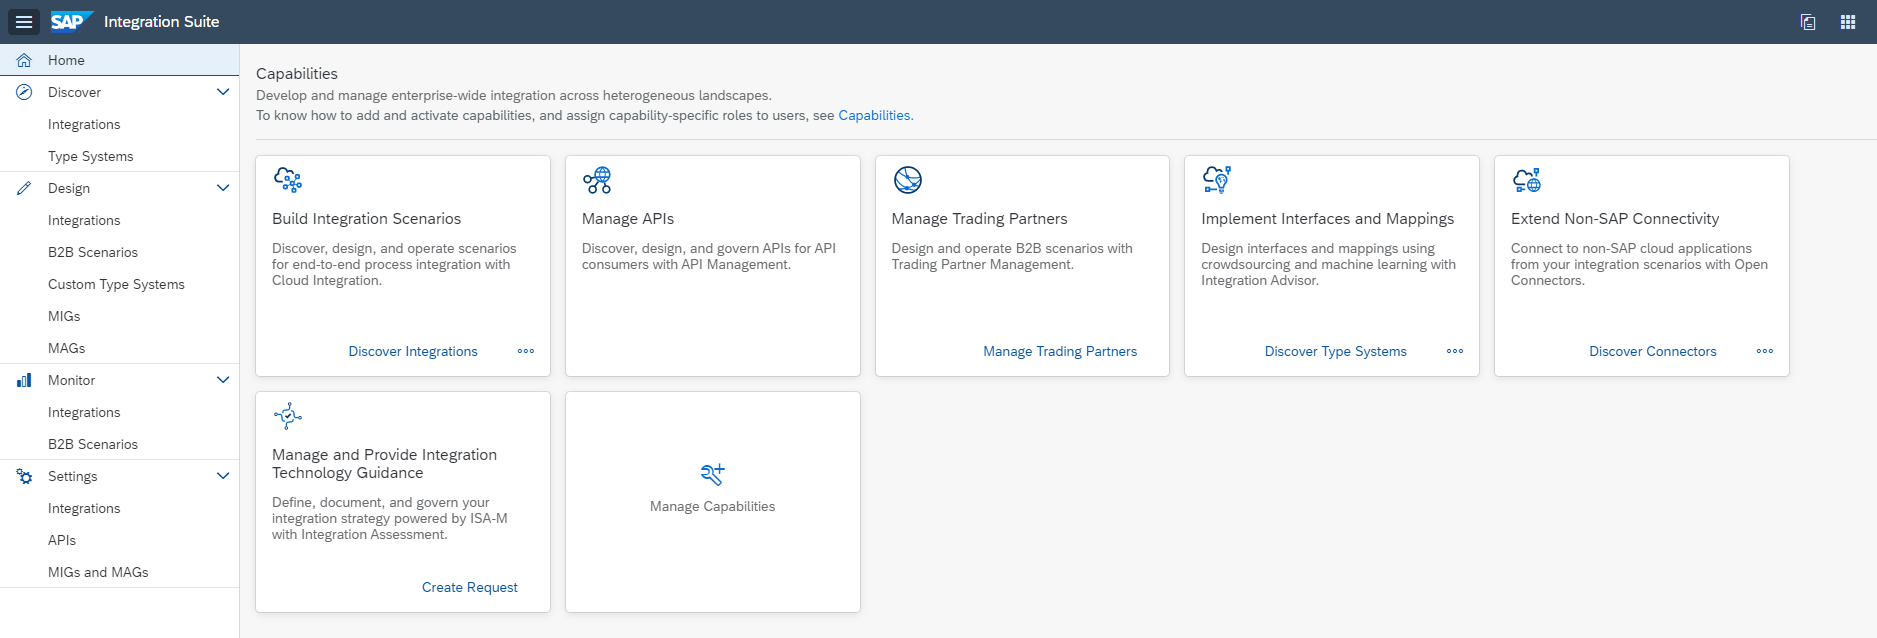
Now go to the Integration Suite home, you should be able to access all the capabilities of Integration Suite from SAP Integration Suite Application instance
SAP Cloud Connector Set-up
Install SAP Cloud Connector (locally if needed) or use directly the one pre-installed on the Server or the SAP Cloud Appliance Library (CAL)
To install locally, download the latest version of SAP Cloud Connector (SCC) from SAP Development Tools Page – https://tools.eu1.hana.ondemand.com/#cloud
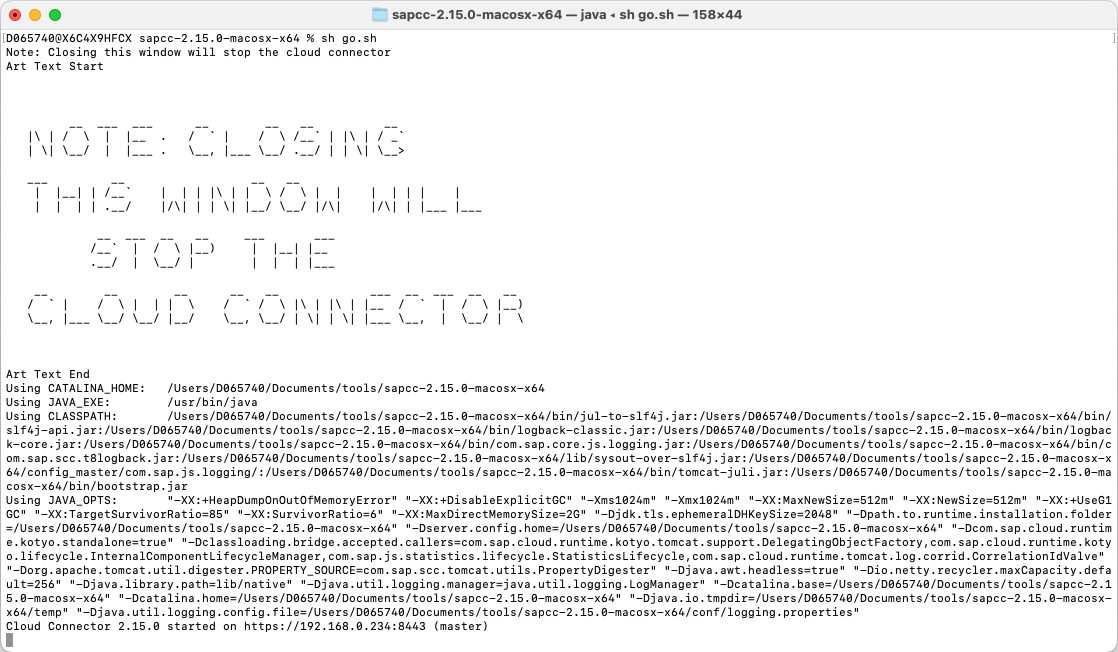
Start the SCC running the command sh go.sh from the extracted directory (in case of mac)
Login to SCC using the default first time credentials username – Administrator / password – manage and you can change the default credentials.
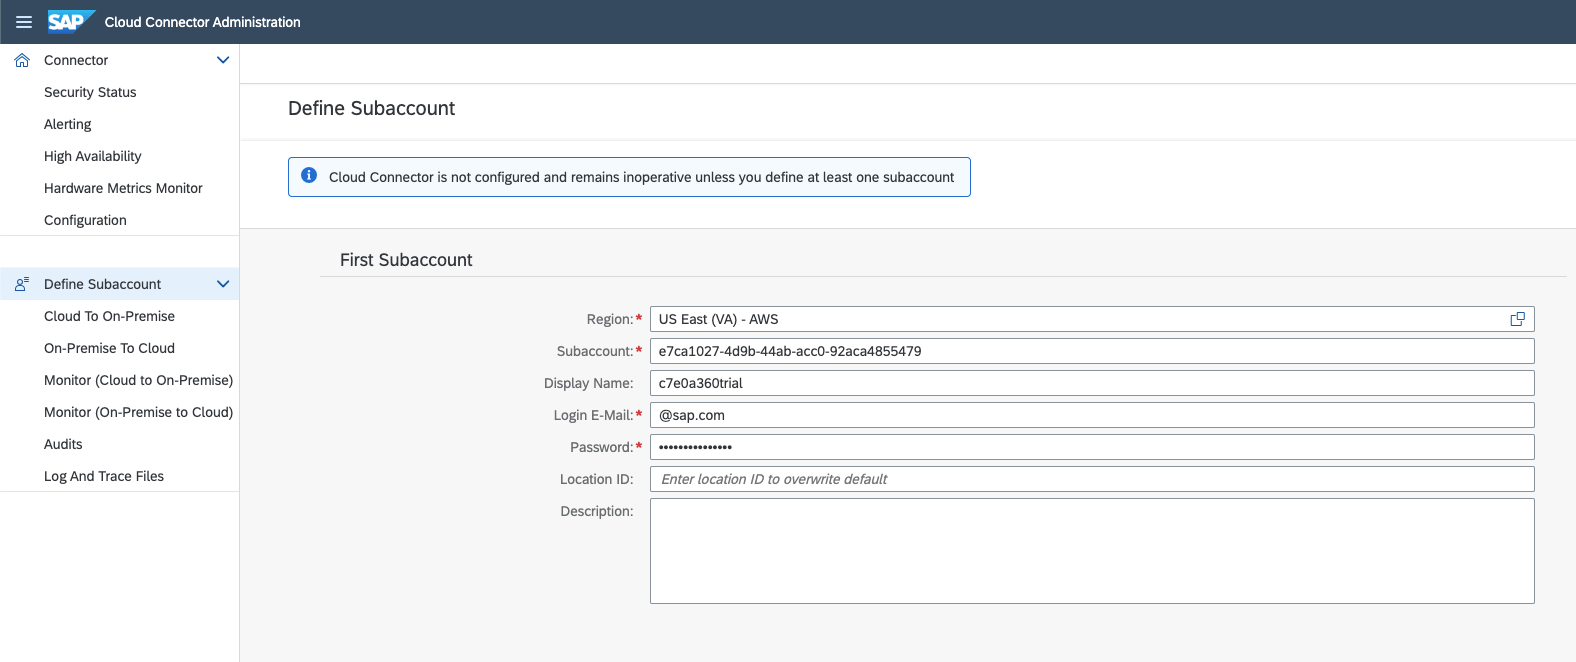
Connect your Cloud Connector to the BTP trial Subaccount providing the relevant information and the subaccount user credentials.
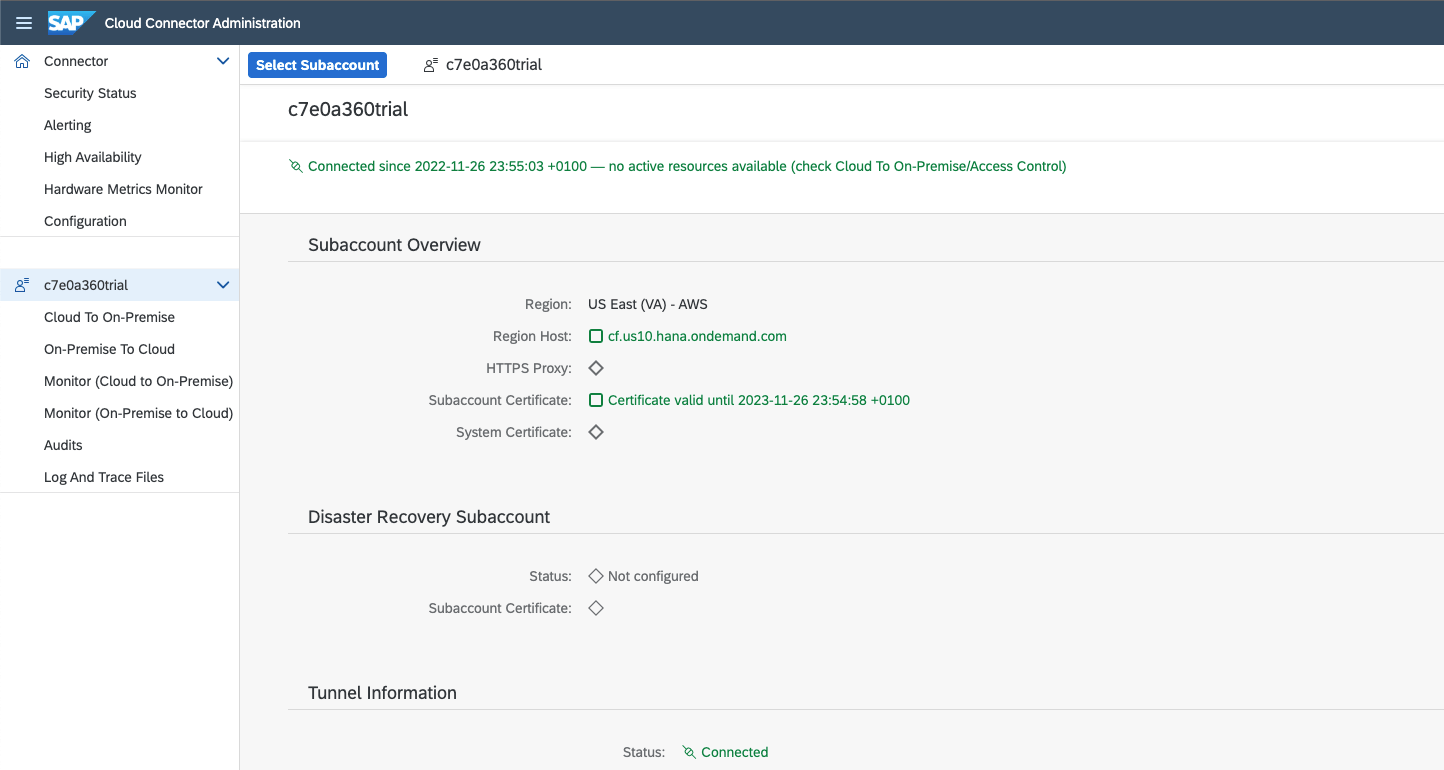
Once connected, goto ‘Cloud To On-Premise’ to connect the SAP ABAP On-Premise system and add a new System Mapping as “ABAP System” with HTTPS protocol, internal host (full host or IP address), port (e.g: 44300), virtual host & port (which would be used at the BTP side). Skip Principal Propagation and System Certificate for now. Use Virtual Host in Request header. Hint: To find the host and port on the On-Premise system -> check the transaction SMICM -> services
Now add the URL Path ‘/sap/opu/odata/sap/’ and Access Policy ‘Path And All Sub-Paths’.

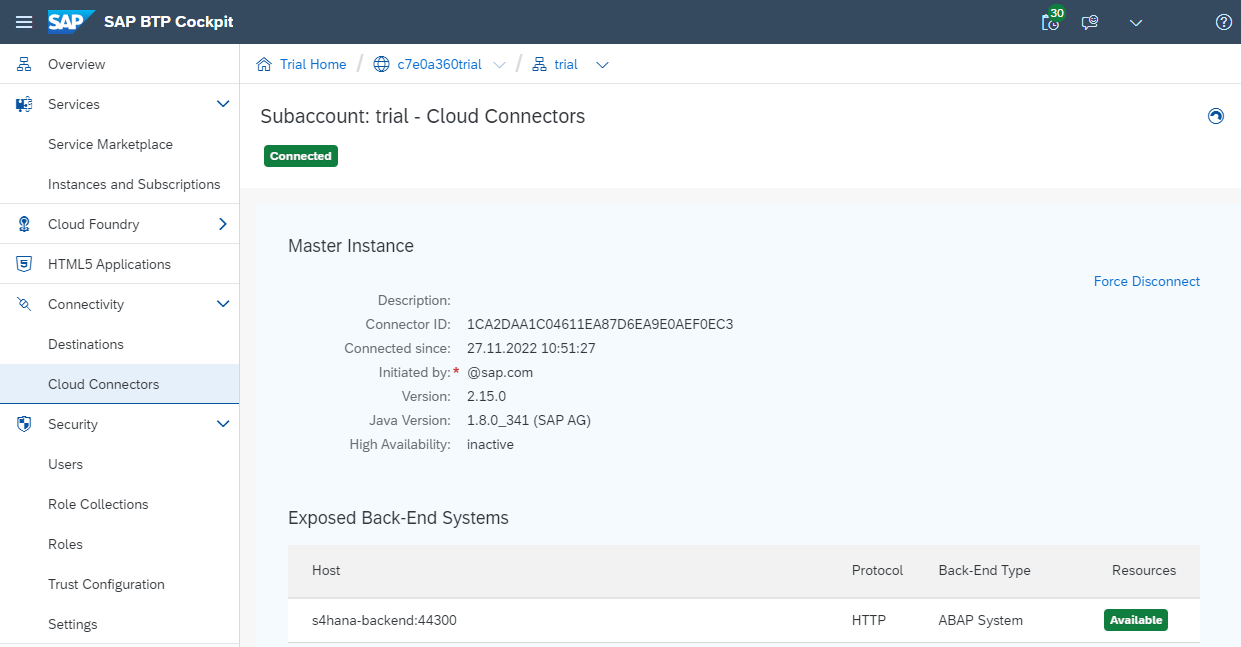
Once connected, You can verify the same both on the SAP Cloud Connector and as well on the SAP BTP Cockpit under Cloud Connectors.
Exercise 1: Building a Sales Order Fiori Application federating the data from S/4HANA On-Premise system to Cloud (SAP BTP)
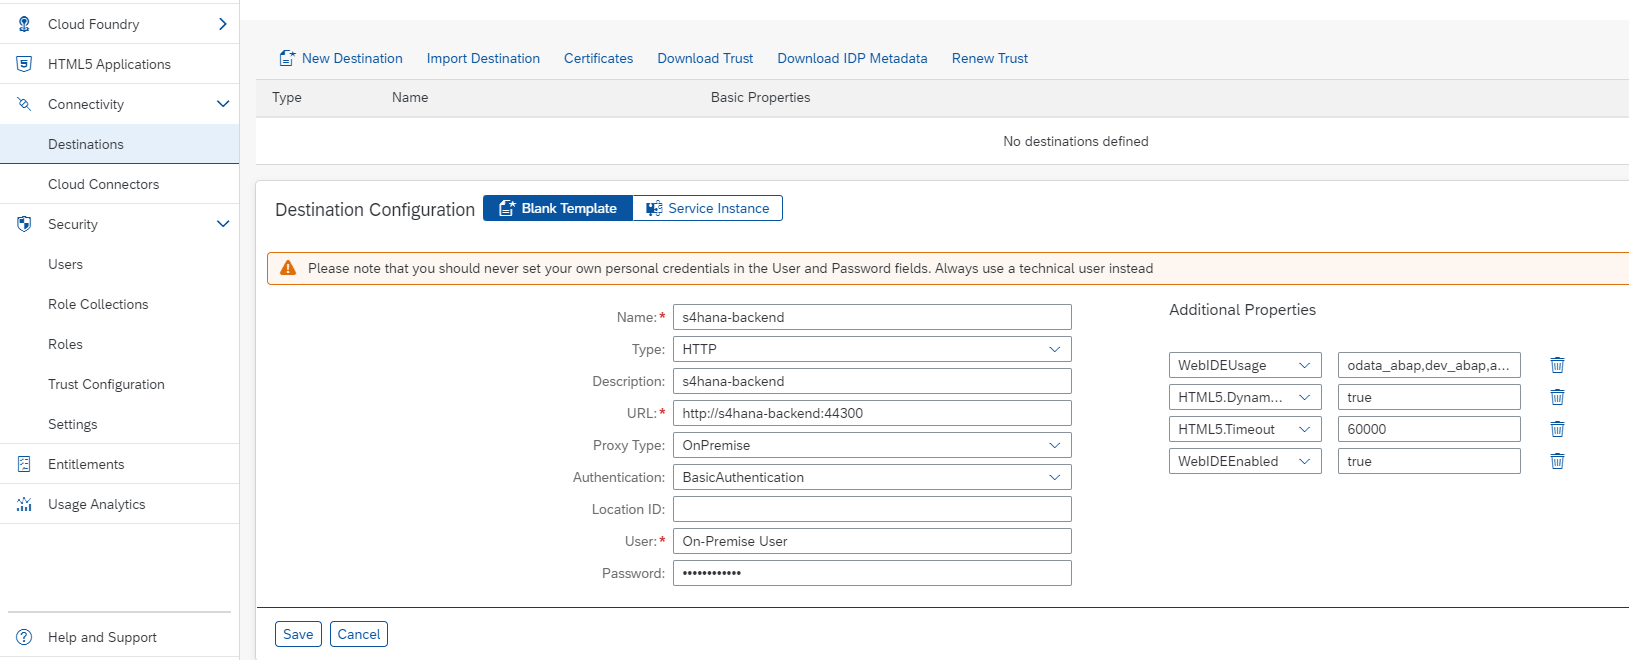
To connect to the On-Premise system from the Fiori Application in BTP create a destination for On-Premise system (either with Principal Propagation or Basic Authentication), for now using Basic Authentication and enter your On-Premise credentials and use the Virtual Host details from Cloud Connector. Include provide the additional Properties which are then needed for the SAP Business Application Studio.
We will use SAP Business Application Studio to quickly build the Fiori Application.
From Service Marketplace, create a SAP Business Application Studio instance and go to the Application.
Create a Dev Space ‘Fiori_dev’ for SAP Fiori kind of applications (this may take 15 mins)

Once created, go to Fiori_dev space and start the creation of new project from template ‘SAP Fiori Application’ with ‘List Report Page’ and Connect to the Data Source using the ‘s4hana-backend’ destination to use ‘ZAPI_SALES_ORDER_SRV (1) – OData V2’. As you can see, the oData services from the SAP S/4HANA On-Premise system are available now for the consumption via the destination through the cloud connector.

Select the Main entity as ‘A_SalesOrder’ and Navigation ‘to_Item’ and the module name ‘sales_order_dashboard’ and click on Finish to complete the project creation.
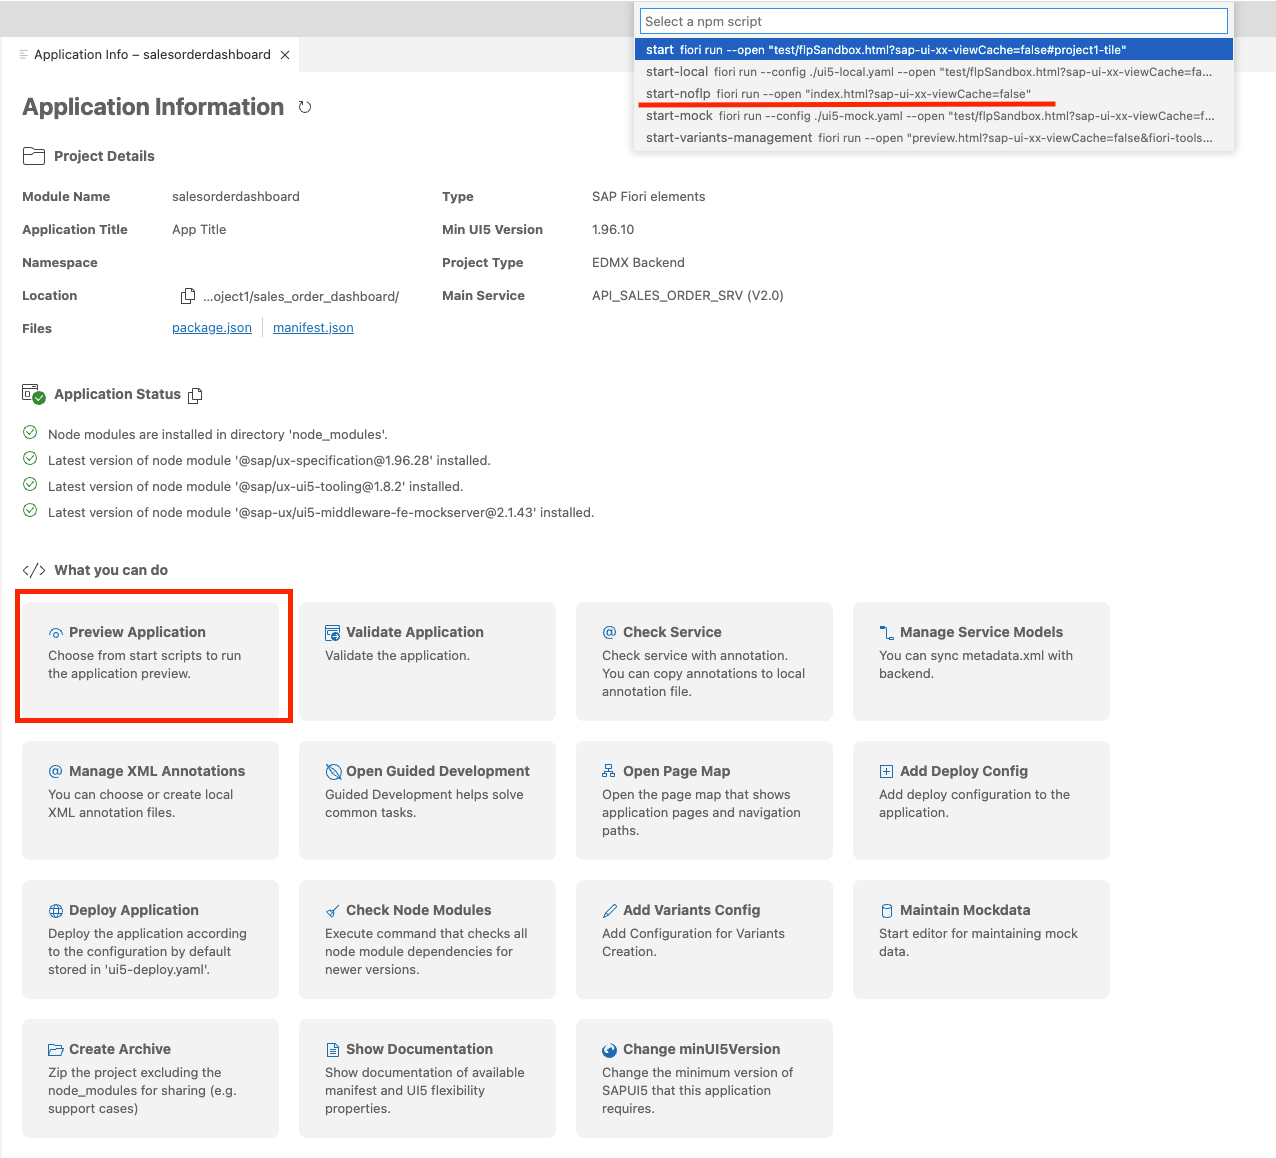
From the Application Information select ‘Preview Application’ to view the Sales Order Fiori Application running on the Browser pointing to the index.html.
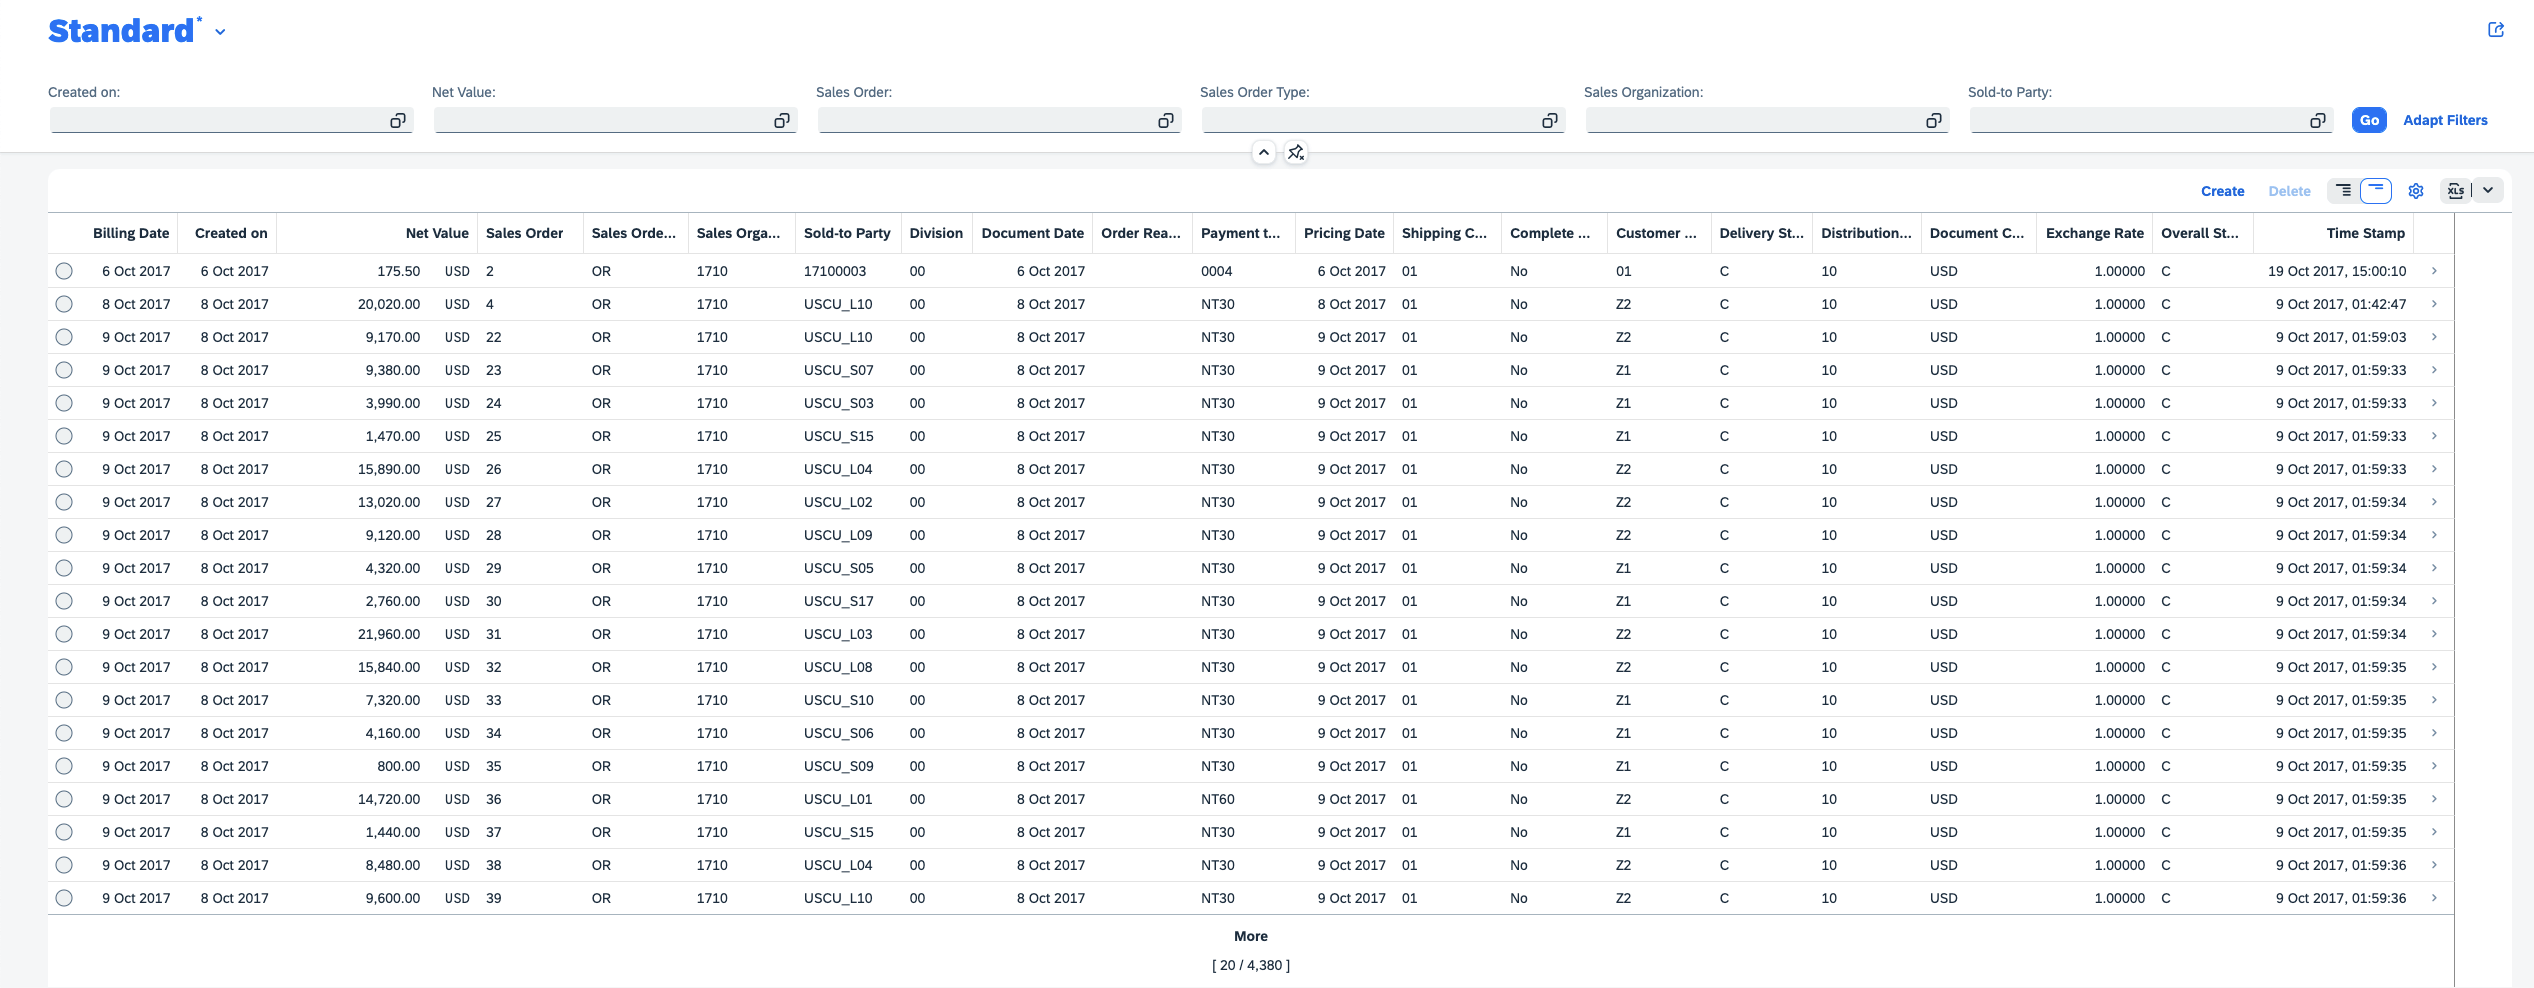
On the Application, Click on the Settings icon to enable the Table Columns and Adapt Filters for the Filter bar to be visible for the relevant Fields and Apply the same to fetch the Sales Order information directly from the S/4HANA On-Premise System.
SAP Integration Suite – API Management (S4H Sales Order API)
SAP API Management lets you publish, promote, and oversee APIs in a secure and scalable environment. Within Integration Suite, the API Management has more than 200 API packages pre-delivered which are ready to be consumed.
Let’s prepare the Sales Order API on the SAP Integration Suite. To do the same, you can copy the pre-delivered API Artifacts of SAP S/4HANA Cloud under Discover -> APIs (Hint: If the API option is not available under Discover, then you must provision the same under Settings -> APIs)

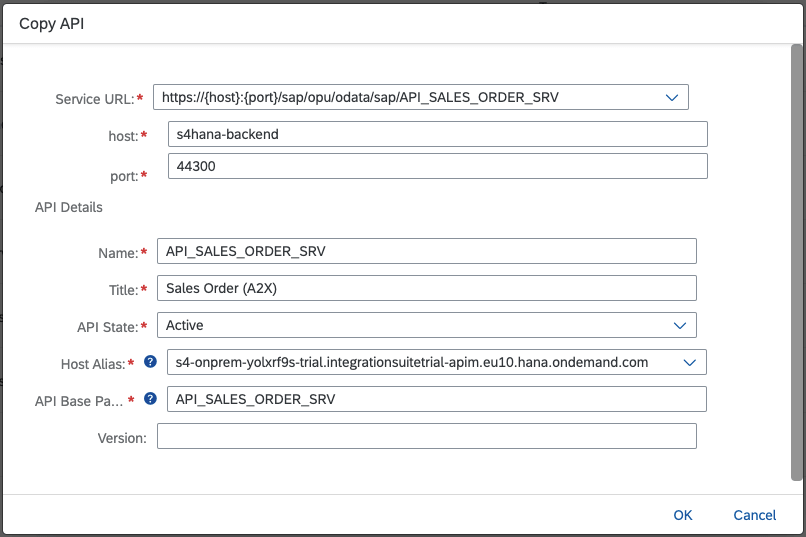
Search for ‘Sales Order’ under Artifacts of SAP S/4HANA Cloud APIs and copy the same to your Integration Suite providing the backend SAP S/4HANA host and port. Hint: If you aren’t able to connect using the Virtual Host/Port, You could also try with the external full IP Address and Https port.
Now the API is available for further changes under Develop. Before we could Test the API, we need to make the following changes (For accepting the Encoding and configuration for Basic Authentication) on the API Policy. To do the same, select the API ‘API_SALES_ORDER_SRV’ from Design -> APIs and click on ‘Policies’.

On the Policy Editor, click on edit and select the ‘PreFlow’ to make changes. These are the policies which affect the API before the flow is triggered.

From the available Policies in the right, select ‘Assign Message’ under Mediation Policies and give a name ‘AcceptEncoding’ and Add the same. Now add the below content to the Policy for updating the Header in HTTP Request with Accept-Encoding.
<!-- This policy can be used to create or modify the standard HTTP request and response messages -->
   <AssignMessage async="false" continueOnError="false" enabled="true" xmlns='http://www.sap.com/apimgmt'>
      <!-- Sets a new value to the existing parameter -->
      <Set>
         <Headers>
            <Header name="Accept-Encoding">gzip,deflate</Header>
         </Headers>
      </Set>
      <IgnoreUnresolvedVariables>false</IgnoreUnresolvedVariables>
      <AssignTo createNew="false" type="request"></AssignTo>
   </AssignMessage>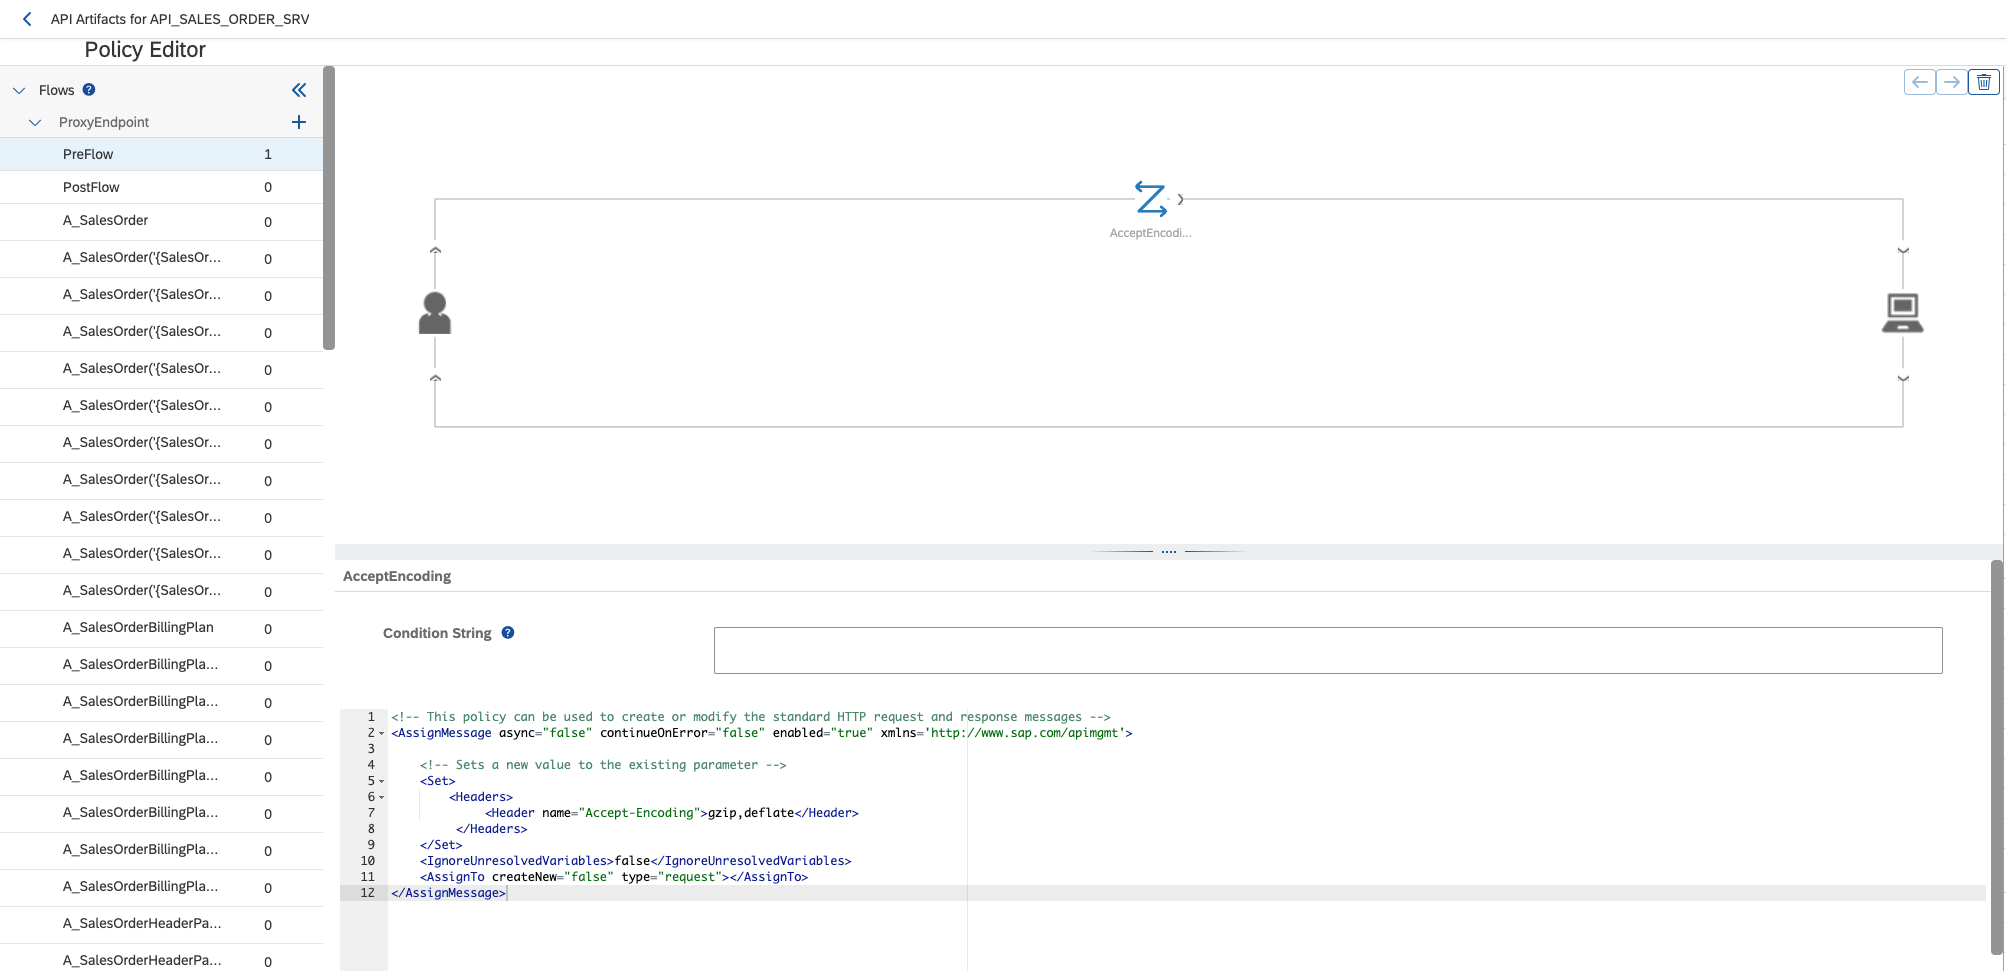
Now select the ‘Key Value Map Operations’ under Mediation Policies and give a name ‘getCredentials’ and Add the same. Add the below content to the Policy for fetching and assigning the User credentials for the Basic Authentication.
<KeyValueMapOperations mapIdentifier="BasicAuthCredentials" continueOnError="false" enabled="true" xmlns="http://www.sap.com/apimgmt">
      <!-- Read parameter with key "username" and assign its value to private variable BasicAuthUsername-->
   <Get assignTo="private.BasicAuthUsername" index='1'>
      <Key><Parameter>username</Parameter></Key>
   </Get>
   <!-- Read parameter with key "password" and assign its value to private variable BasicAuthPassword-->
   <Get assignTo="private.BasicAuthPassword" index='1'>
      <Key><Parameter>password</Parameter></Key>
   </Get>
   <Scope>environment</Scope>
   </KeyValueMapOperations>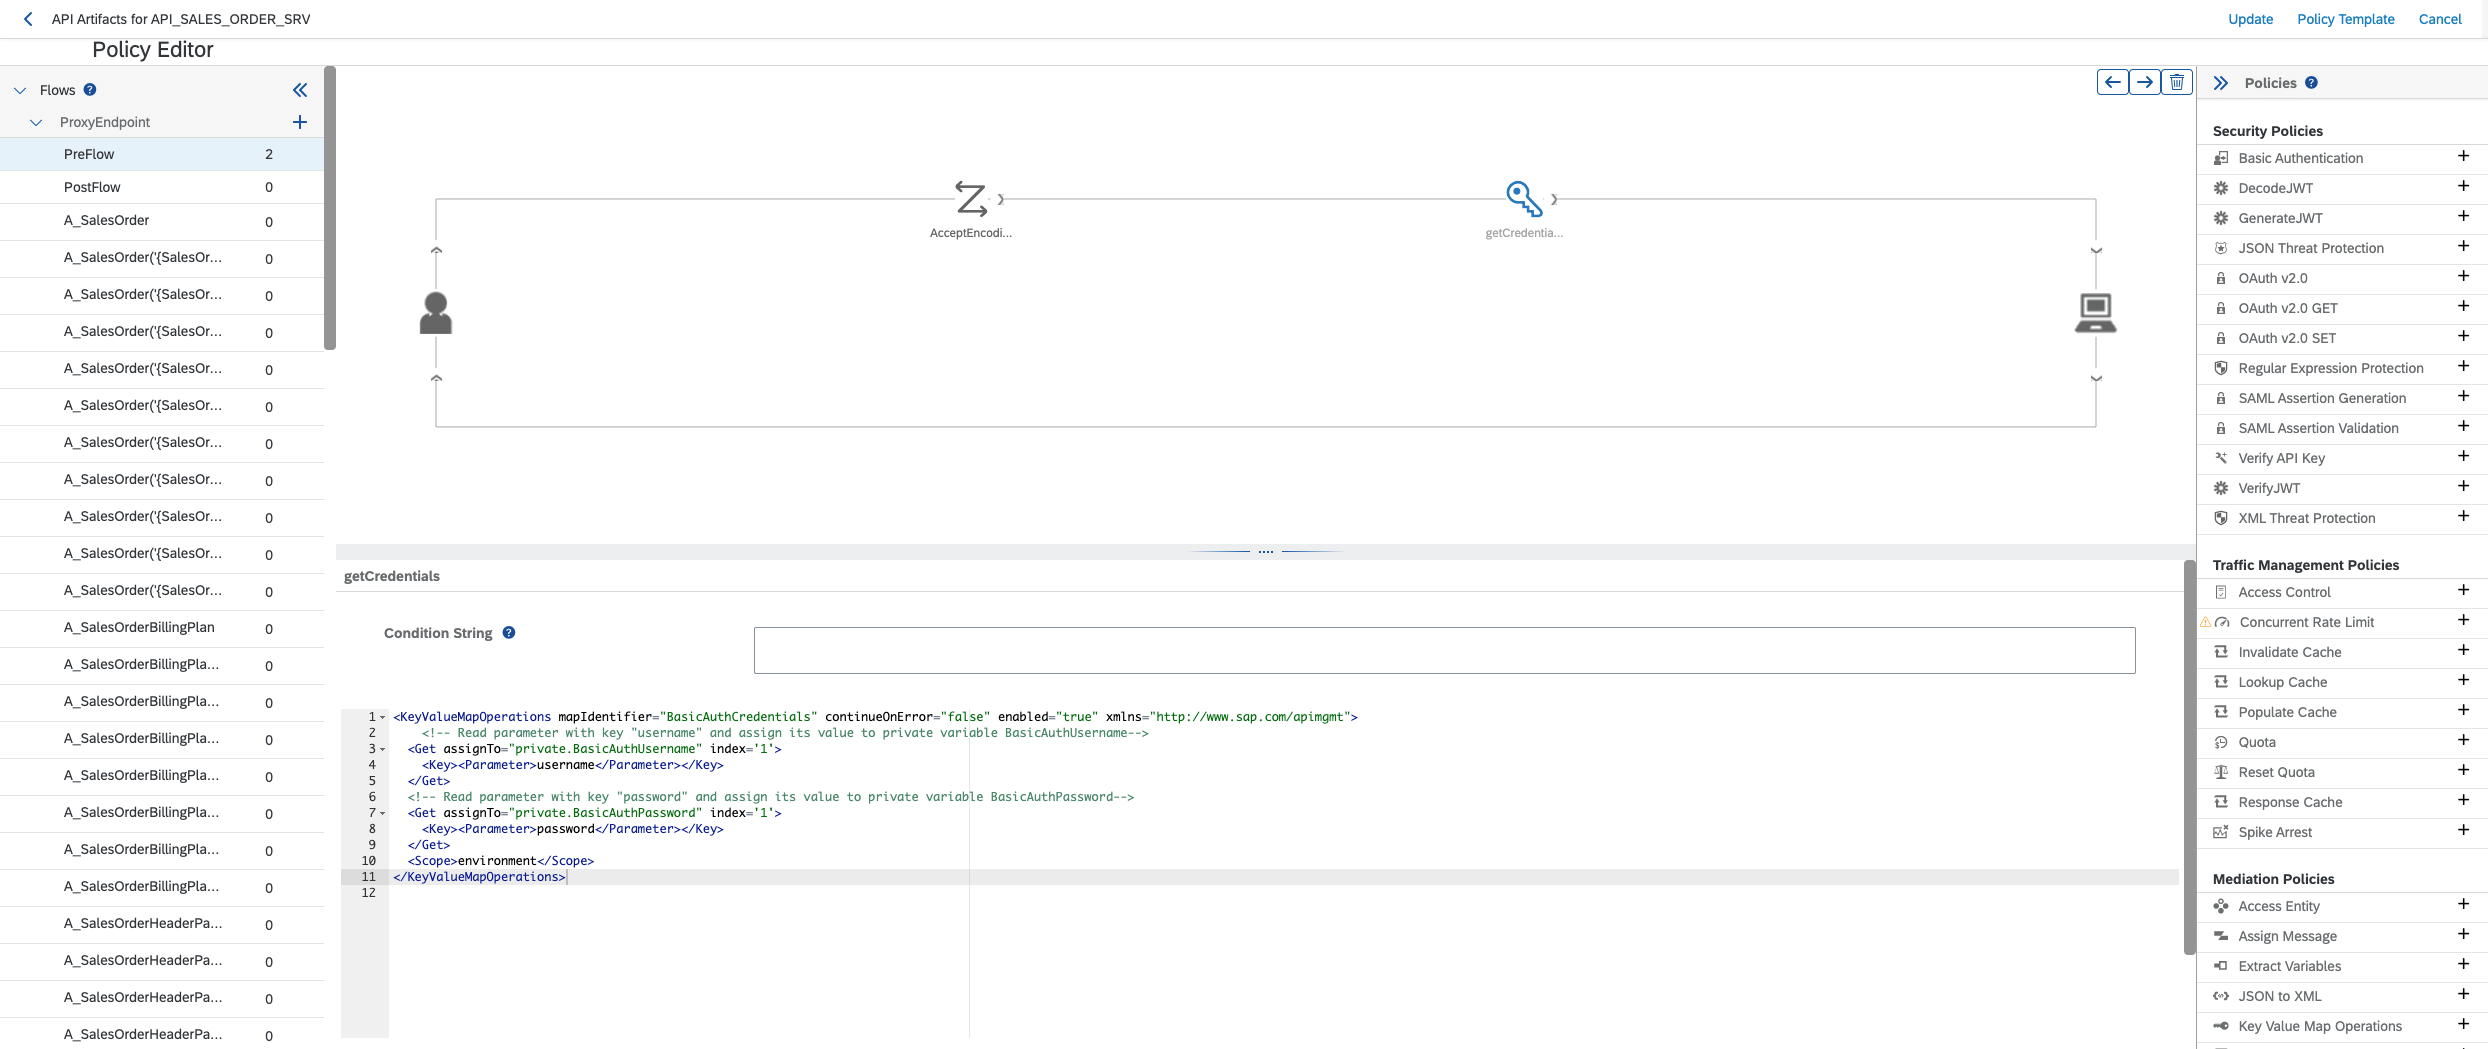
We will create the necessary Key Value Map for storing the User Credentials securely with in Integration Suite in a moment.
Finally add the ‘Basic Authentication’ policy from Security Policies and update the below content to the Policy for setting the credentials for the Authentication.
<BasicAuthentication async='true' continueOnError='false' enabled='true' xmlns='http://www.sap.com/apimgmt'>
      <!-- Operation can be Encode or Decode -->
      <Operation>Encode</Operation>
      <IgnoreUnresolvedVariables>false</IgnoreUnresolvedVariables>
      <!-- for Encode, User element can be used to dynamically populate the user value -->
      <User ref='private.BasicAuthUsername'></User>
      <!-- for Encode, Password element can be used to dynamically populate the password value -->
      <Password ref='private.BasicAuthPassword'></Password>

      <!-- Assign to is used to assign the encoded value of username and password to a variable. This should not be used if the operation is Decode -->
      <AssignTo createNew="true">request.header.Authorization</AssignTo>
   </BasicAuthentication>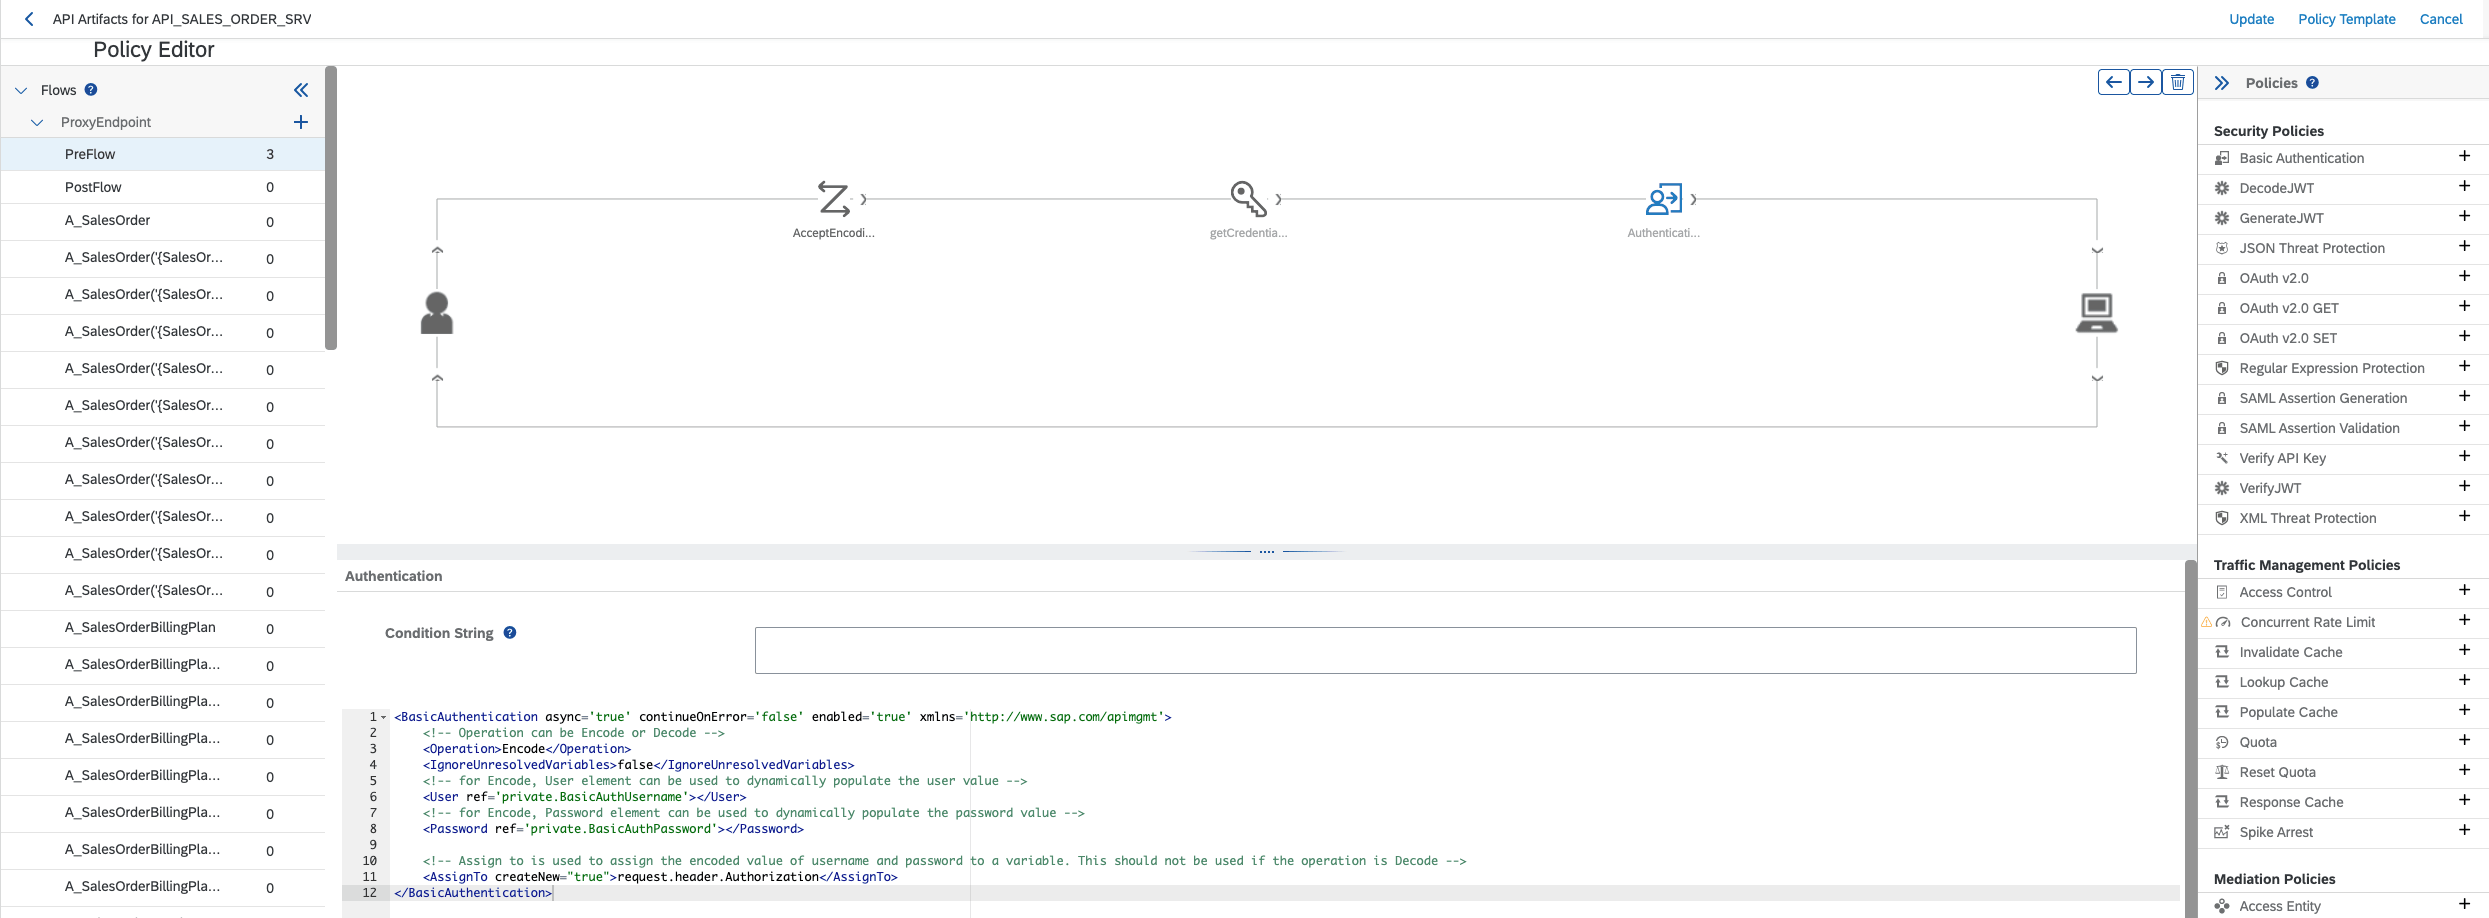
Update the Policies, Save the API and Deploy the same.
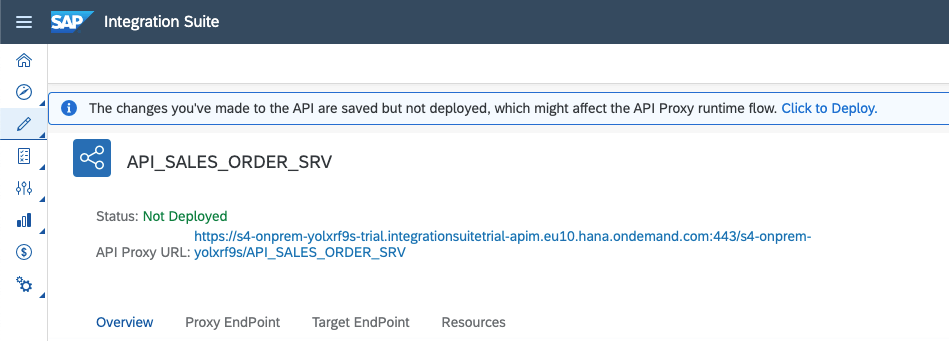
The last step here is to configure the User Credentials for the Authentication. For the same go to Configure -> APIs -> Key Value Maps -> Create. Use the Name ‘BasicAuthCredentials’ and the key value pair for both username and password.

It’s time to test the API. Go to Test -> APIs and select the API ‘API_SALES_ORDER_SRV’, use the relevant Resource endpoint (For Ex: ‘/A_SalesOrder’), apply any query parameters and hit ‘Send’. You should successfully get the results from the S/4HANA On-Premise Backend system.
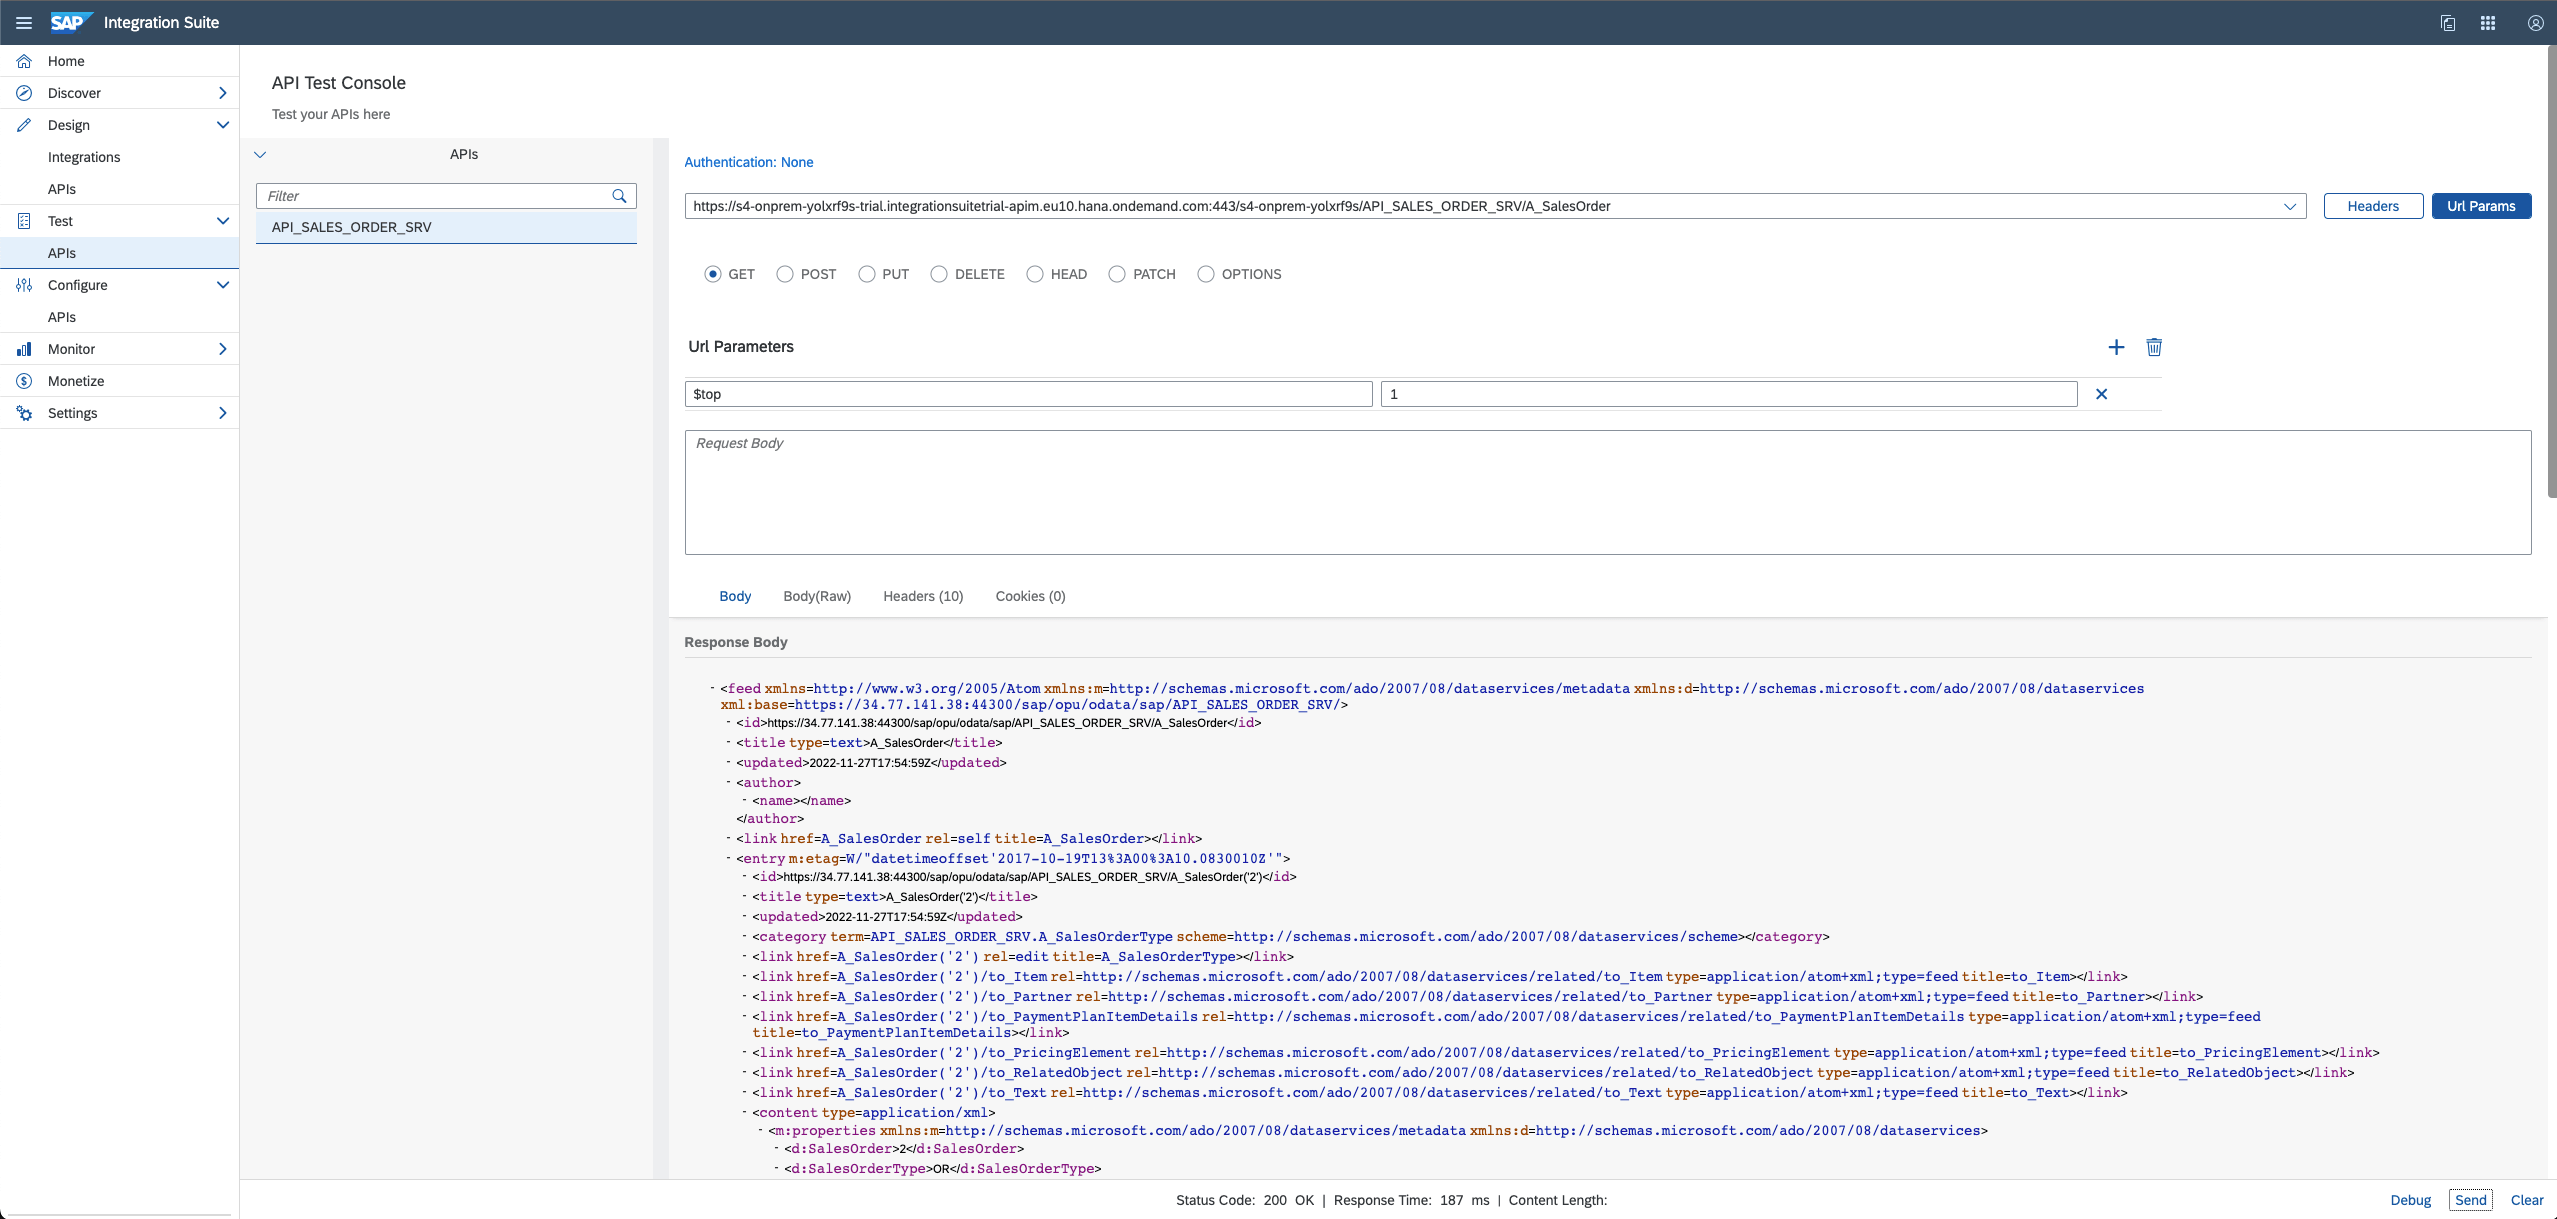
SAP Integration Suite – Open Connector (Slack API)
Open Connectors help in establishing a unified API layer for different variety of 3rd Party systems. It enables the connection between SAP and Non-SAP systems in an unified approach. Within Integration Suite, there are more than 160 unique connectors.
Here I am taking Slack as an example for the Non-SAP system to explore Open Connector capabilities. You can as well find other blogs which uses Google or Salesforce systems together with Open Connector. Now let’s get started. If you don’t have a slack account already, create a new one – https://slack.com/get-started#/createnew
Create a new Slack Workspace “sap-notifications”

Let’s create a new Slack Channel in the above Workspace named “sales-orders” to receive the notifications related to sales orders.
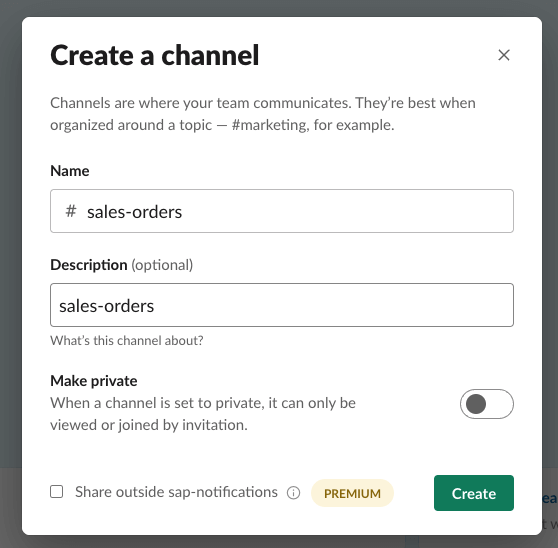
Go to Integration Suite Home and open the Integration Suite Open Connectors dashboard.

Create a new Instance for an Open Connector under Instances for ‘Slack’

Enter the name for Connector as same as the Slack workspace ‘sap-notifications’, add the OAuth Scope for ‘chat:write’ and click on ‘Create Instance’.
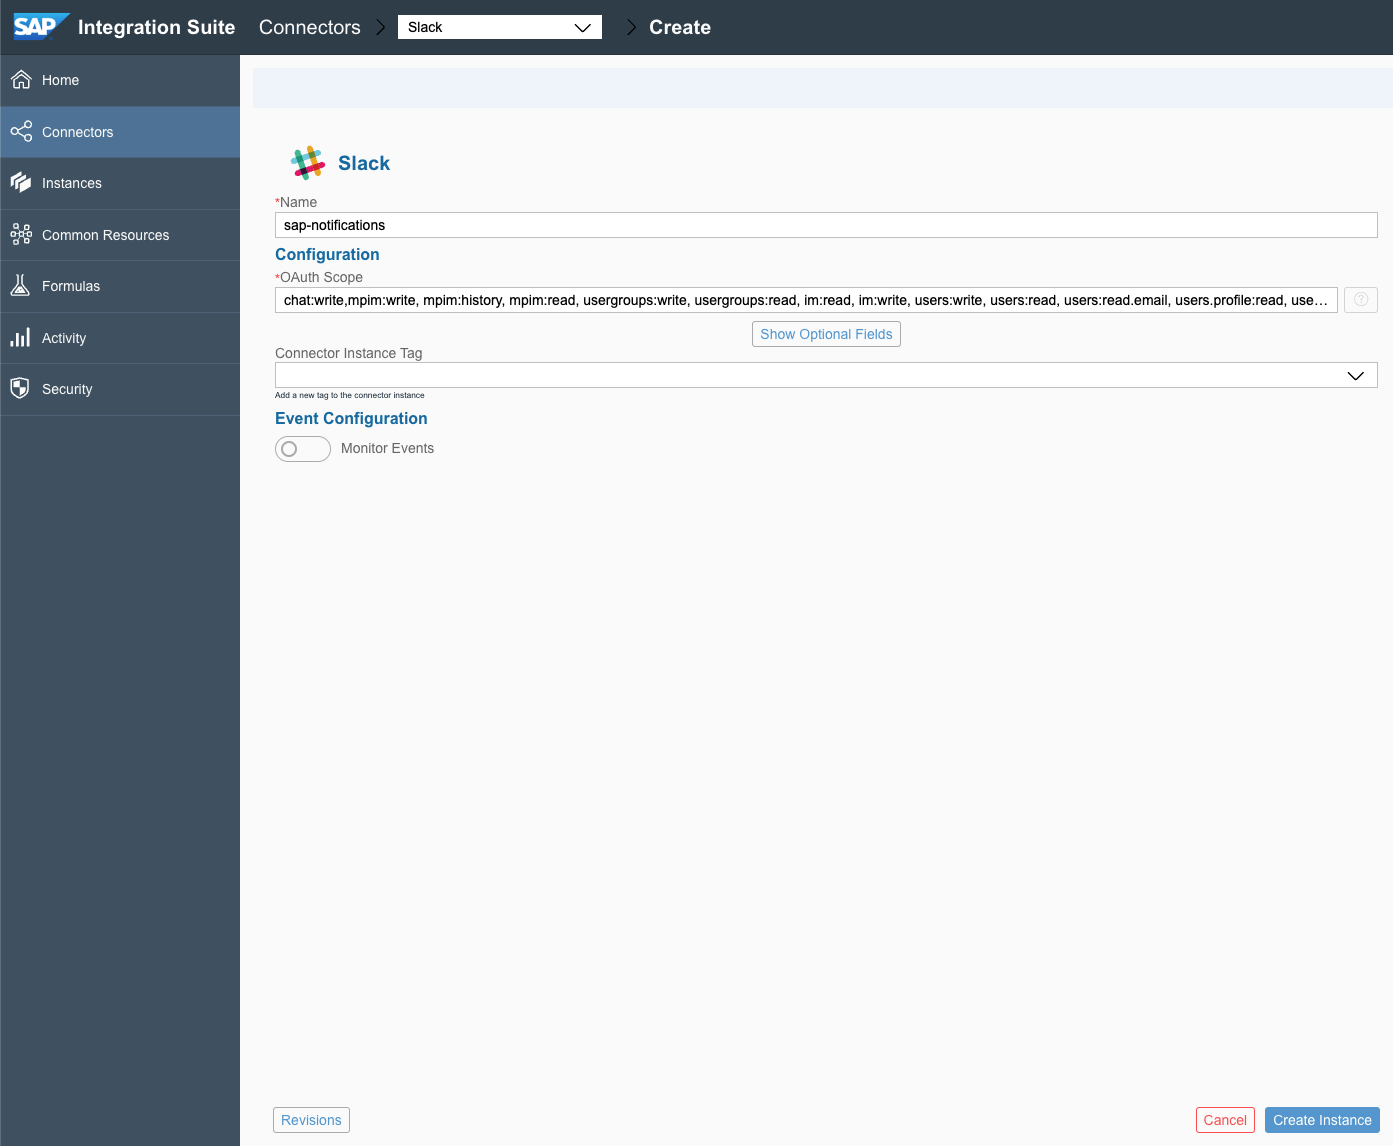
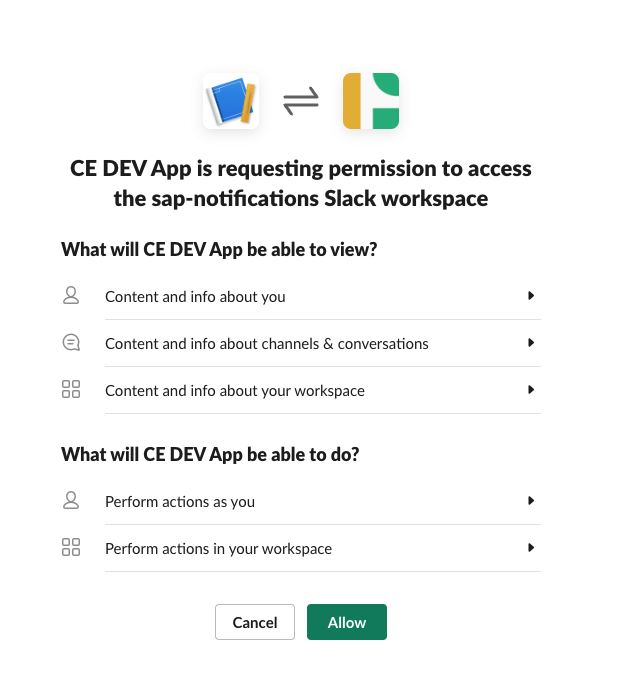
Allow the permissions for the App to access the Slack workspace.
Upon Success, You should see the following screen and success message.

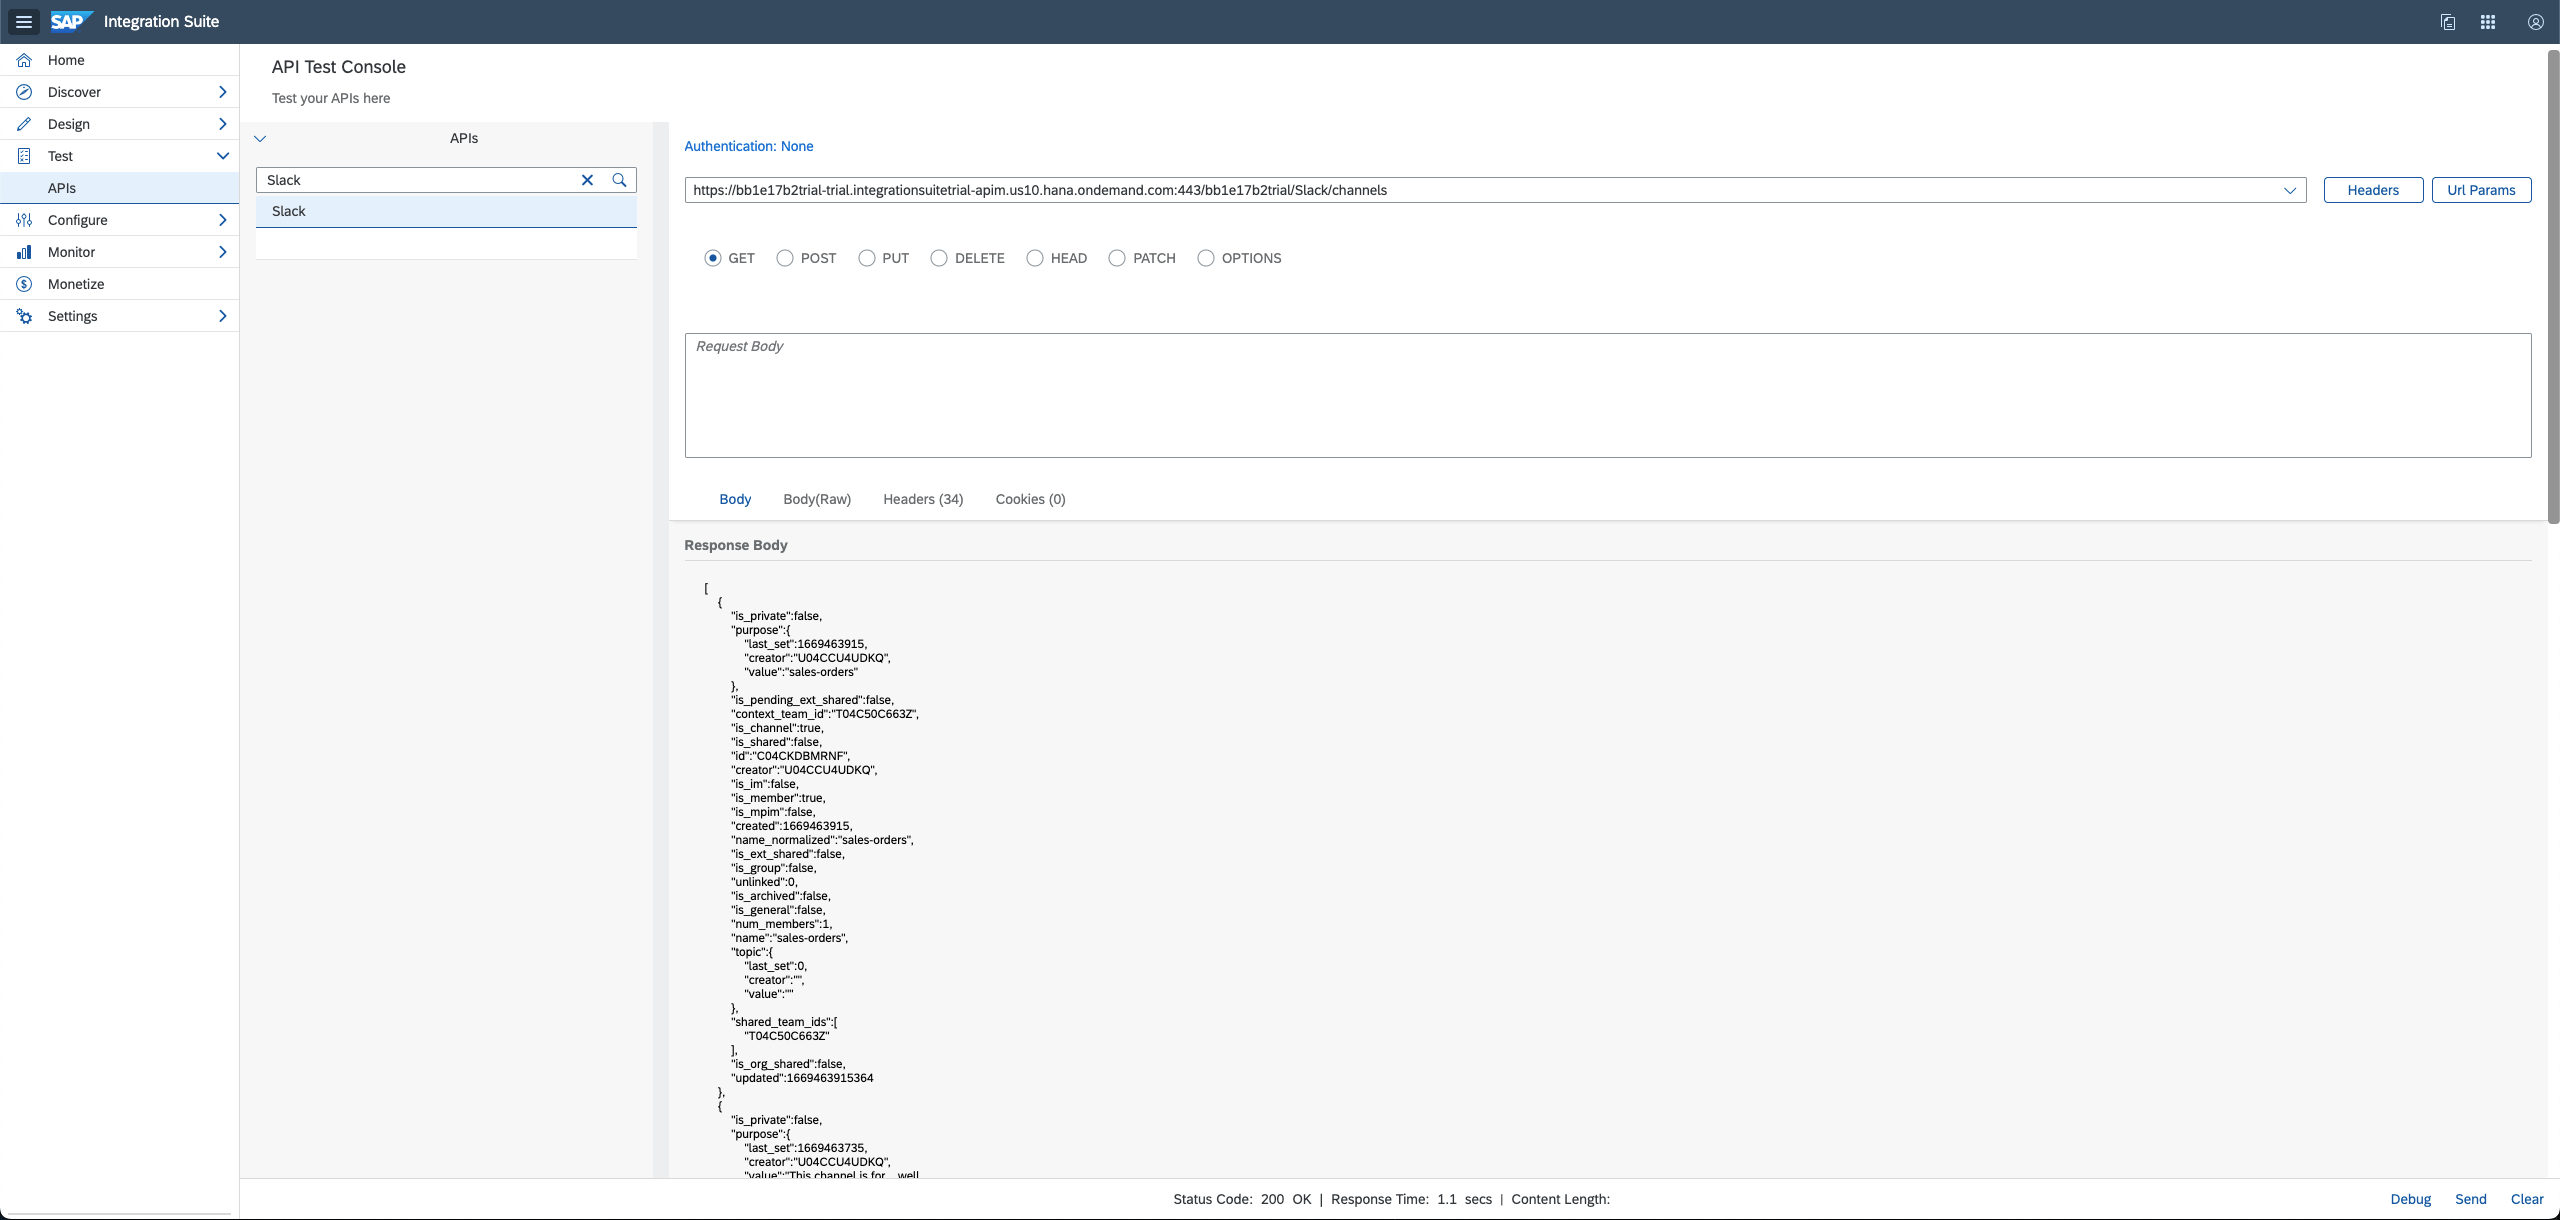
You can test the Open Connector using the option ‘Test in the API docs’ by sending a GET request to the resource ‘/channels’. You should see the slack channel ‘sales-orders’.

To use this Open Connector within Integration Suite API Management, copy the Authorization details (Organization Secret and User Secret) from the Open Connector dashboard.
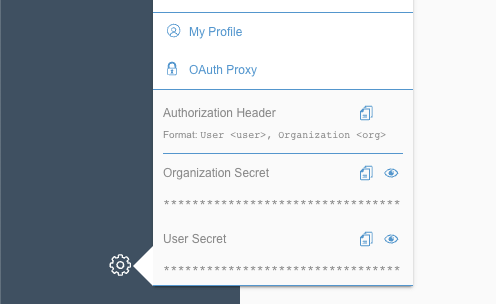
Go back to the Integration Suite home -> Configure -> APIs, Create a new API Provider named ‘Slack-OpenConnector’ and provide the details related to your region, the copied Organization Secret and User Secret from the previous step and save.

You can now start designing a new API using this API provider from the Design -> APIs and selecting the API Provider – ‘Slack-OpenConnector’ and click on Discover to select the right Open Connector instance.
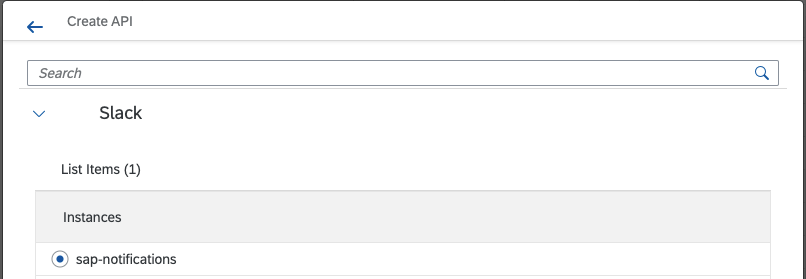
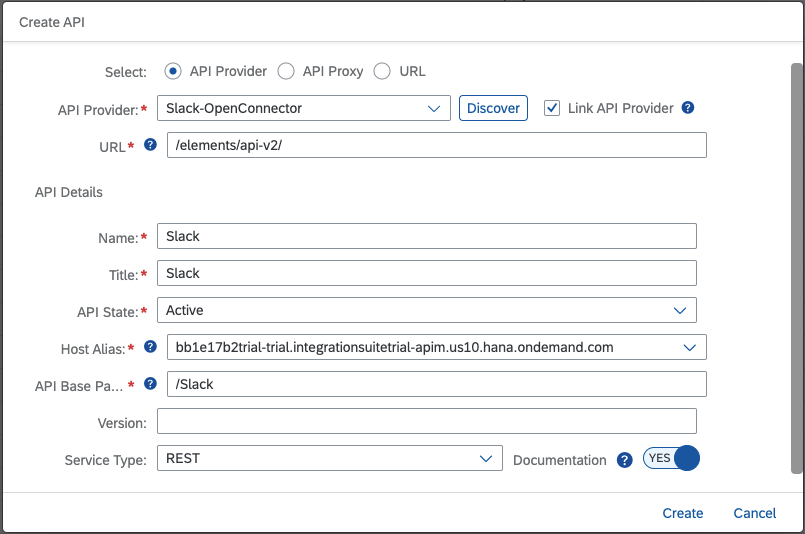
Save and deploy the same. To Test the same from the API Management, go to Test -> APIs. Select the API ‘Slack’ and do the GET request on the ‘/channels’ resource to view the similar results to the Test in API docs.
SAP Integration Suite – Cloud Integration (iFlow)
Cloud Integration supports end-to-end process integration across cloud-based and on-premise applications based on the exchange of messages. Integration developers can use predefined integration content out of the box, enhance it, or develop their own integration content from scratch. There are more than 450 pre-built Integrations which are available for ready to use. Now we are going to build an Integration for our custom scenario from scratch.
On the Integration Suite home, go to Design -> Integrations, create a new package named ‘SalesOrder-iFlow’ and save.

Go to Artifacts -> Add -> select Integration Flow, give a Name ‘s4hana-slack’ and click on Ok to create the Integration Flow. Once created select the same to open the Graphical Editor. The following Integration Process would be created by default.
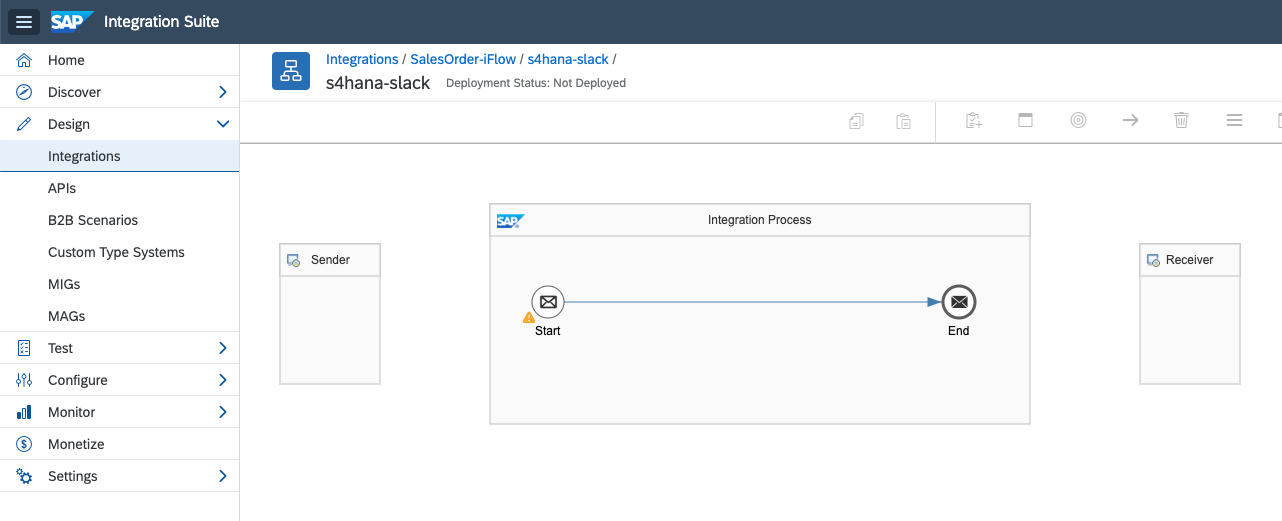
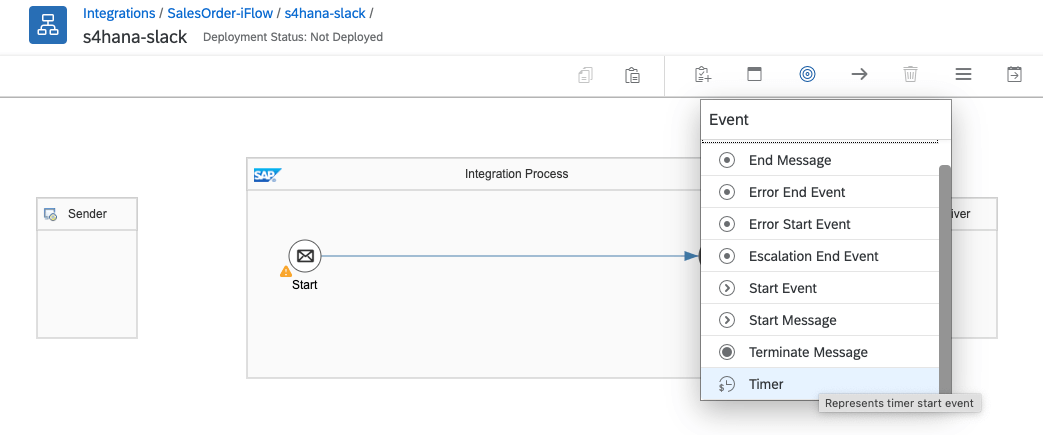
For our scenario, we would like to run the Integration Flow once a day to notify the daily Sales Order values. Hence instead of the ‘Start’, we use ‘Timer’ from the Event.
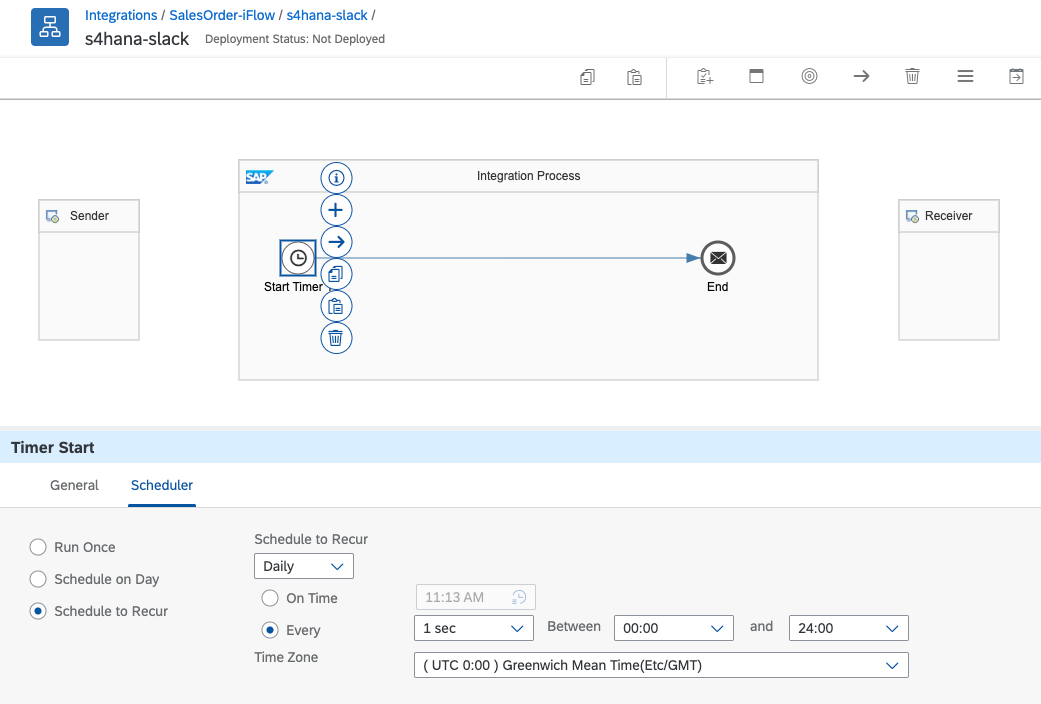
Once added, on double clicking on the ‘Start Timer’, you can configure the Scheduler.
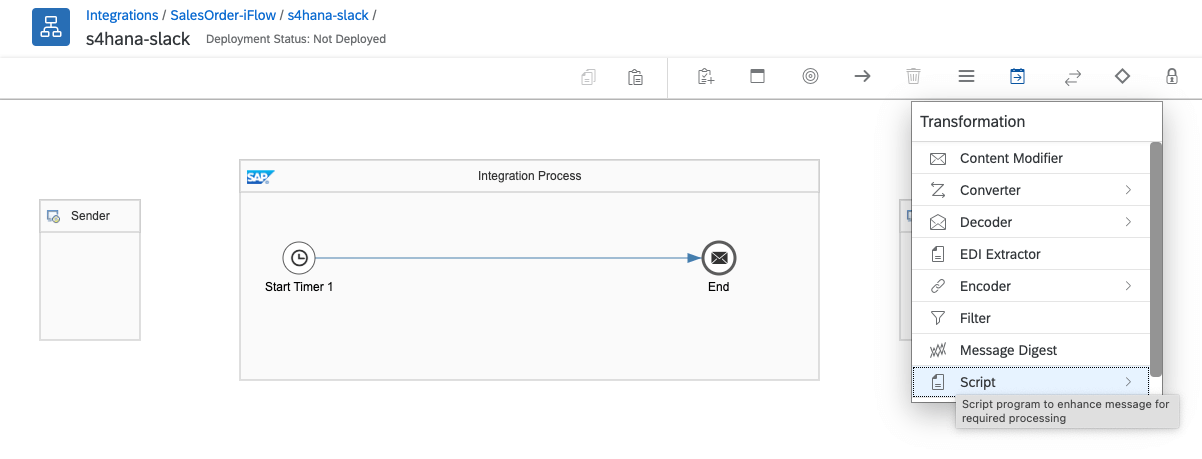
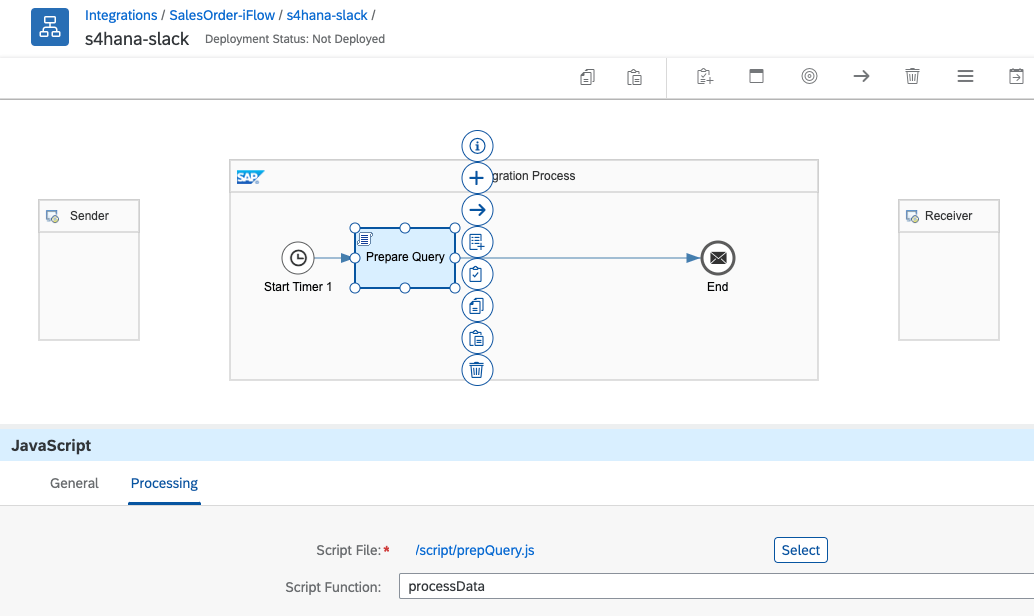
As we wanted to get the daily sales order information, we should add the ‘current date’ as a ‘creation date’ in the $filter query parameter to oData API. To prepare the same, let’s use the scripting type JavaScript from the Transformation option. Let’s rename the same to ‘Prepare Query’.
On the JavaScript config – Processing, upload the Script File ‘PrepQuery.js’ with the code below and set the Script Function to ‘processData’.
importClass(com.sap.gateway.ip.core.customdev.util.Message);
importClass(java.util.HashMap);
function processData(message) {
var query;
query = "$filter=CreationDate eq datetime'" + new Date().toISOString().split('T')[0] + "T00:00:00'";
message.setProperty('query', query);
message.setProperty('date', new Date().toISOString().split('T')[0]);
return message;
}
Next step is to call the API. Add the step ‘Request Reply’ from the External Call option and name it ‘Call API’.

Now include the Participant type Receiver as the ‘S4H_API’.
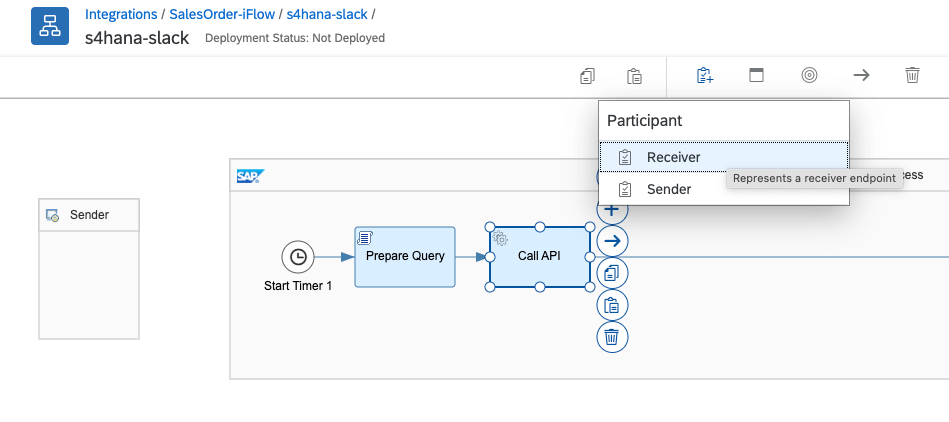
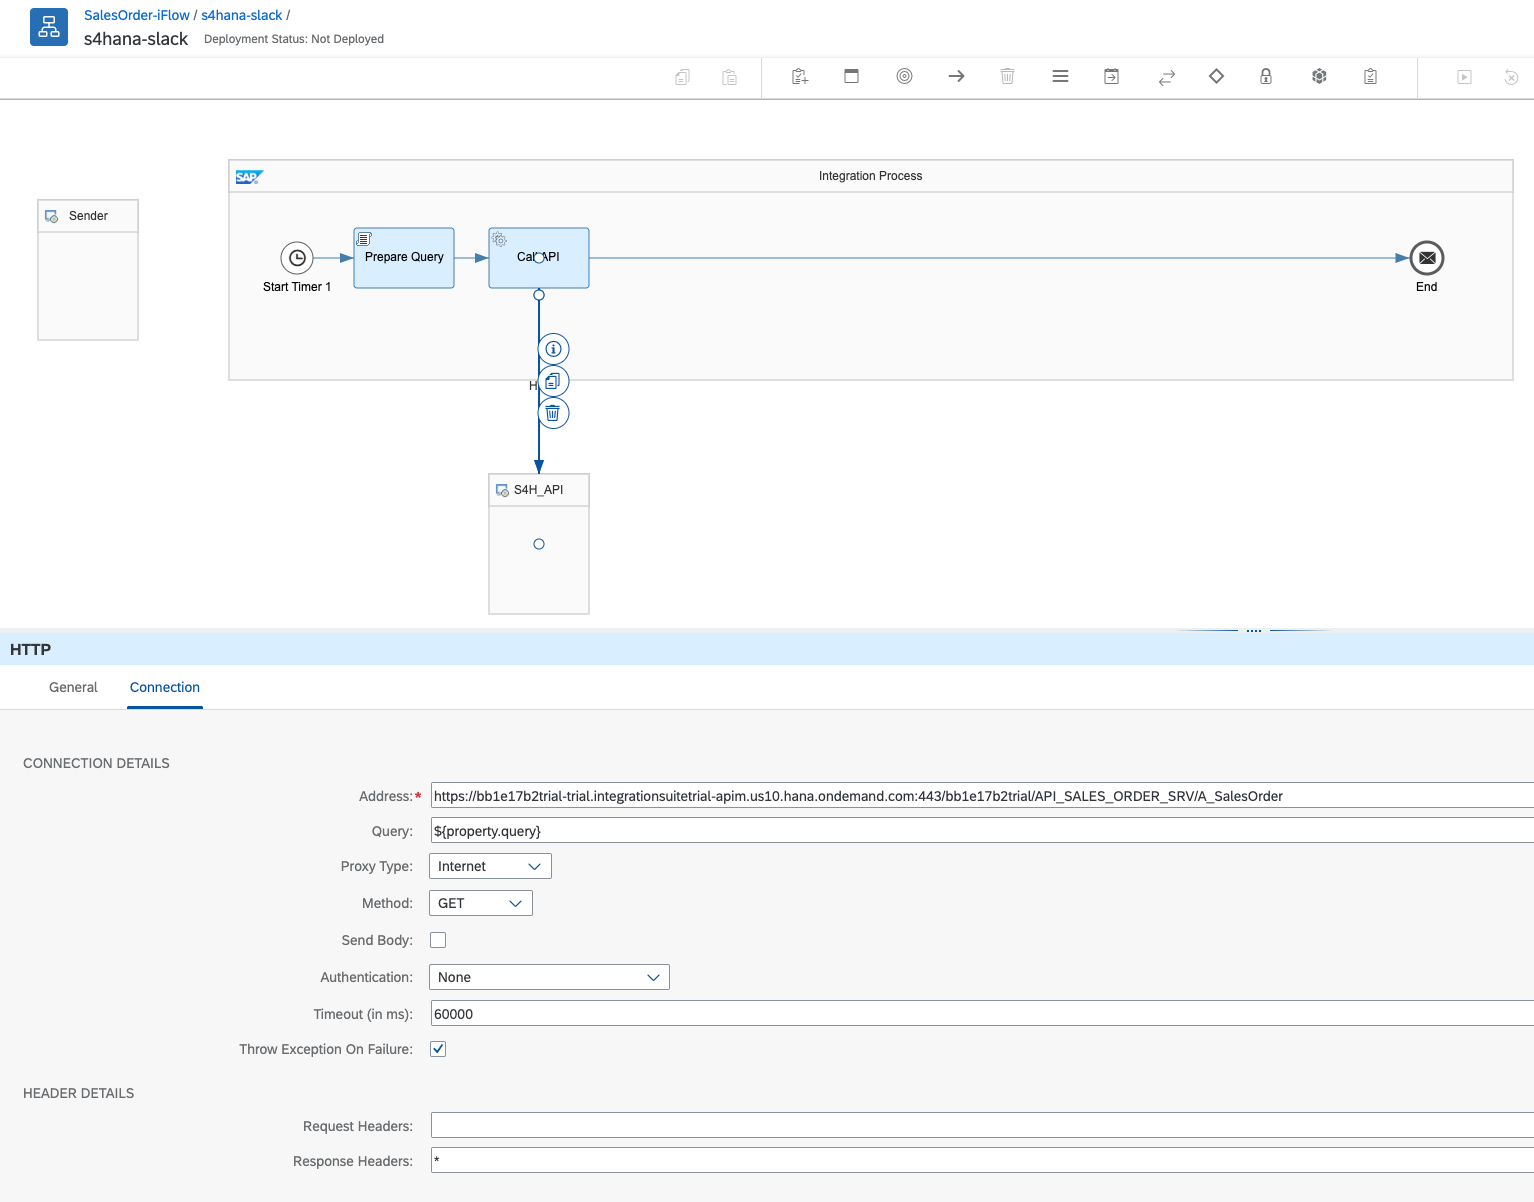
Connect the Call API to S4H_API using the HTTP adapter. (Hint: You could as well use the oData adapter here, but we reserve this approach for a further demo down in this blog)
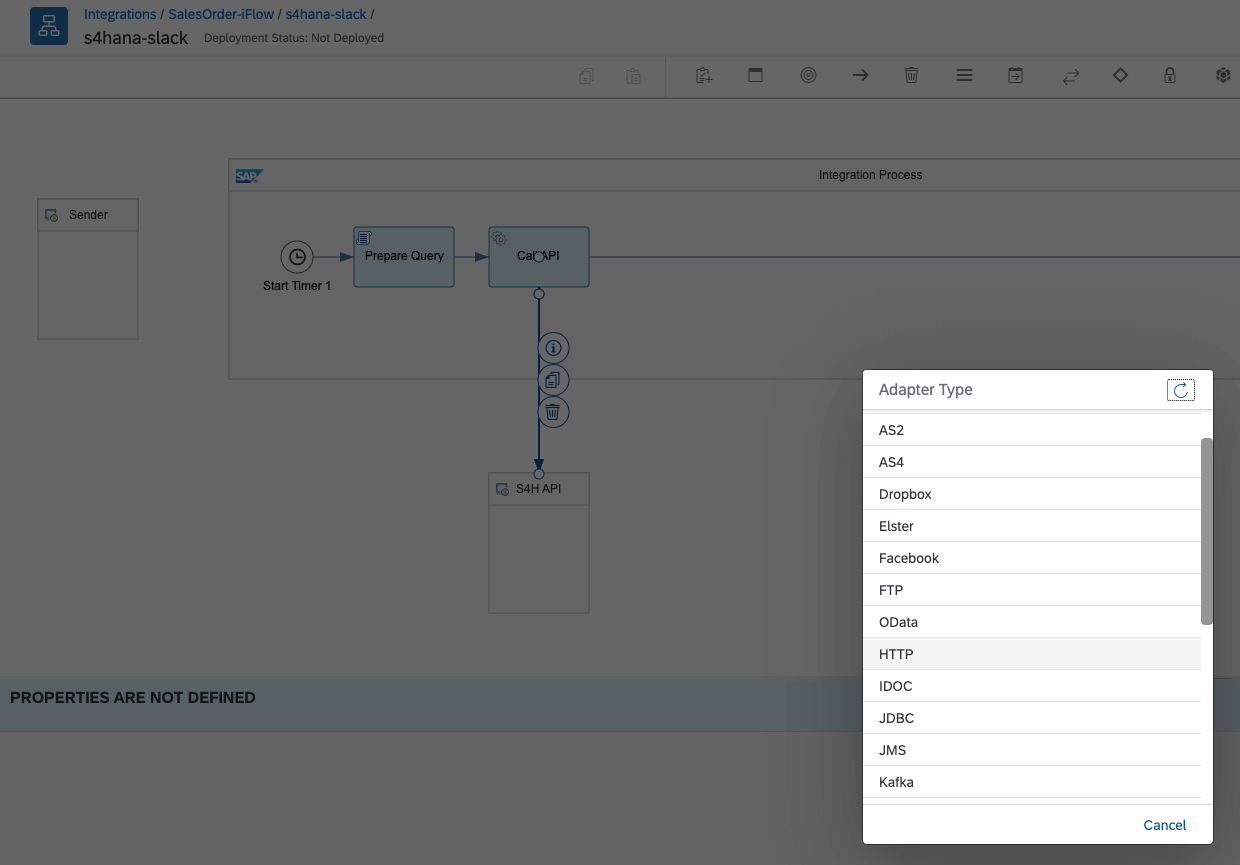
Update the HTTP adapter Connection details with the Address to the S4HANA API (which we prepared during the API Management step) and the Query property from the Prepare Query step.
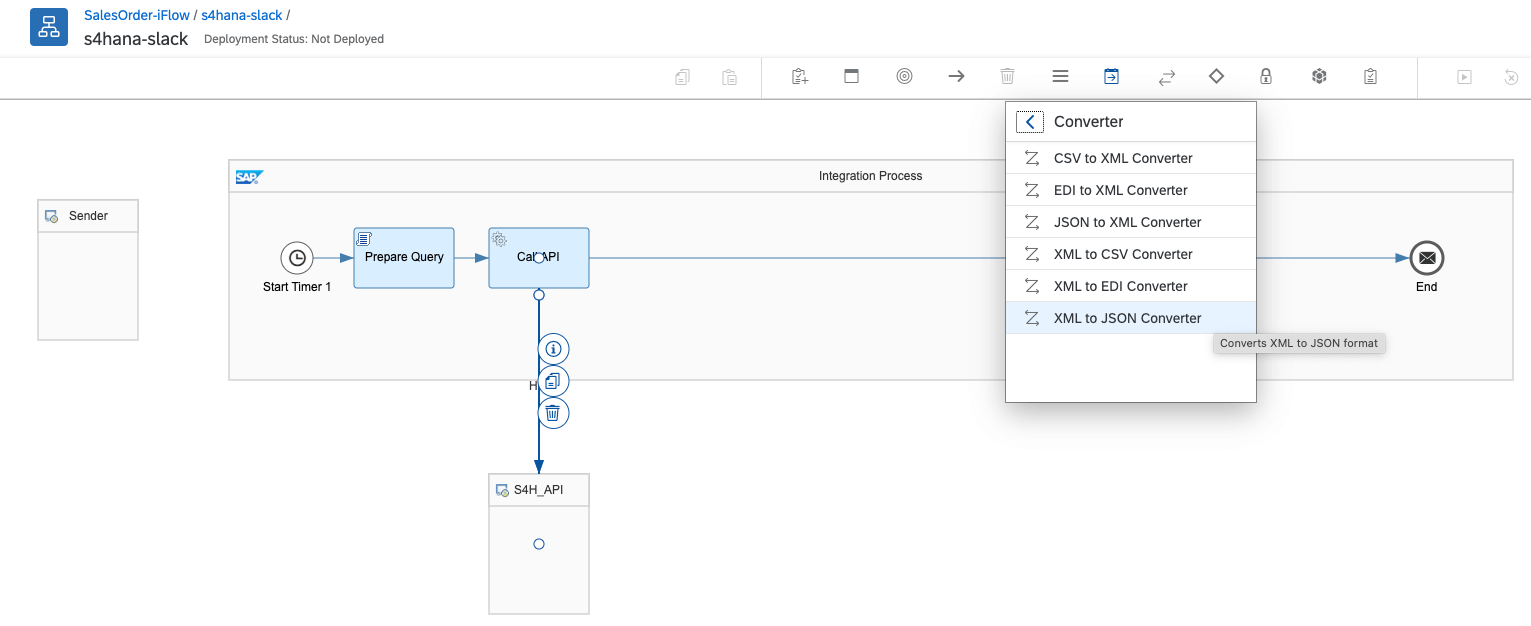
Here I would like to convert the XML Output from the S4HANA oData API to JSON format for further process. Normally this can be done using the query parameter $format=JSON but let’s use the Integration Flow step ‘XML to JSON Converter’ from Transformation option.
On the Processing configuration of XML to JSON Converter, uncheck the Use Namespace Mapping to avoid any errors related to the Namespaces.
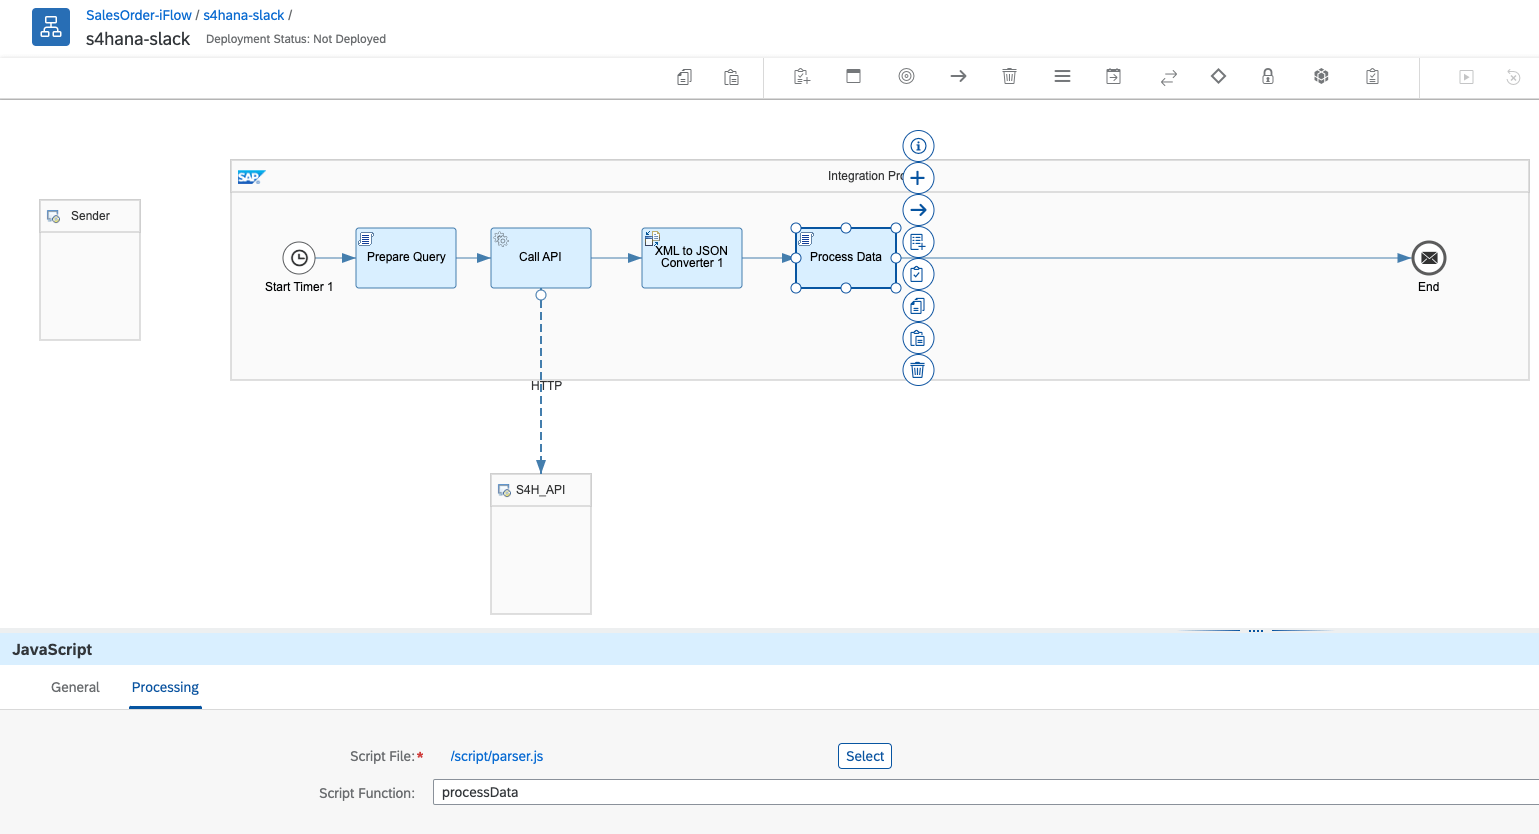
As a next step, let’s read the JSON and add all the Sales Order NetAmount to calculate the Total Net Amount of Sales Orders of this particular day. To do this, let’s use again the JavaScript step from the Transformation option, name this step ‘Process Data’. Include the below JavaScript ‘parser.js’ for the Processing config and the Script Function as ‘processData’.
importClass(com.sap.gateway.ip.core.customdev.util.Message);
importClass(java.util.HashMap);
function processData(message) {
var body = String(message.getBody(new java.lang.String().getClass()));
//create json from string object
var iAmount = 0;
body = JSON.parse(body);
if(body.feed.entry) {
if (body.feed.entry.length && body.feed.entry.length > 1) {
//sum of total amount
for(var i=0; i<body.feed.entry.length; i++) {
iAmount = iAmount + parseFloat(body.feed.entry[i].content.properties.TotalNetAmount);
}
message.setProperty('Amount', iAmount.toString() + " " + body.feed.entry[0].content.properties.TransactionCurrency);
} else {
message.setProperty('Amount', body.feed.entry.content.properties.TotalNetAmount + " " + body.feed.entry.content.properties.TransactionCurrency);
}
} else {
message.setProperty('Amount', '0 USD');
}
return message;
}
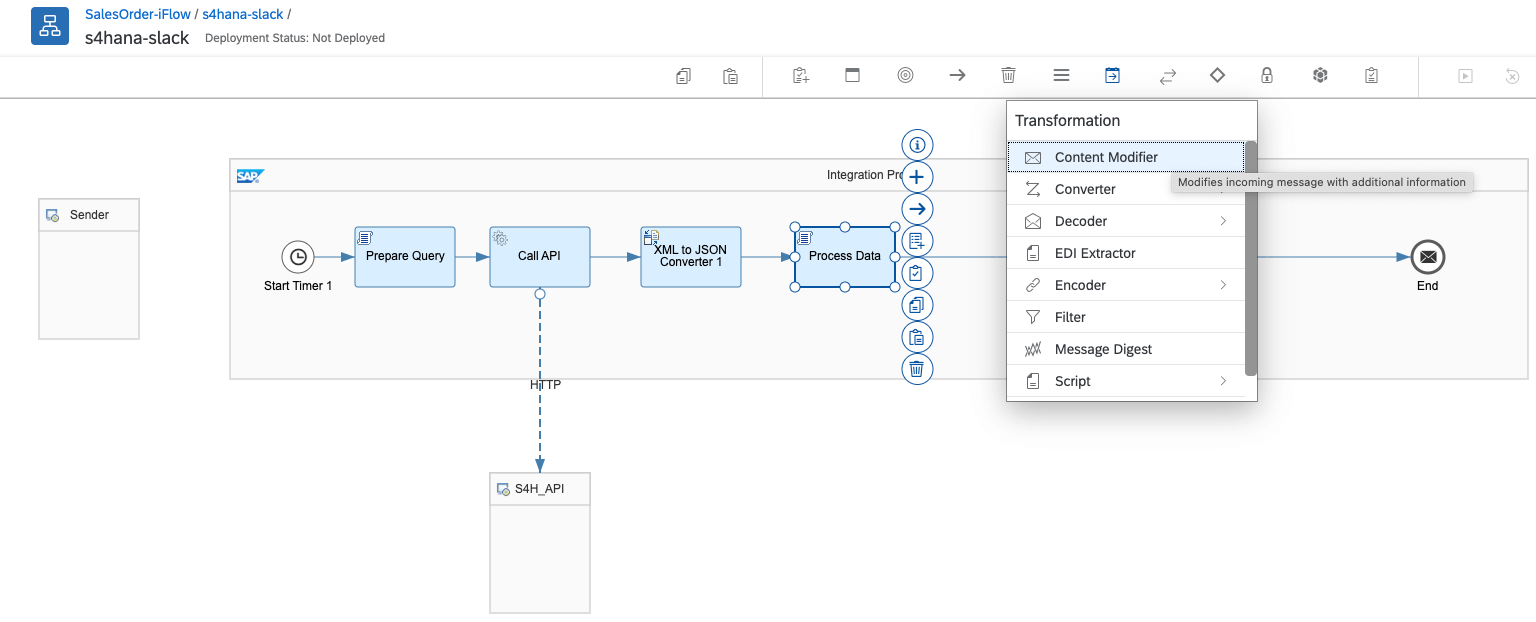
To prepare the Slack message which would be sent as a Notification to the relevant Slack channel, include a Content Modifier step and name it ‘Prepare Message’.
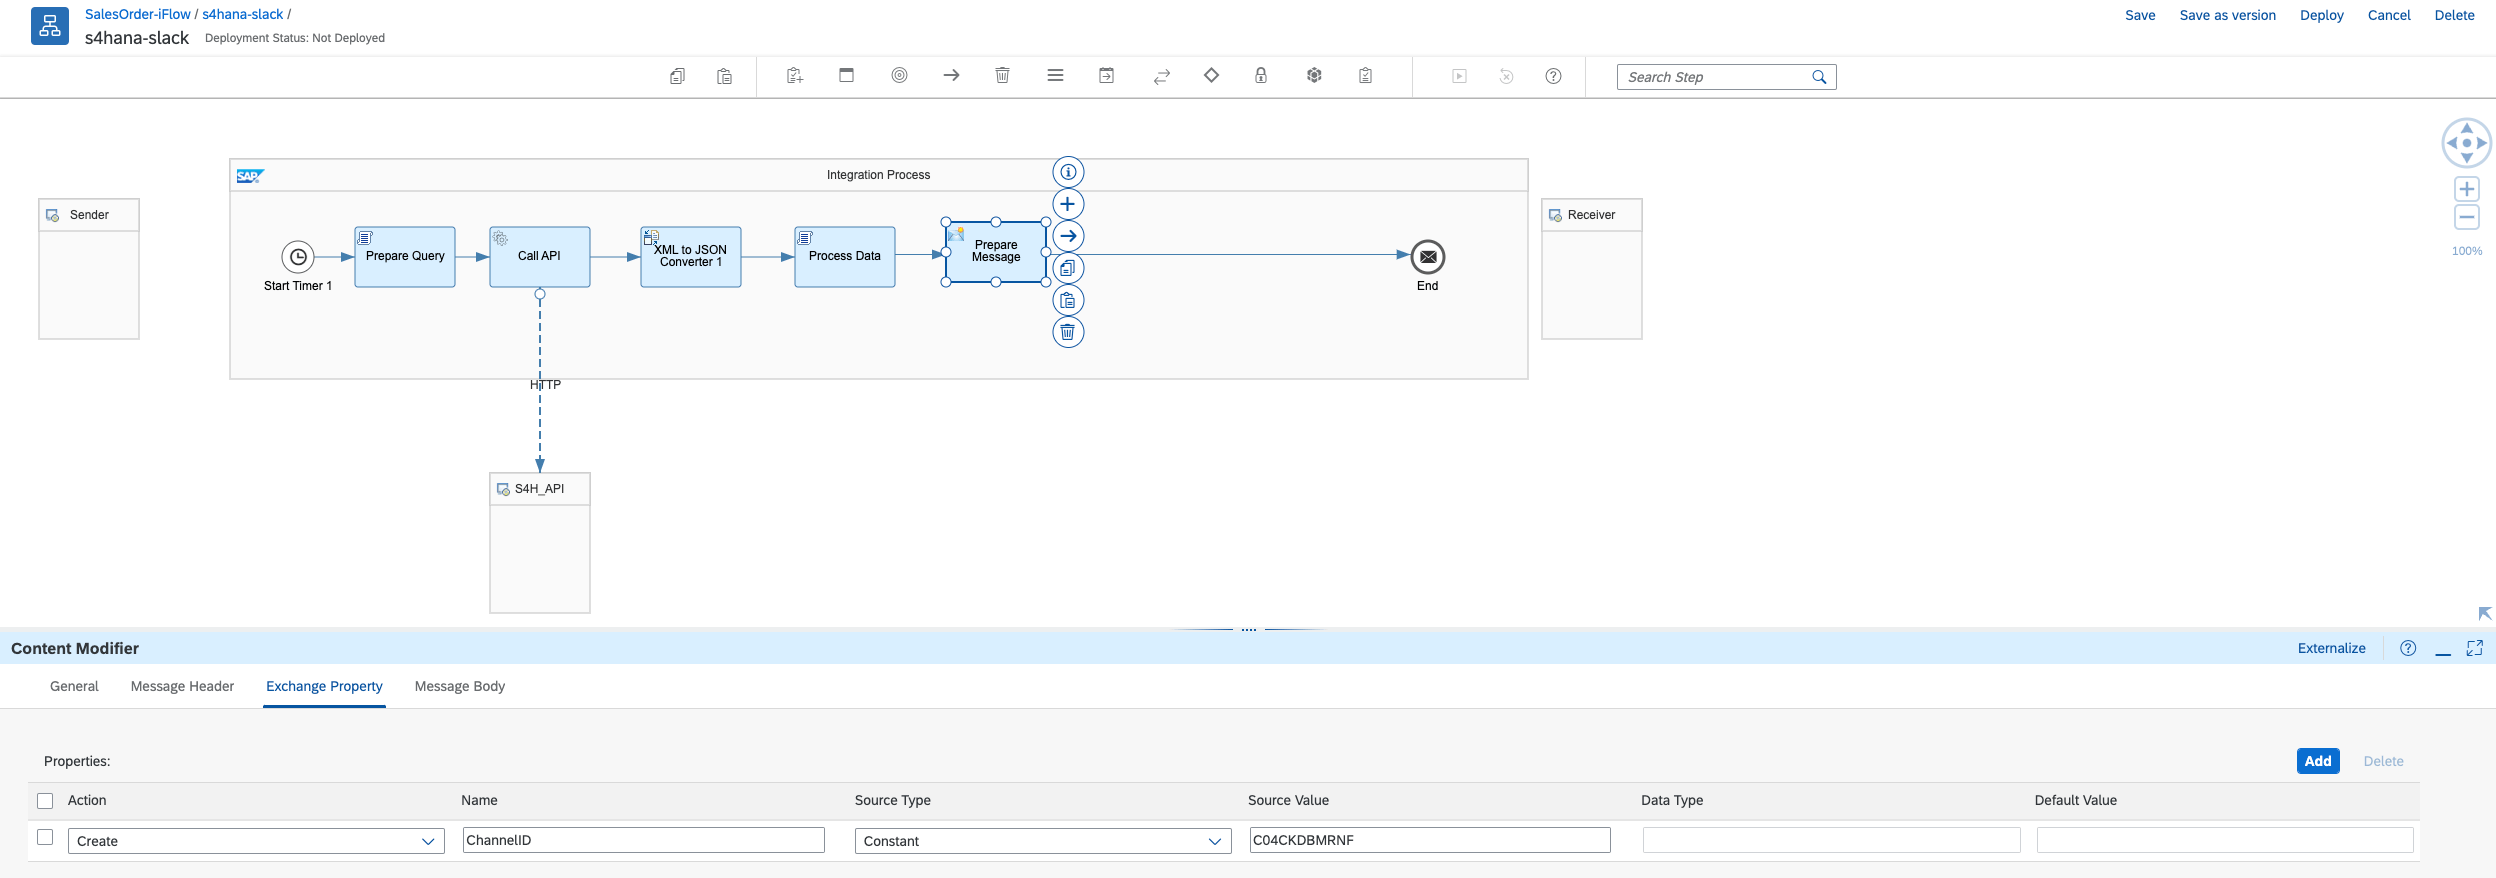
Update the ‘Exchange Property’ configuration of Prepare Message Content Modifier by adding a new property ‘ChannelID’ with the value of id of the slack channel ‘sales-orders’. Hint: You get this id from the Slack API Response of GET request to the resource endpoint ‘/channels’.
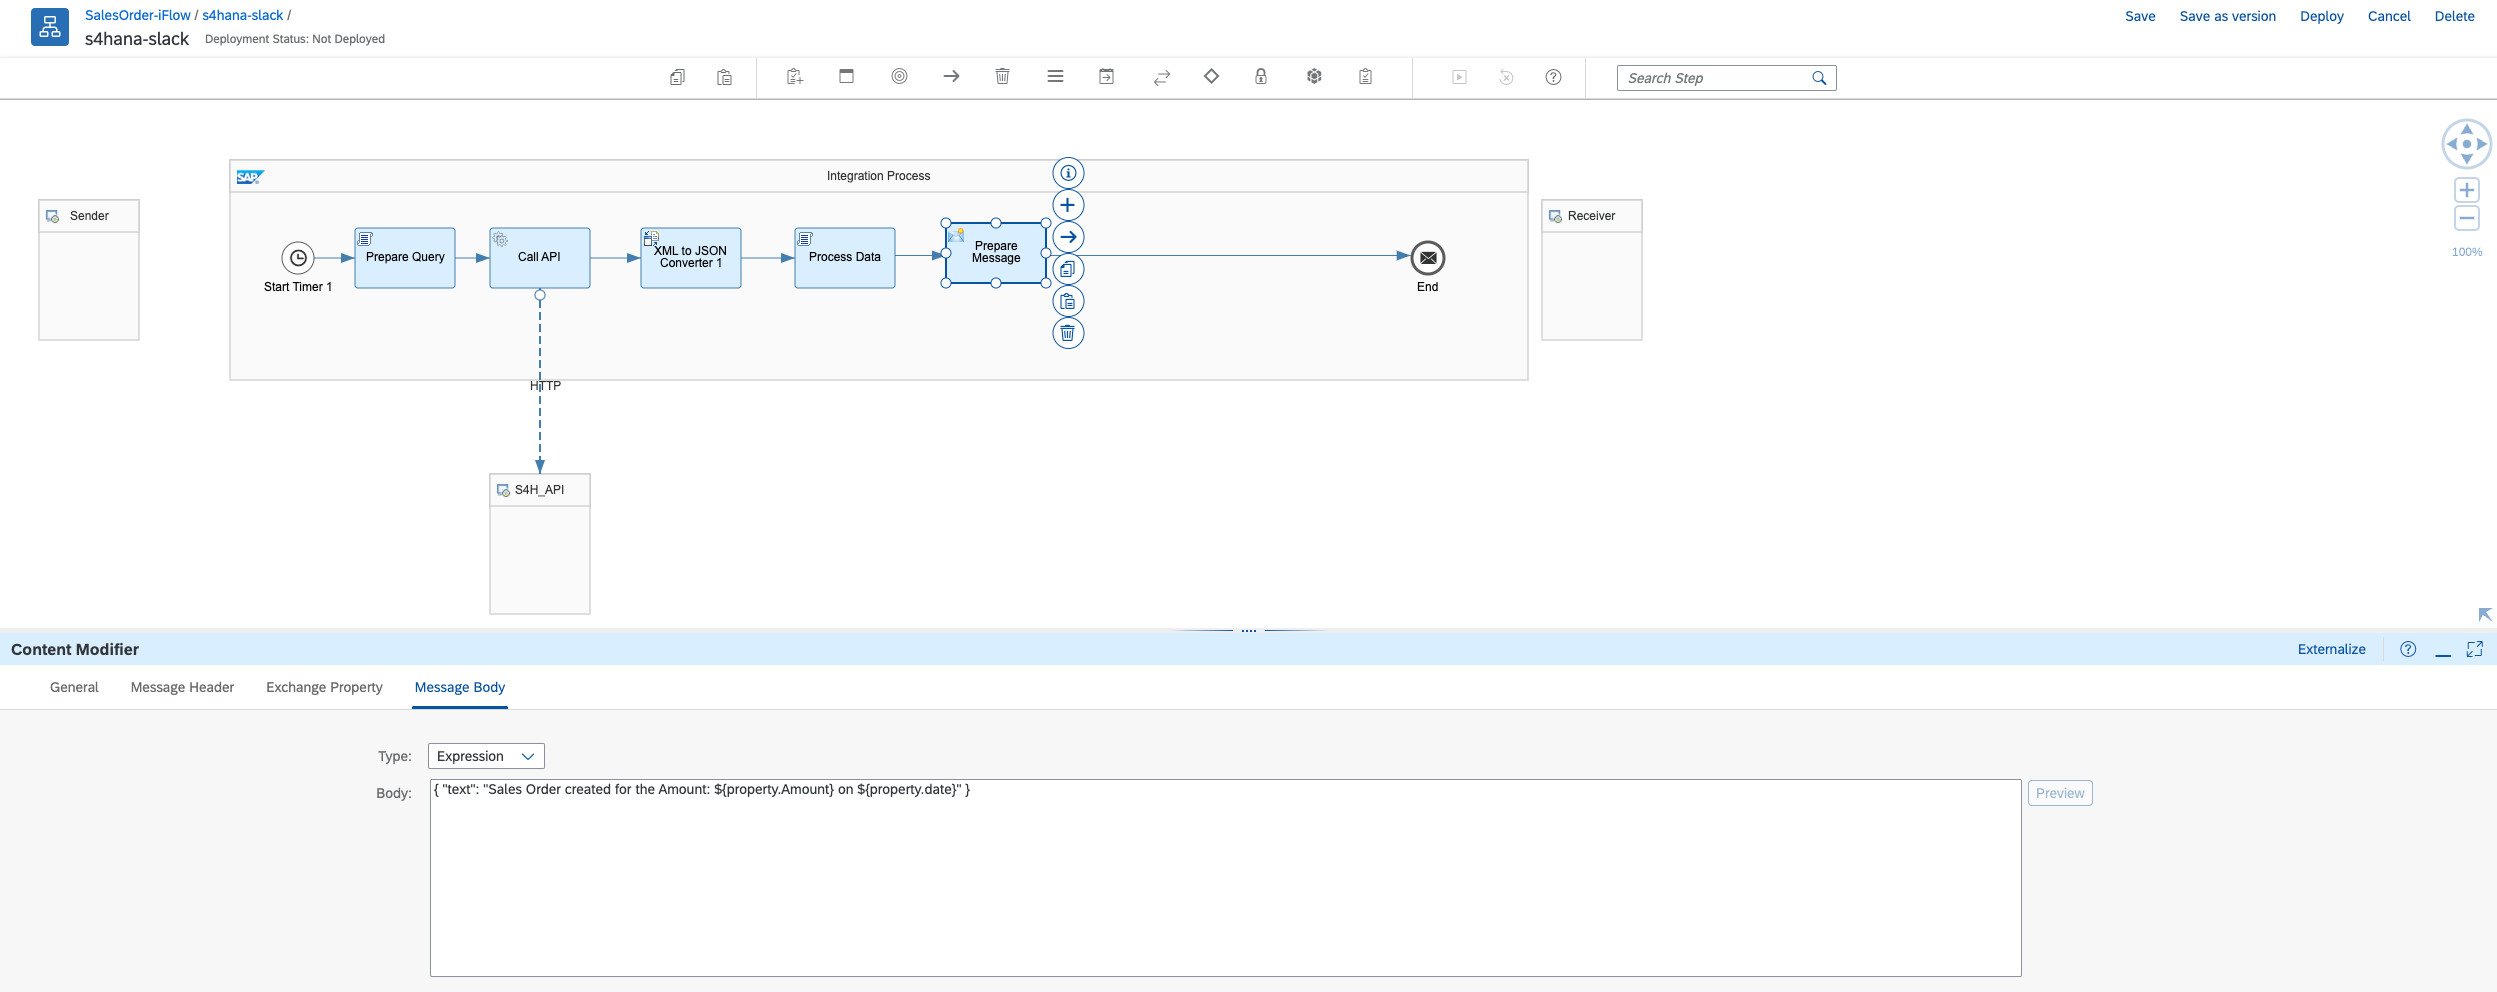
Similarly update the Message Body with the Expression containing the text which would be sent to the Slack channel.
{ "text": "Sales Order created for the Amount: ${property.Amount} on ${property.date}" }
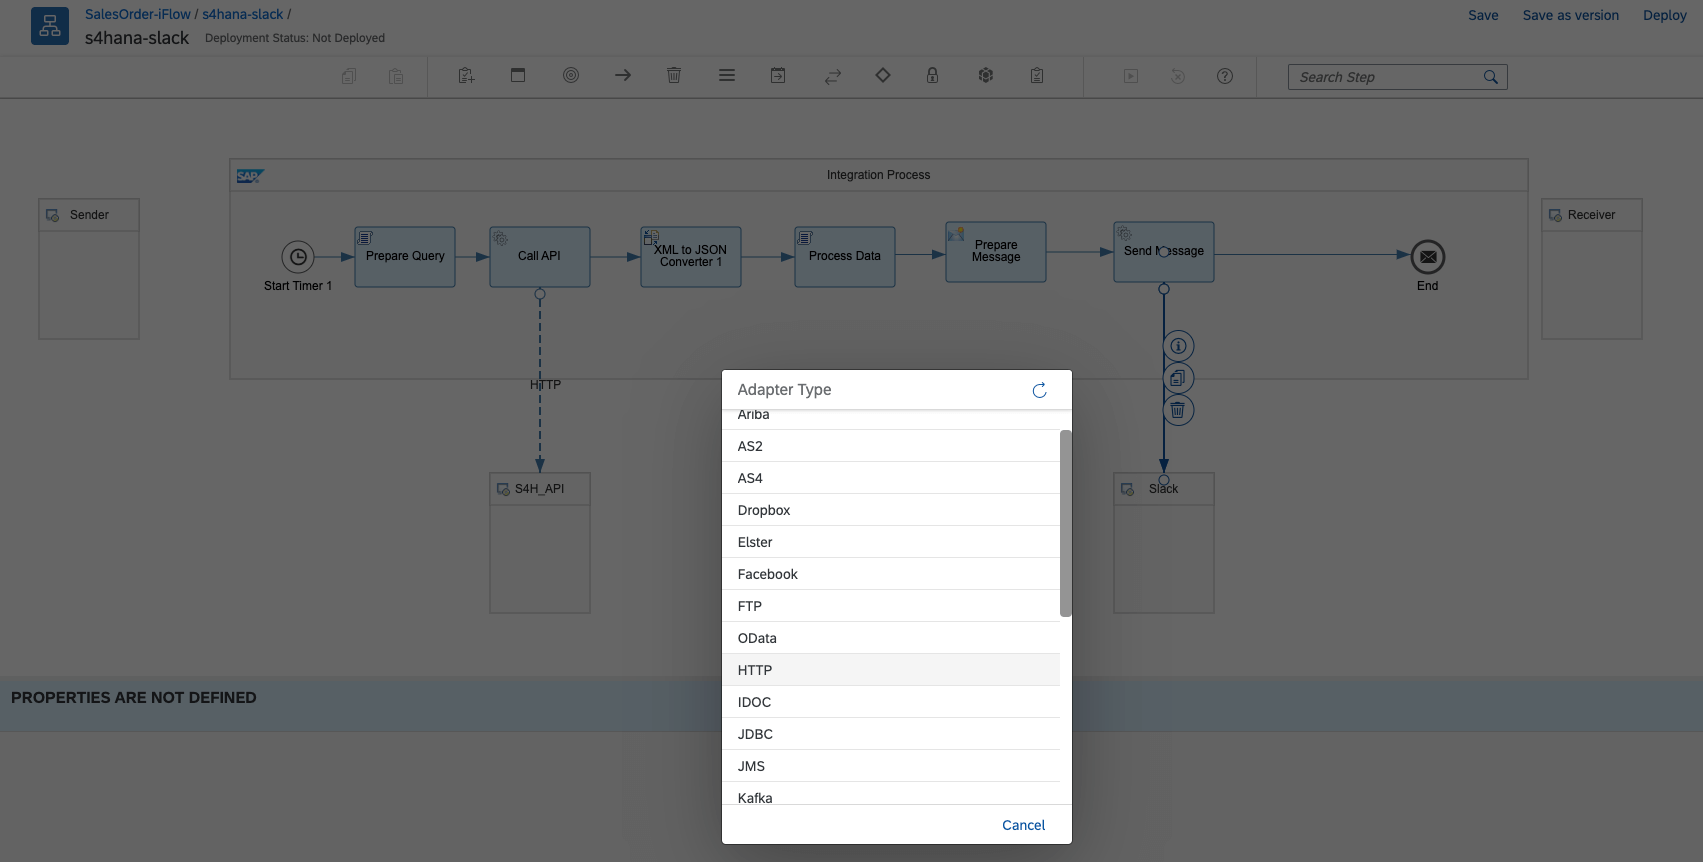
Now include a Request Reply step and name it ‘Send Message’, Participant type Receiver as the ‘Slack’ and connect both using the HTTP adapter.
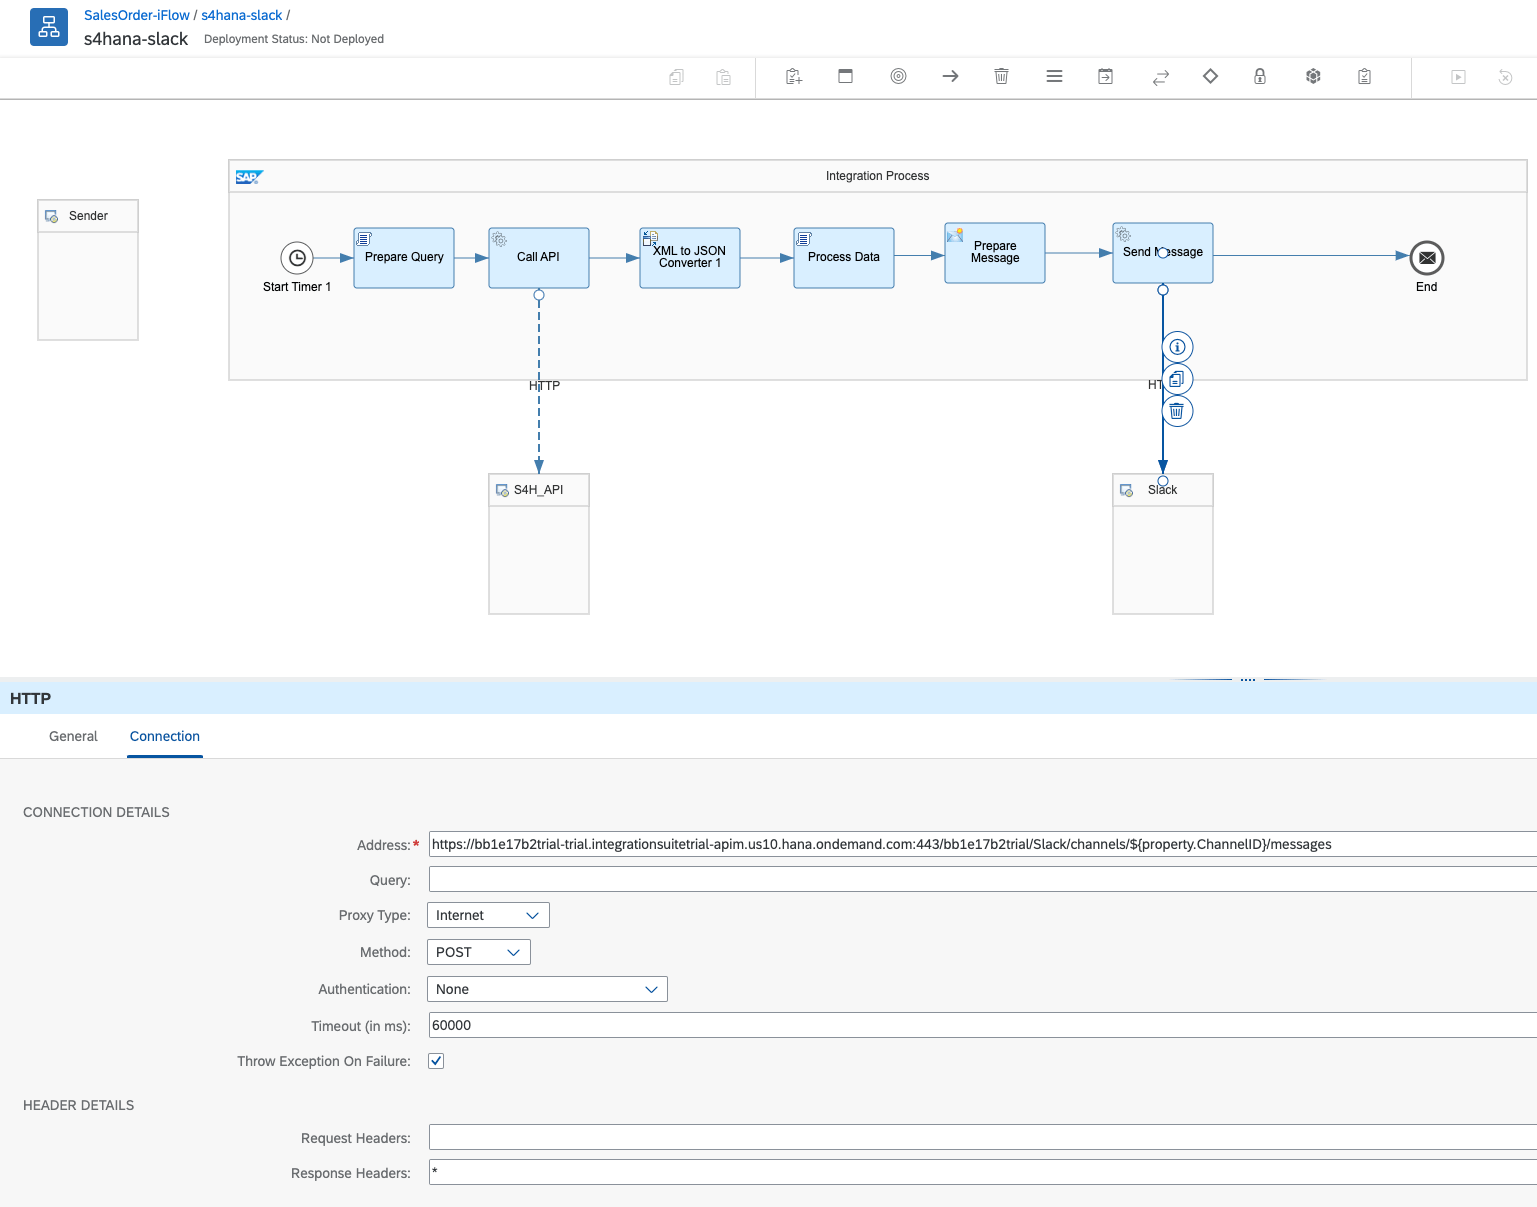
Update the HTTP Connection configuration with the Address of Slack API to POST messages to channel using the ChannelID property.
Save and Deploy the Integration Flow. Hint: Before deploying check the ‘Start Timer’ configuration that it’s set to ‘Run Once’ which will trigger the timer immediately after the deployment.
If everything is successfull, You should immediately get the ping notification on the Slack in the channel ‘sales-order’. If the total Amount is 0 USD which means there is no Sales Order created for the day yet.
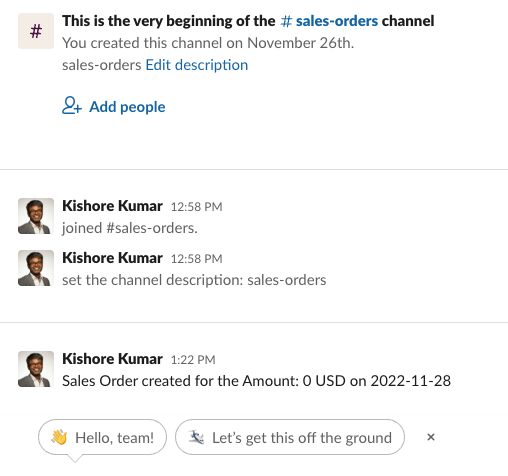
Exercise 2: Using Integration Suite to design an Integration Scenario which notifies Sales Managers on the daily Sales Order value via Slack
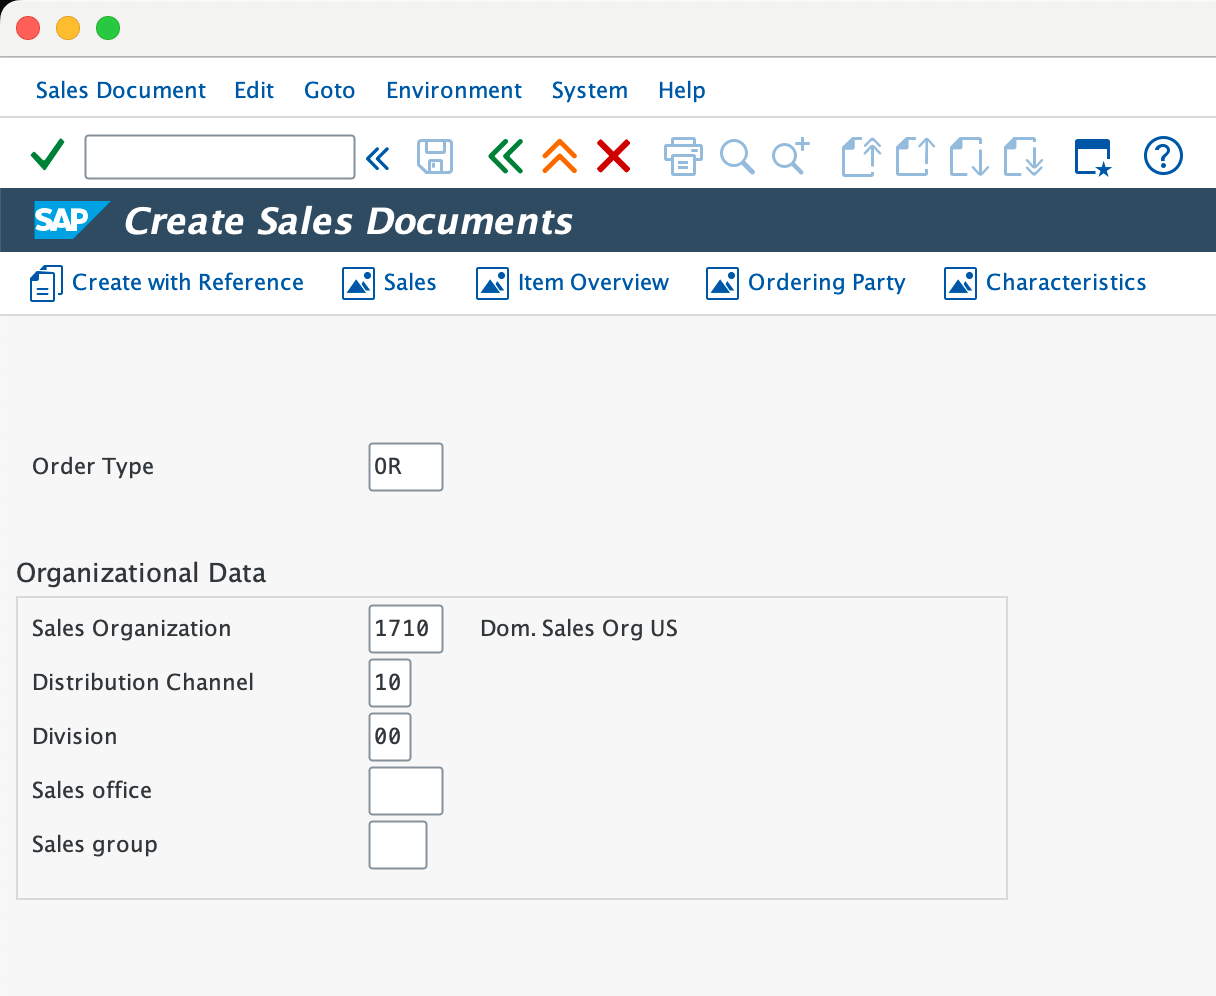
It’s time to test our second demo scenario. Open the S4HANA On-Premise ABAP System Transaction VA01 to create a new Sales Order.
Enter the details like Order Type, Sales Organization, Distribution Channel and Division.
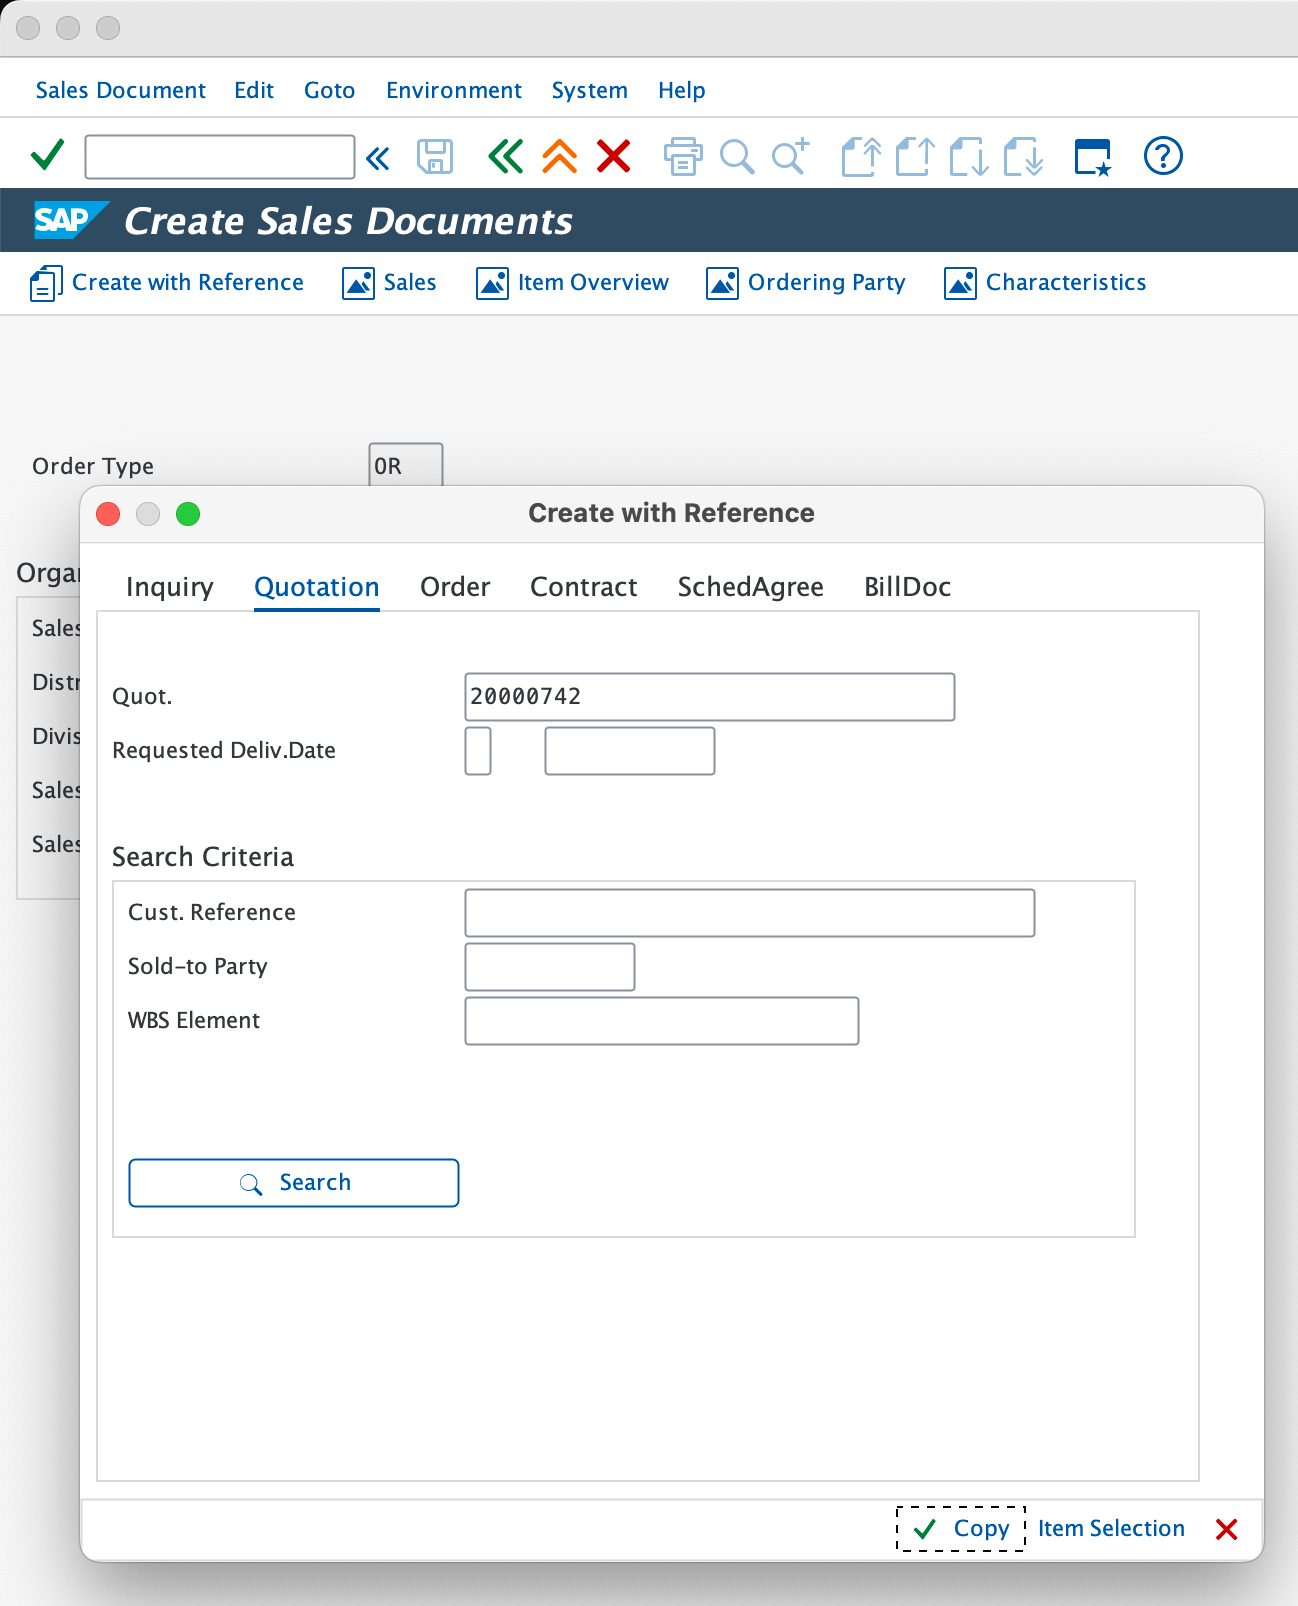
Click on ‘Create with Reference’, enter the ‘Quotation’ number and click on Copy.
Click on ‘Delivery Proposal’, change ‘Order Quantity’ if needed, enter Customer Reference as ‘Demo’ and click on Save. You should see the Sales Order created successfully here with the below message.

Go back to the Integration Suite home -> Design -> Integrations -> select ‘SalesOrder-iFlow’ -> Artifacts -> s4hana-slack -> Actions -> Deploy (to redeploy the Integration Flow which will retrigger the Start Timer).

Once the deployment is successfuly, you should get a new notification from Slack on the channel ‘sales-orders’ with the Amount of newly created Sales Order from the On-Premise System.
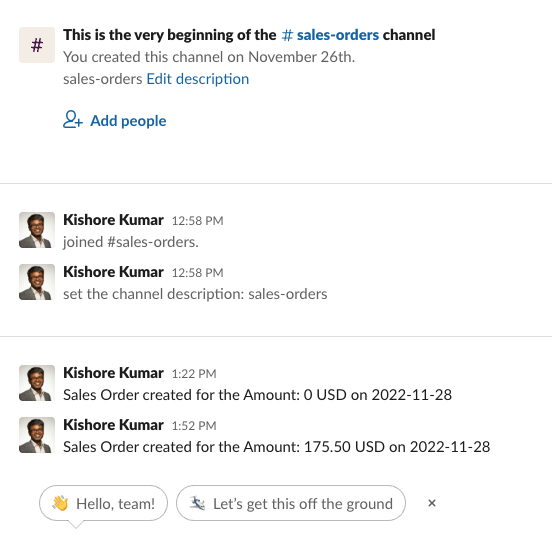
Connecting Exercise 1 & Exercise 2
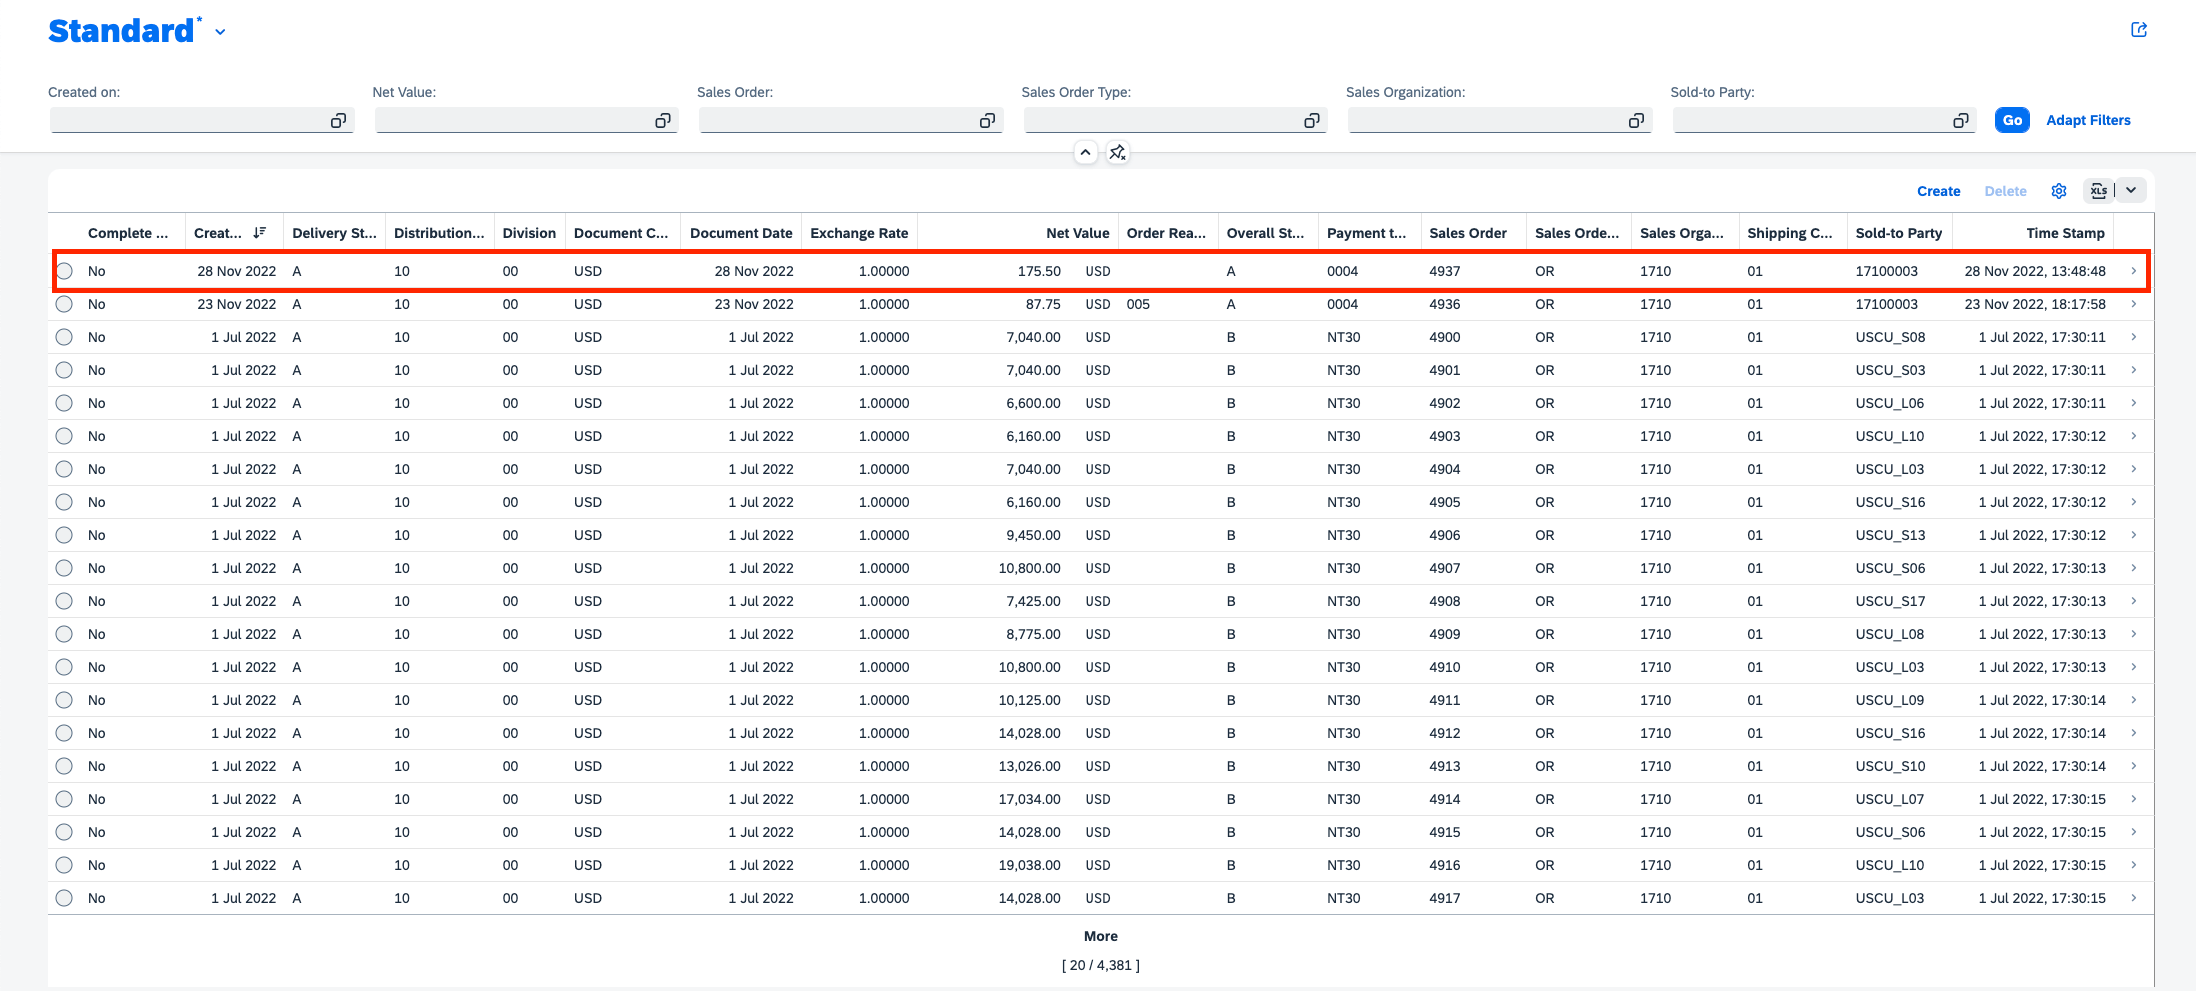
Remember the Sales Order Fiori Application that we had built in Exercise 1, open the application and Sort the list based on ‘Created on’ in descending and hit Ok.
Now you should see the full details of the Sales Order which was created and sent to the Slack channel as a Notification.
Exercise 3: Using Integration Advisor to do mapping guidelines between different standards of Sales Order Scenario
SAP Integration Advisor is an intelligent integration content management system that helps you accelerate the development of business-oriented interfaces and mappings. It uses a machine learning-based proposal approach that helps you to accelerate your efforts.
As you know during our sales order iFlow, we converted the xml data to json format using the converter for easier message processing but in a real productive scenario it’s not always that simple. In case of B2B scenario, it’s often the case there are different standards being used between different involved parties and the plain conversion doesn’t help.
What happens if the trading partners in B2B scenarios, name the same information using different fields. What if one party delivers the data in oData format and the other needed in SOAP or CXML or etc. Manual mapping of different fields or conversion is tedious and error prone process.
SAP Integration Suite Integration Advisor helps here with Intelligent Machine Learning based proposals for mappings effectively.
We had the Sales Order information in oData format and now the other party needed the same information in SOAP format having same information mapped to different fields.
First step is to create the Message Implementation Guidelines for source oData and the target SOAP.
Go to Integration Suite Home -> Design -> MIGs
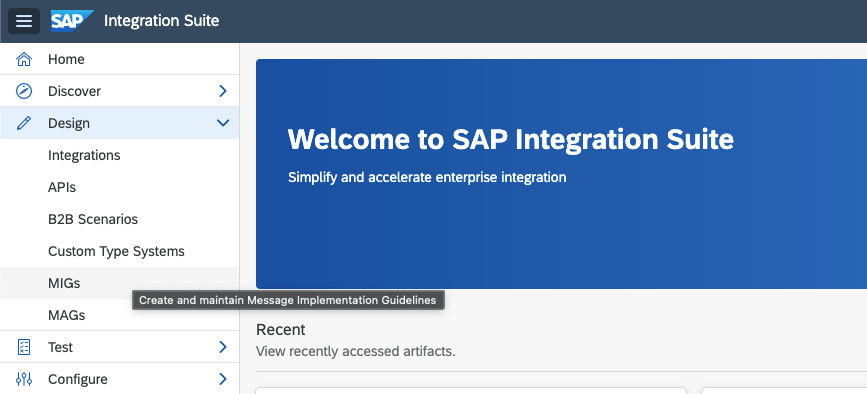
Click on Add and search for the Type system ‘oData’ and select the entry ‘SAP S/4HANA’.

On the next screen, search and select the relevant sales order API ‘A_SalesOrder’.

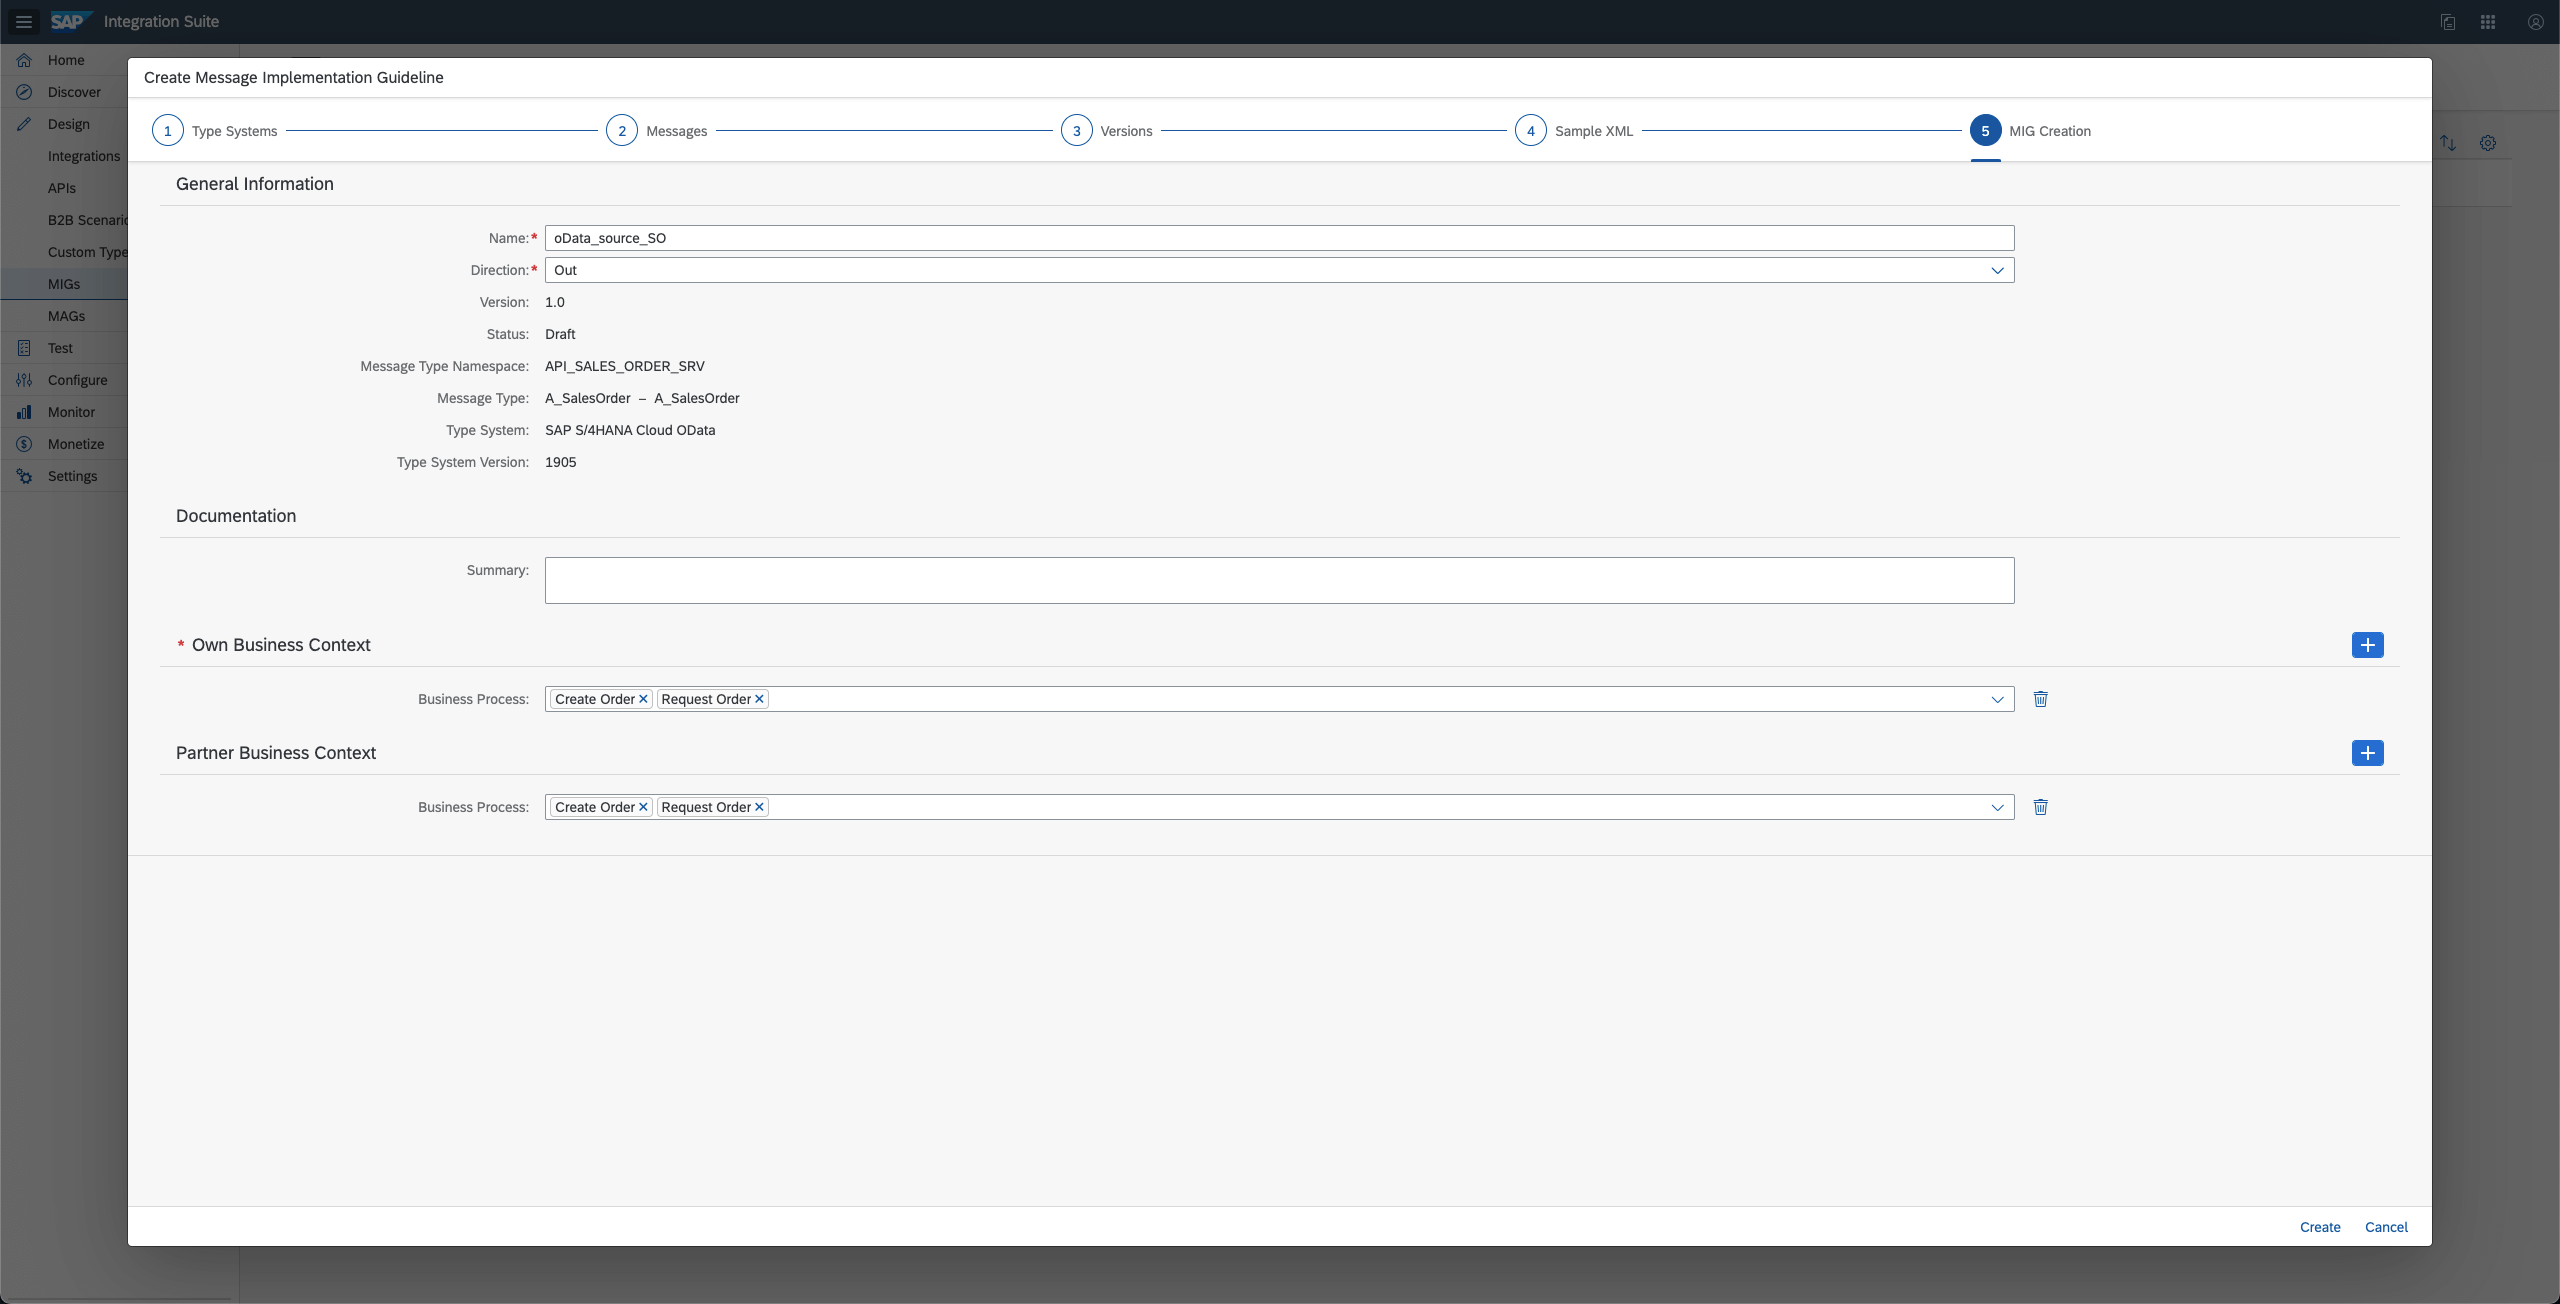
Select the version, skip the sample xml and enter the relevant information for the MIG Creation and click on Create.
On the next step within structure, you can select the ‘Get Proposals’ option for the Integration Advisor to generate the confidence score.
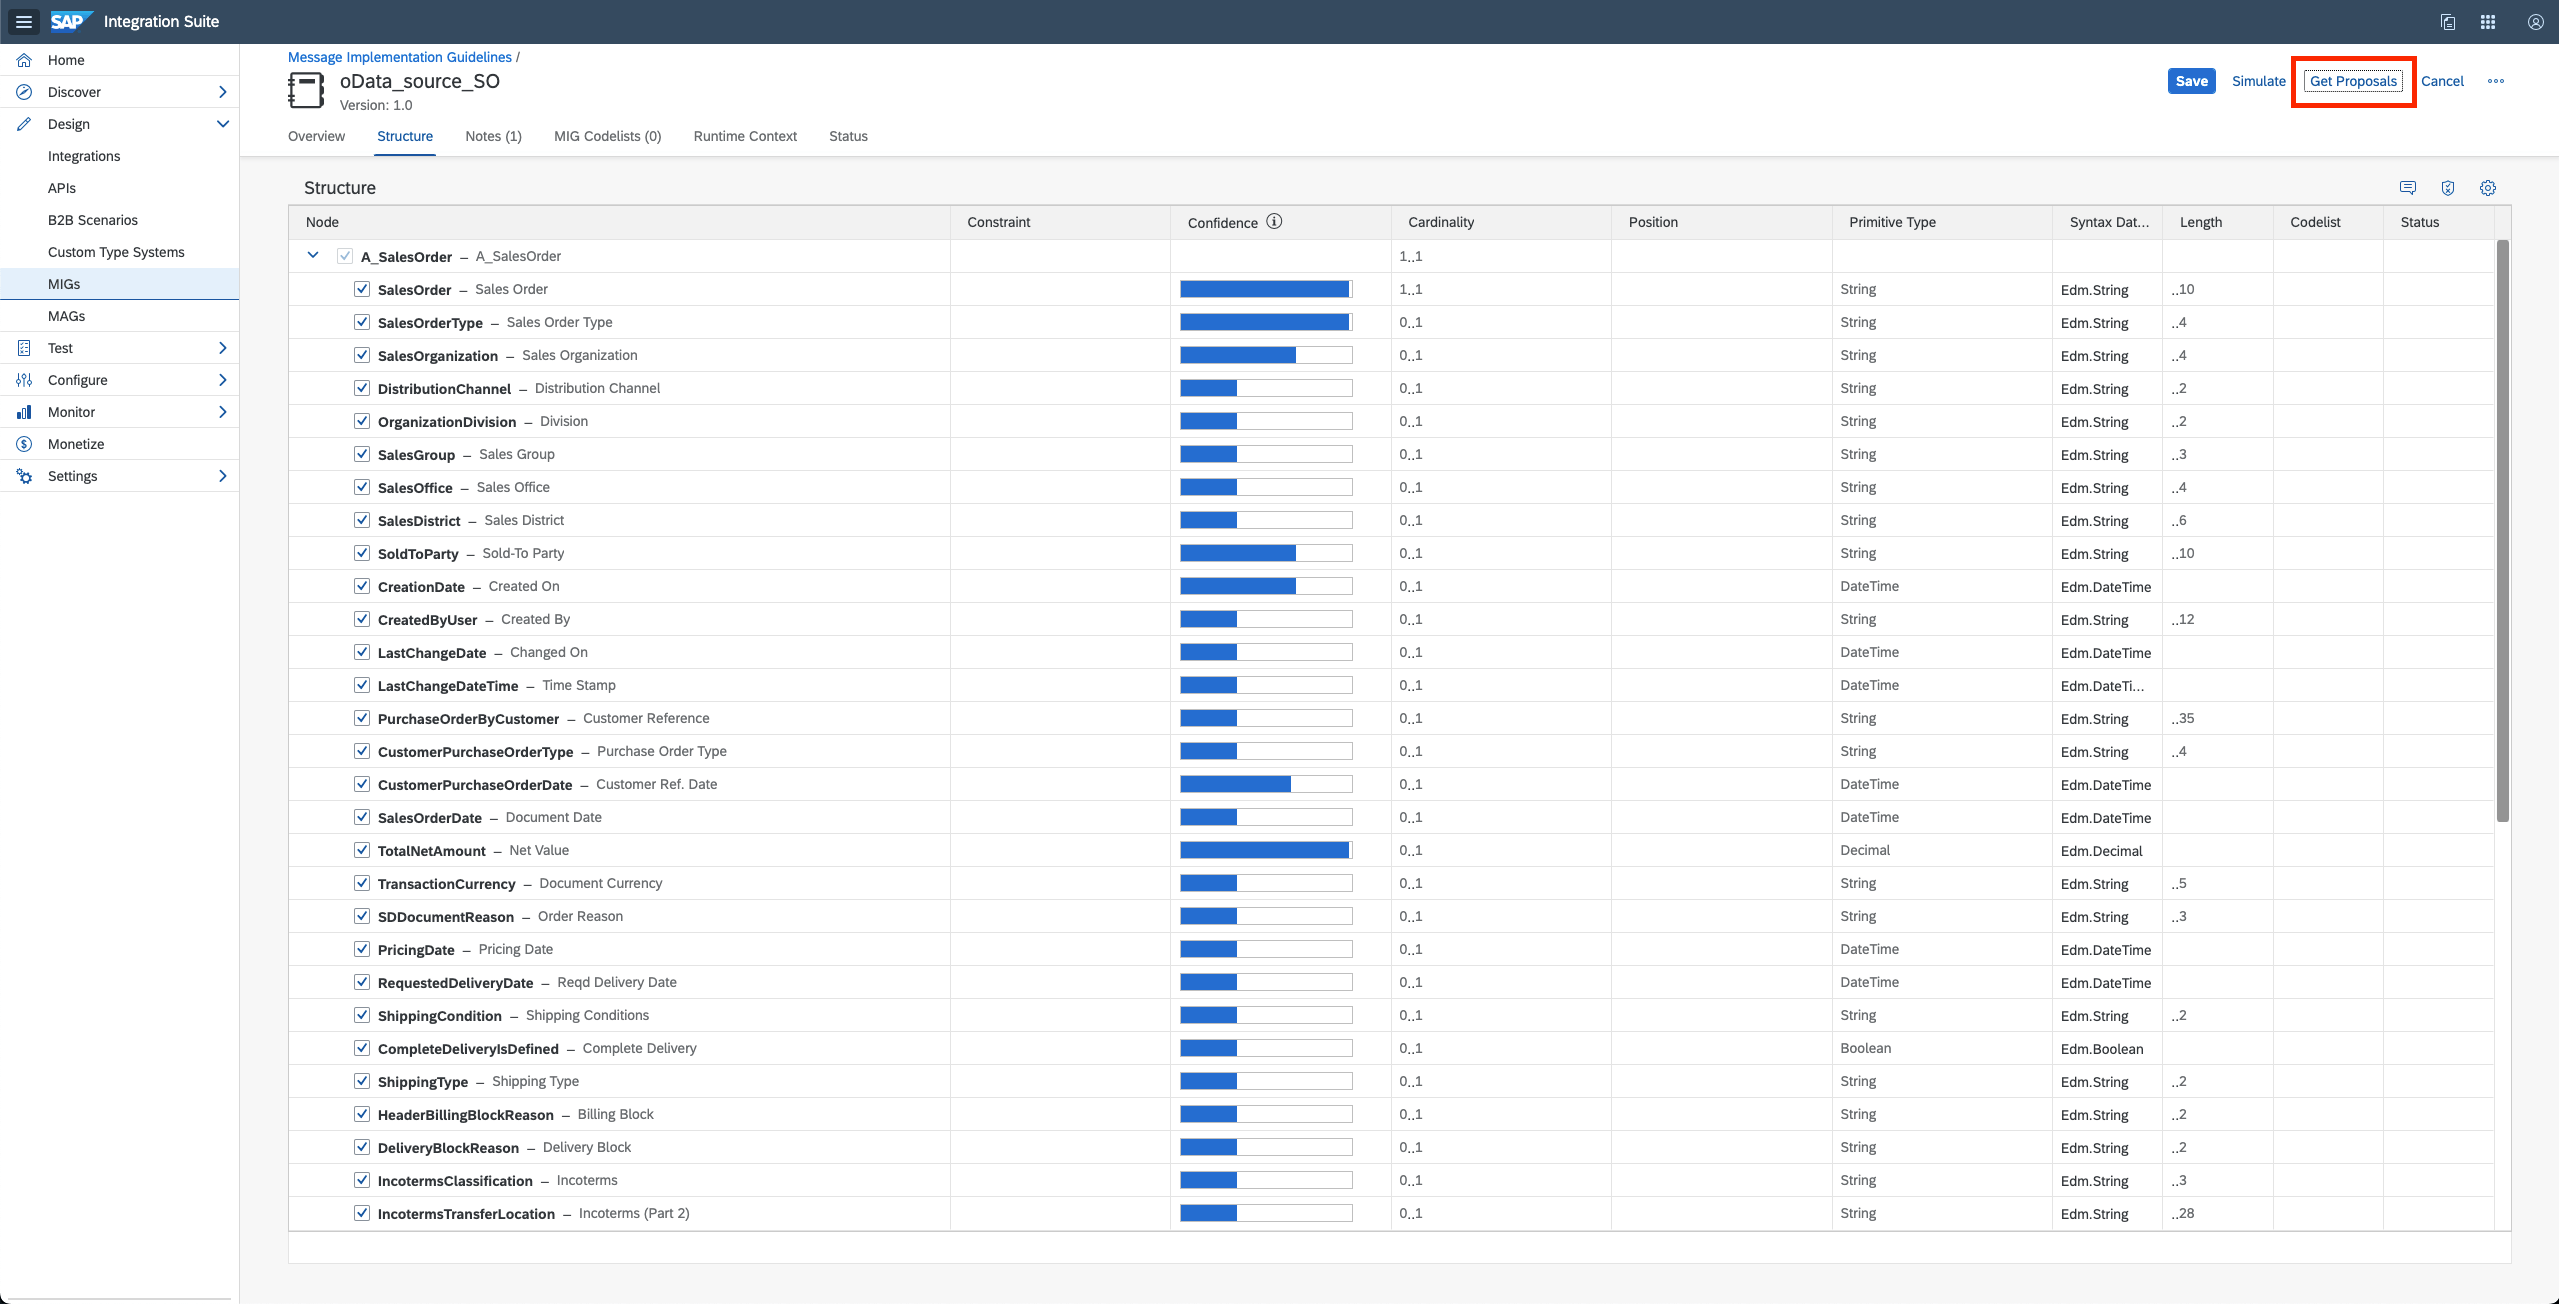
You can decide based on your business expertise or on the proposals from the advisor which fields you would like to select and click on save. Once saved, you can have the MIG for further processing.
Now let’s do the same for the target SOAP format. Here I have selected the OrderRequest.
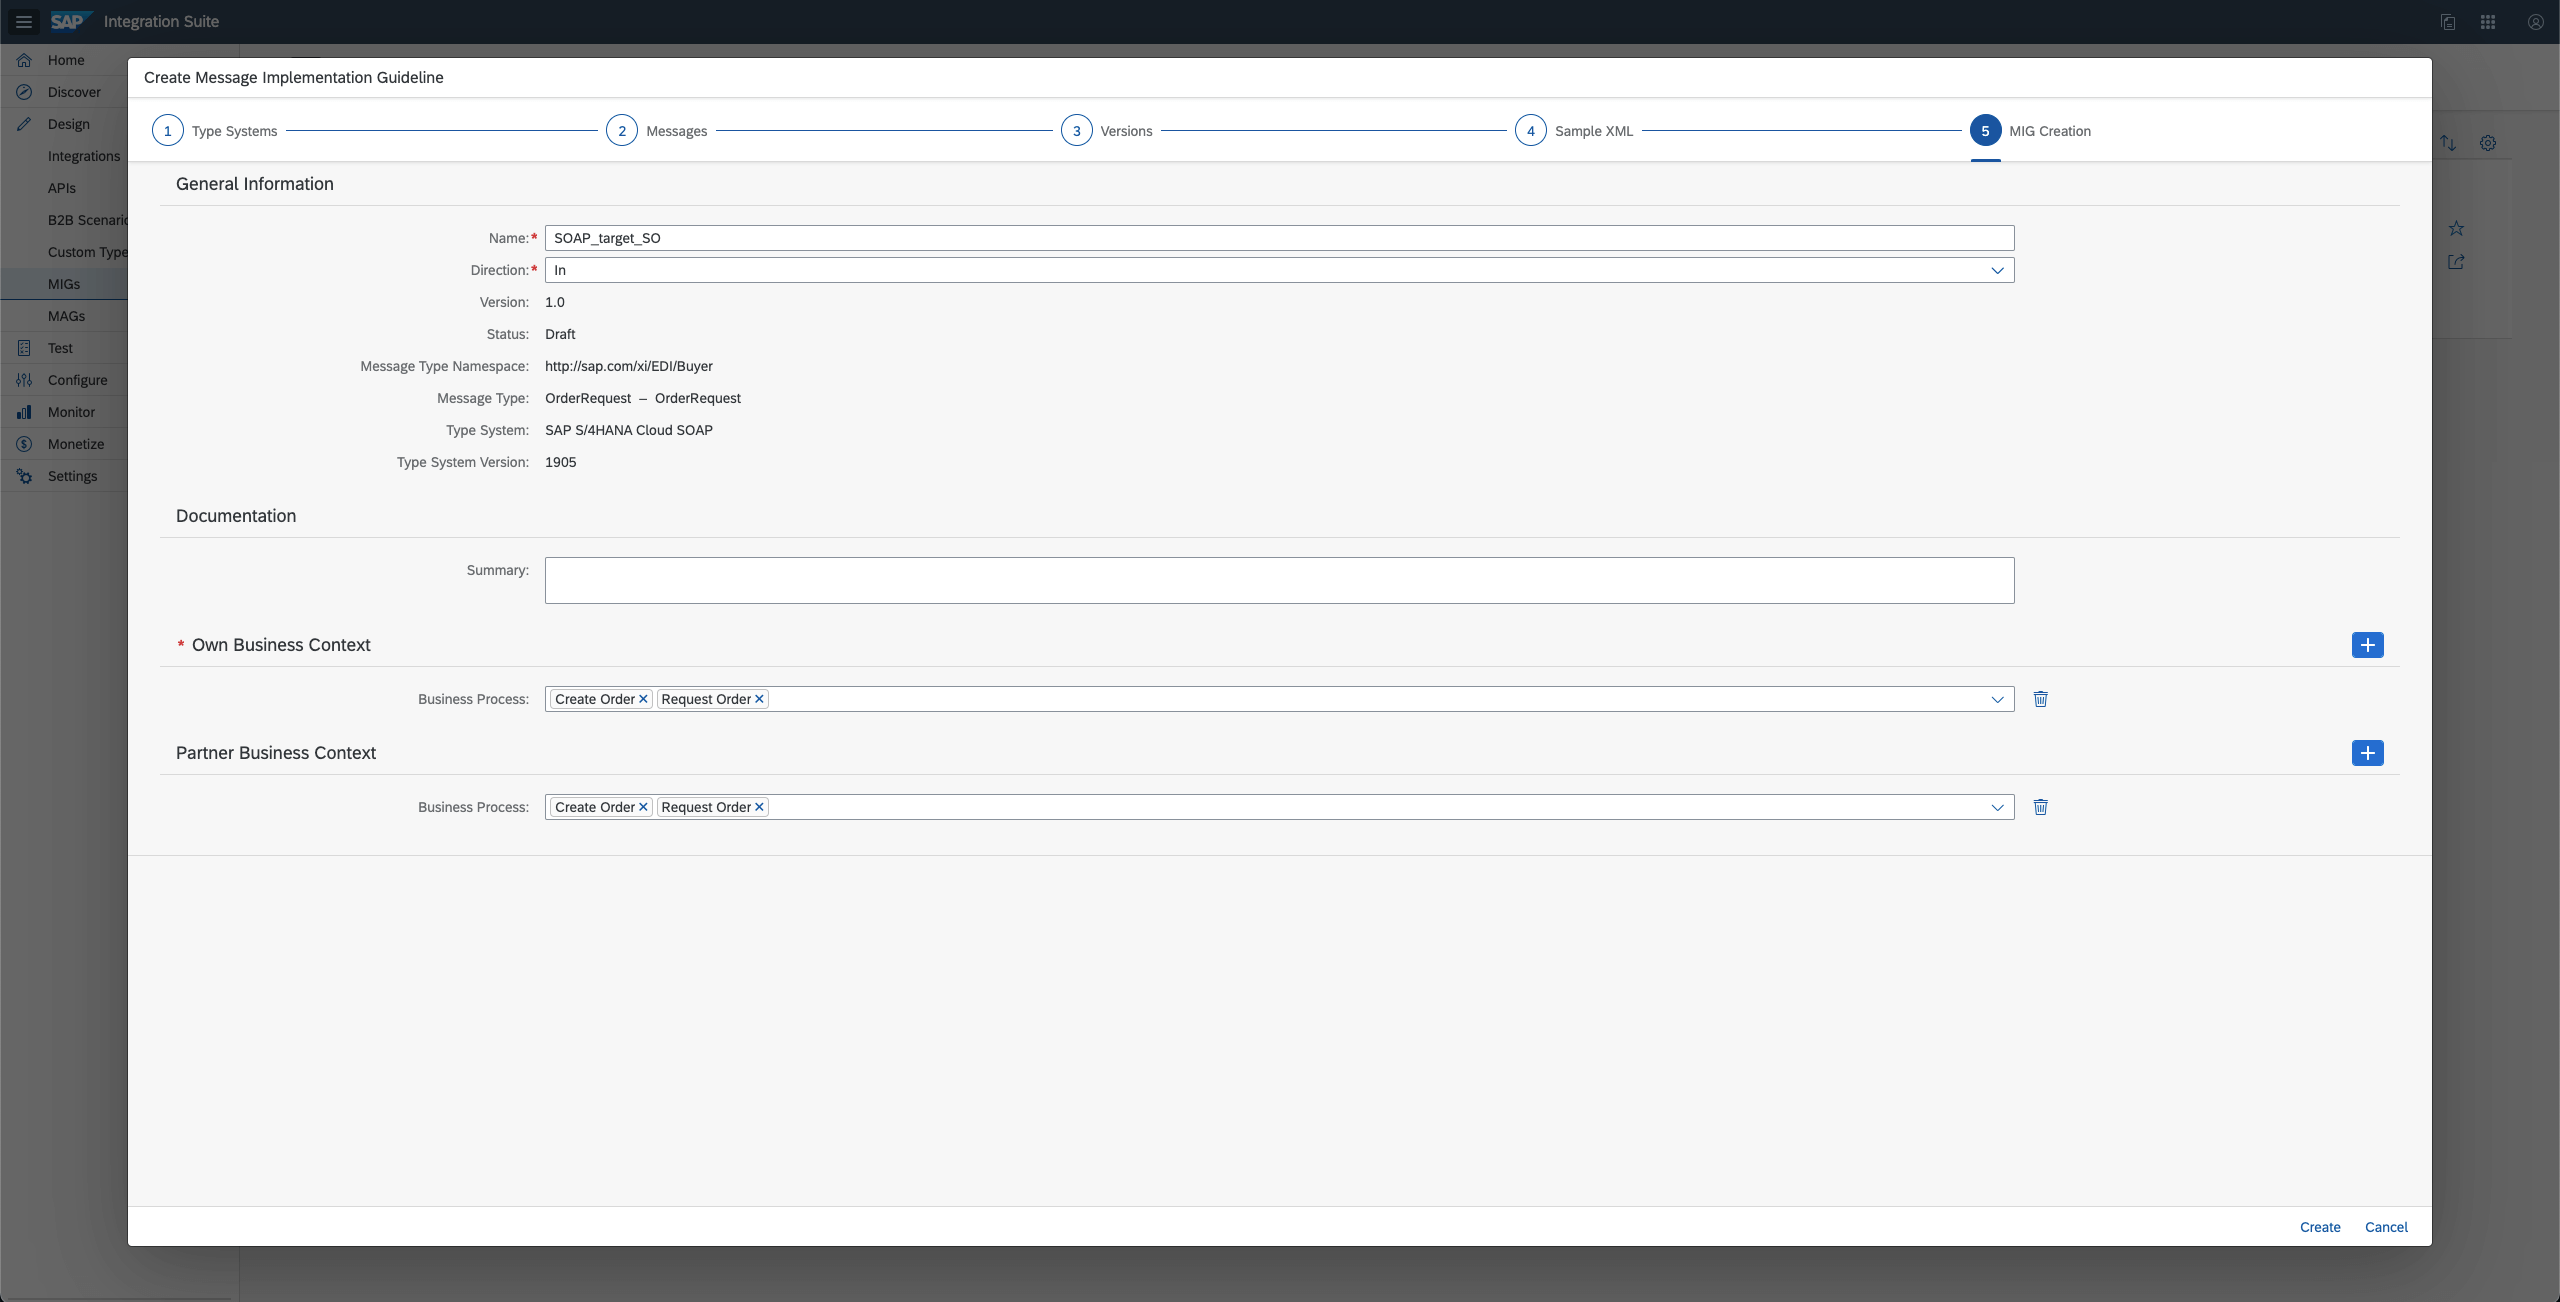
Here as well you can generate the proposals and based on the business expertise, proposals confidence, you can select the fields which you need and save the MIG for target SOAP.
Next step is to do the Mapping. For the same go to Design -> MAGs. Click on Add and select both source and target MIG one by one. Click on Create.
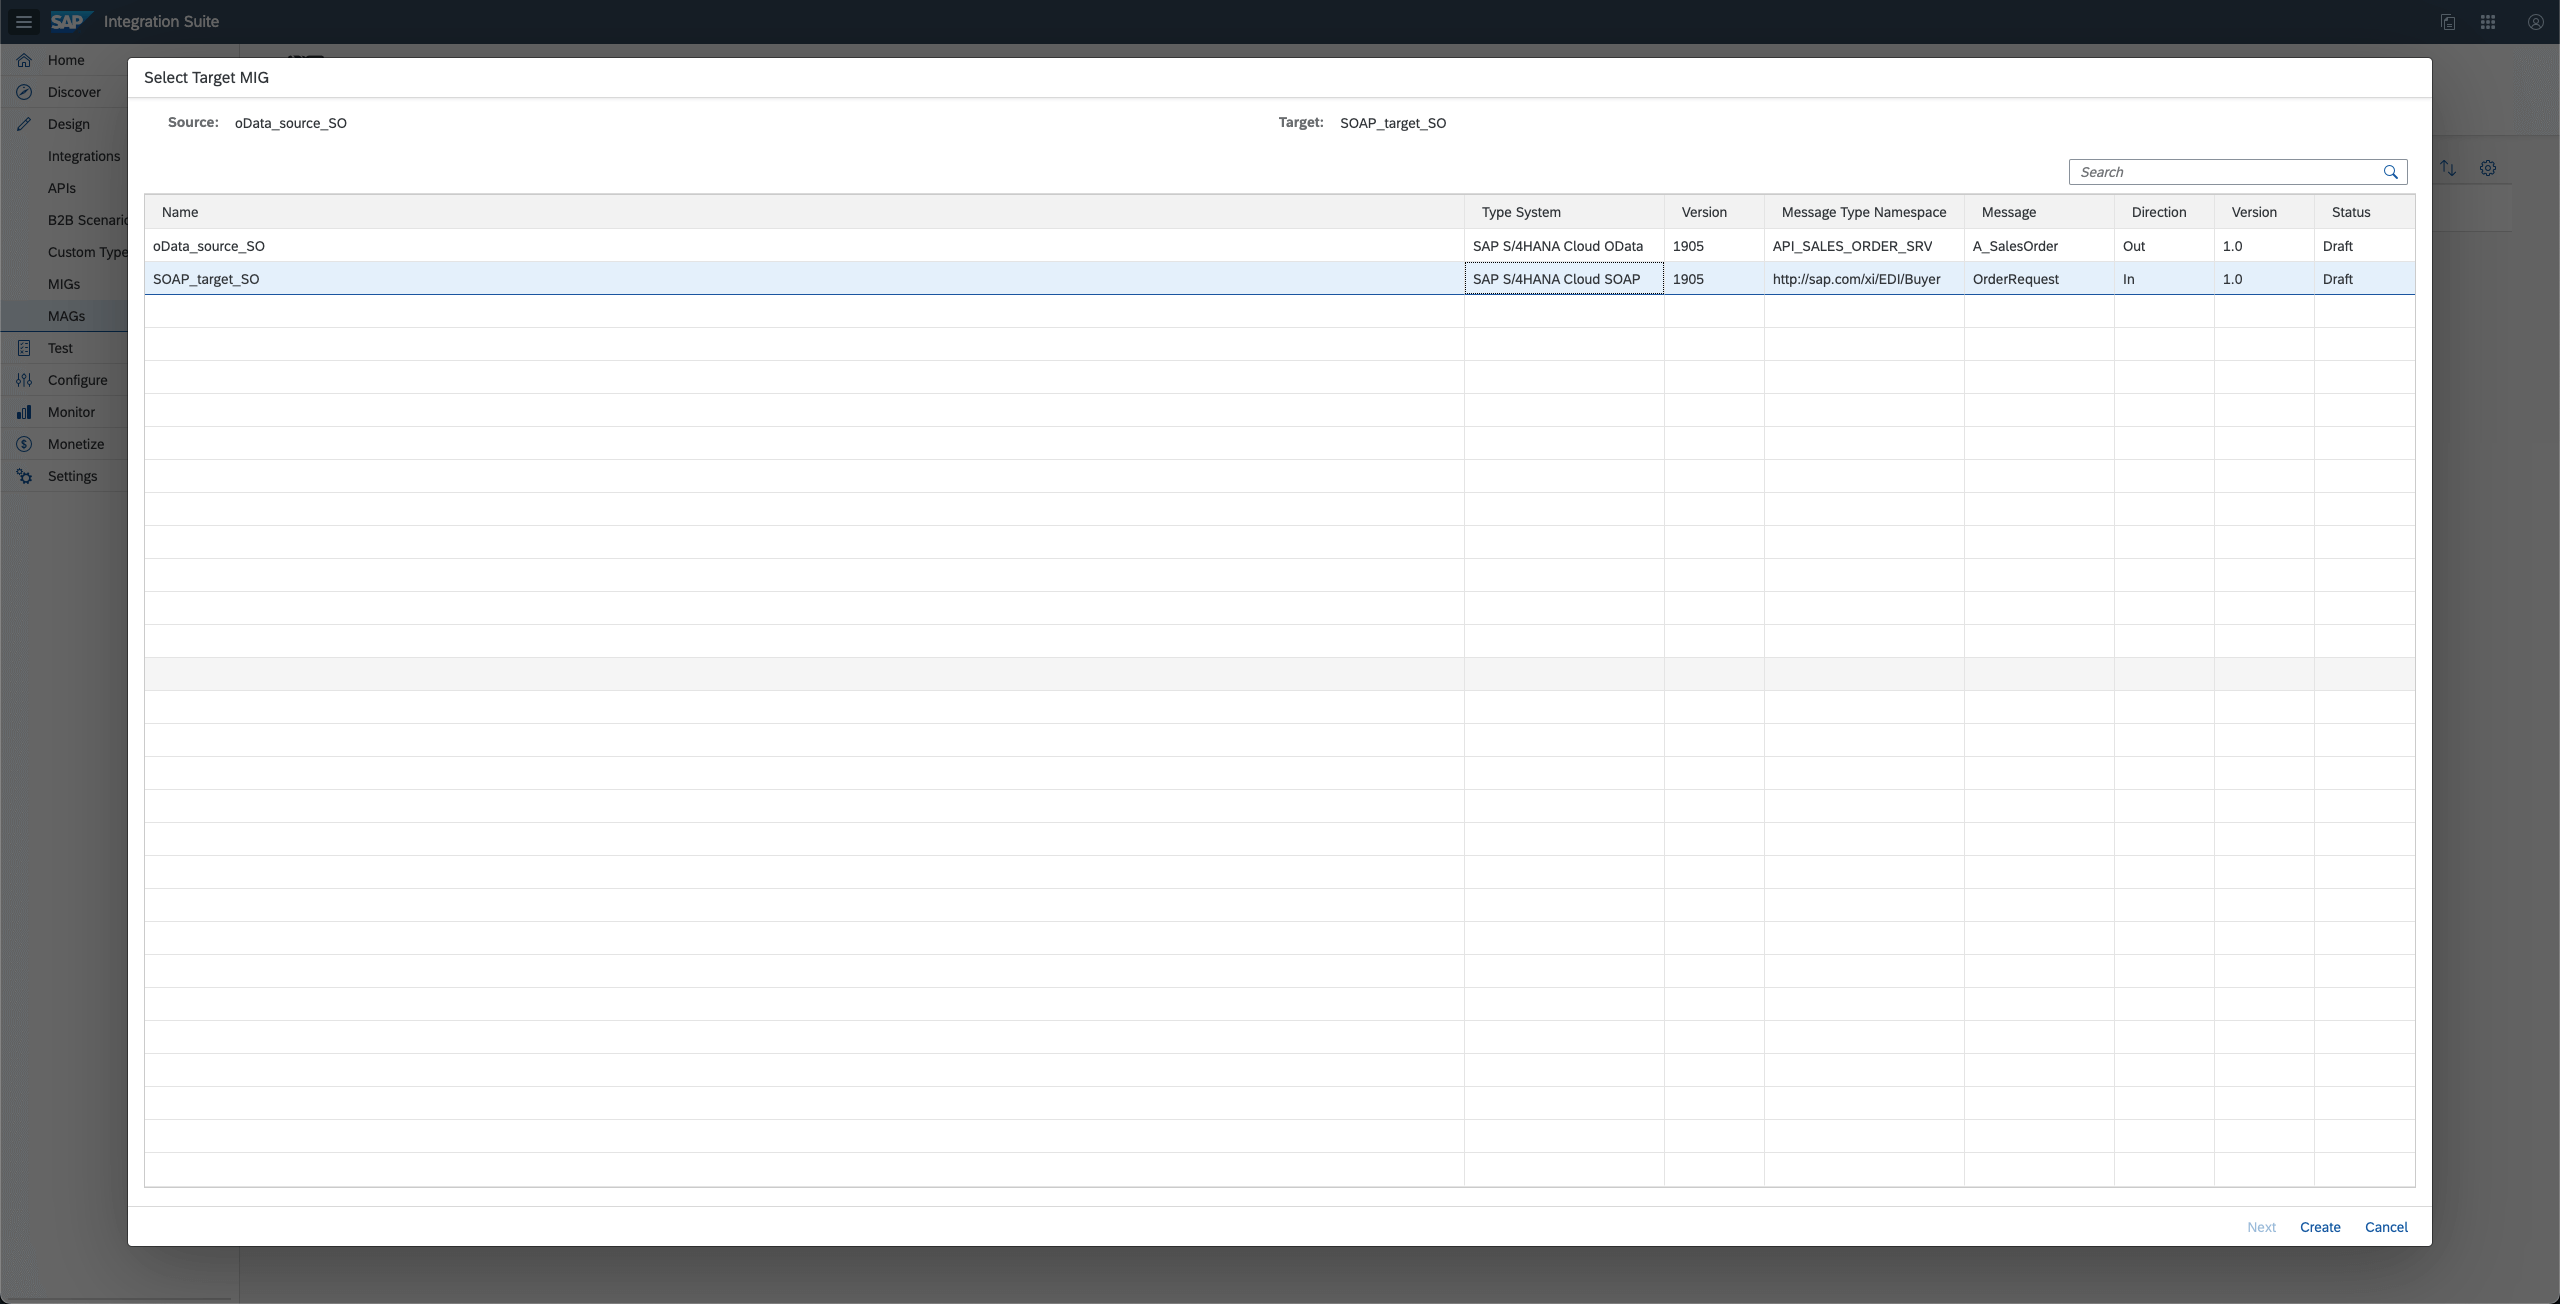
On the Mapping view, you can click on Proposal for the Integration Advisor to generate the mapping on it’s own or you can drag and drop to connect the fields between source and target.
For simplicity and demo purposes, I have only selected the minimal fields and done the mapping myself.
Here is my MIG for source oData and target SOAP.
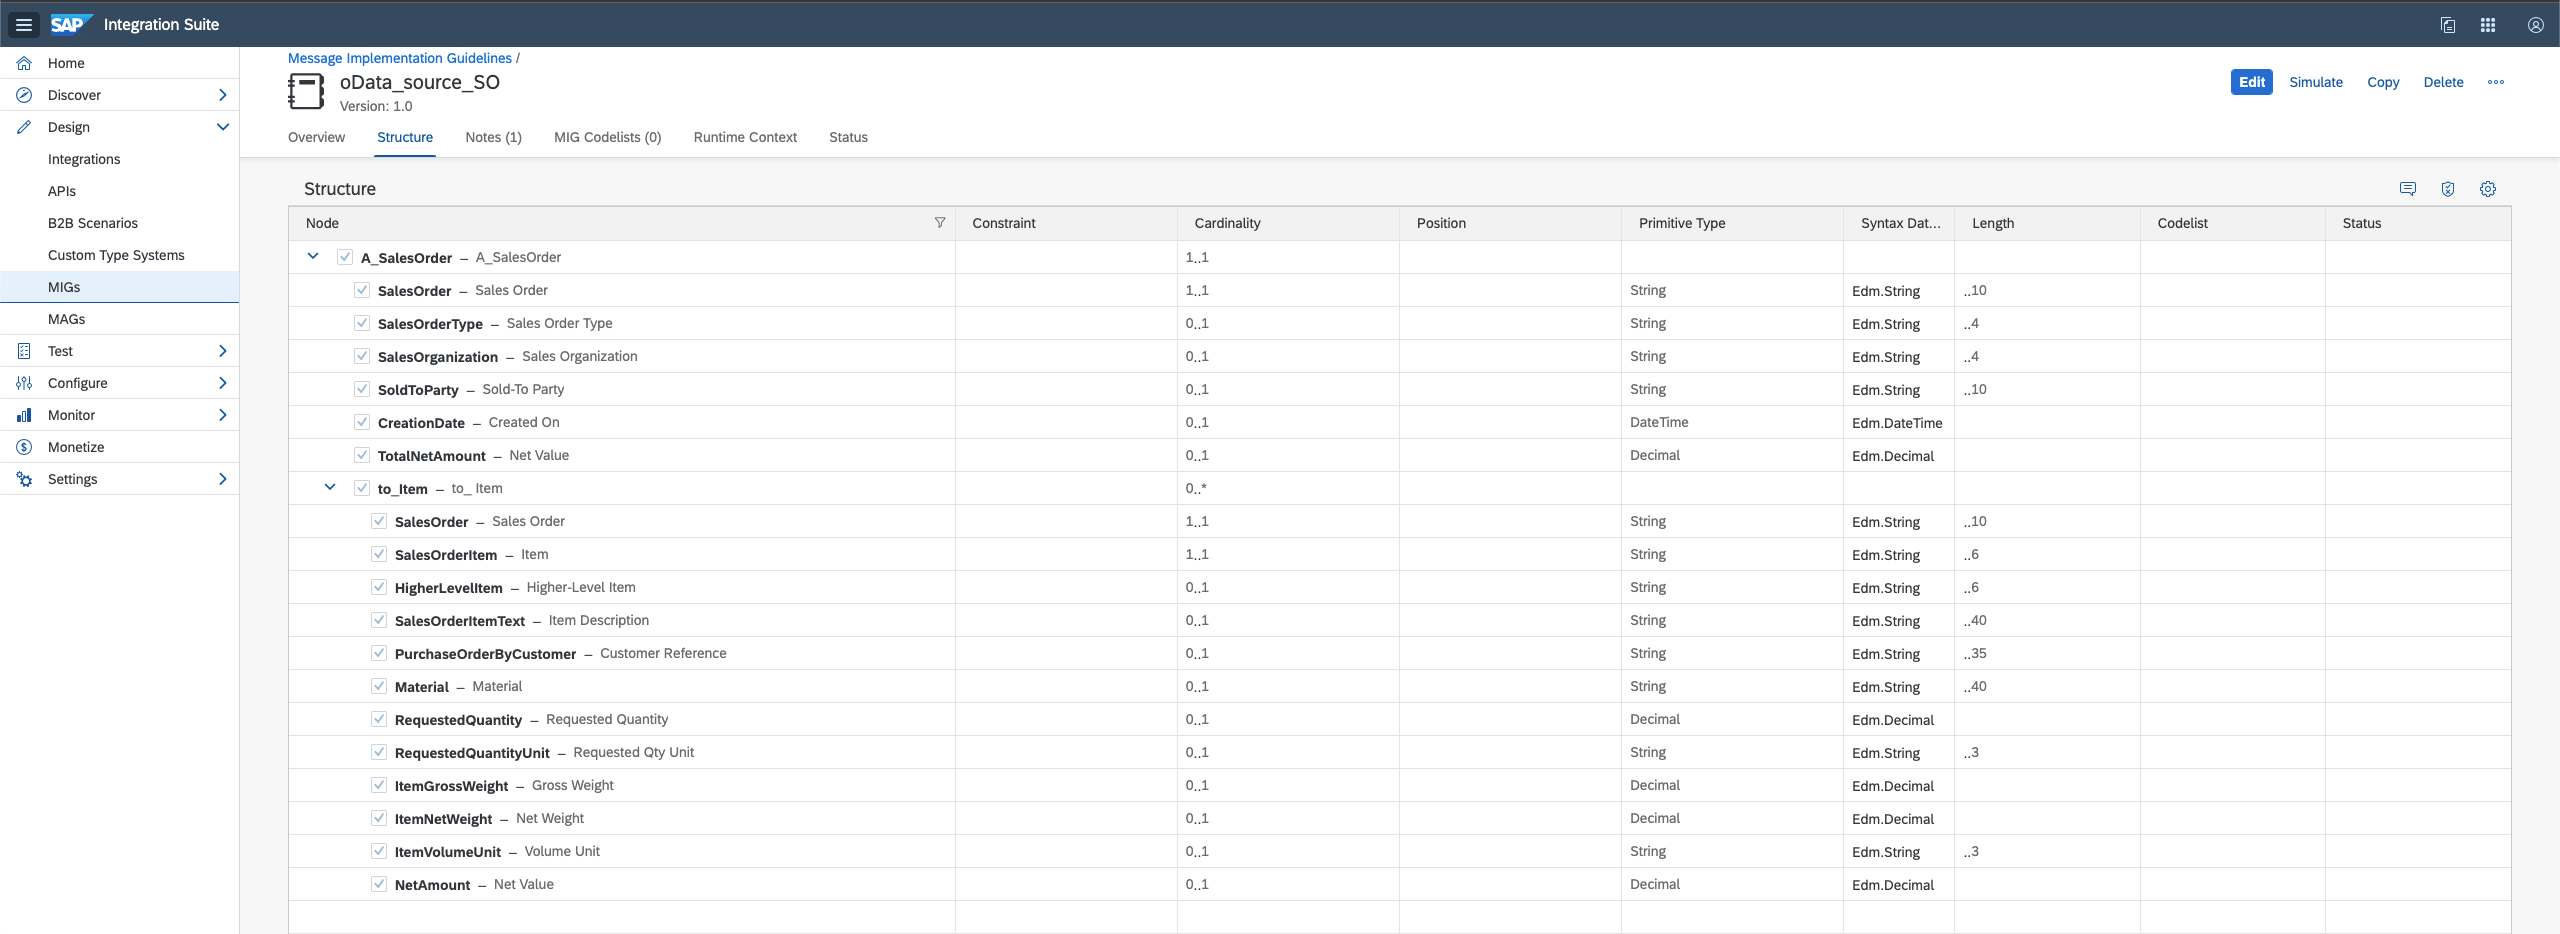

And the simple mapping between the MIGs.
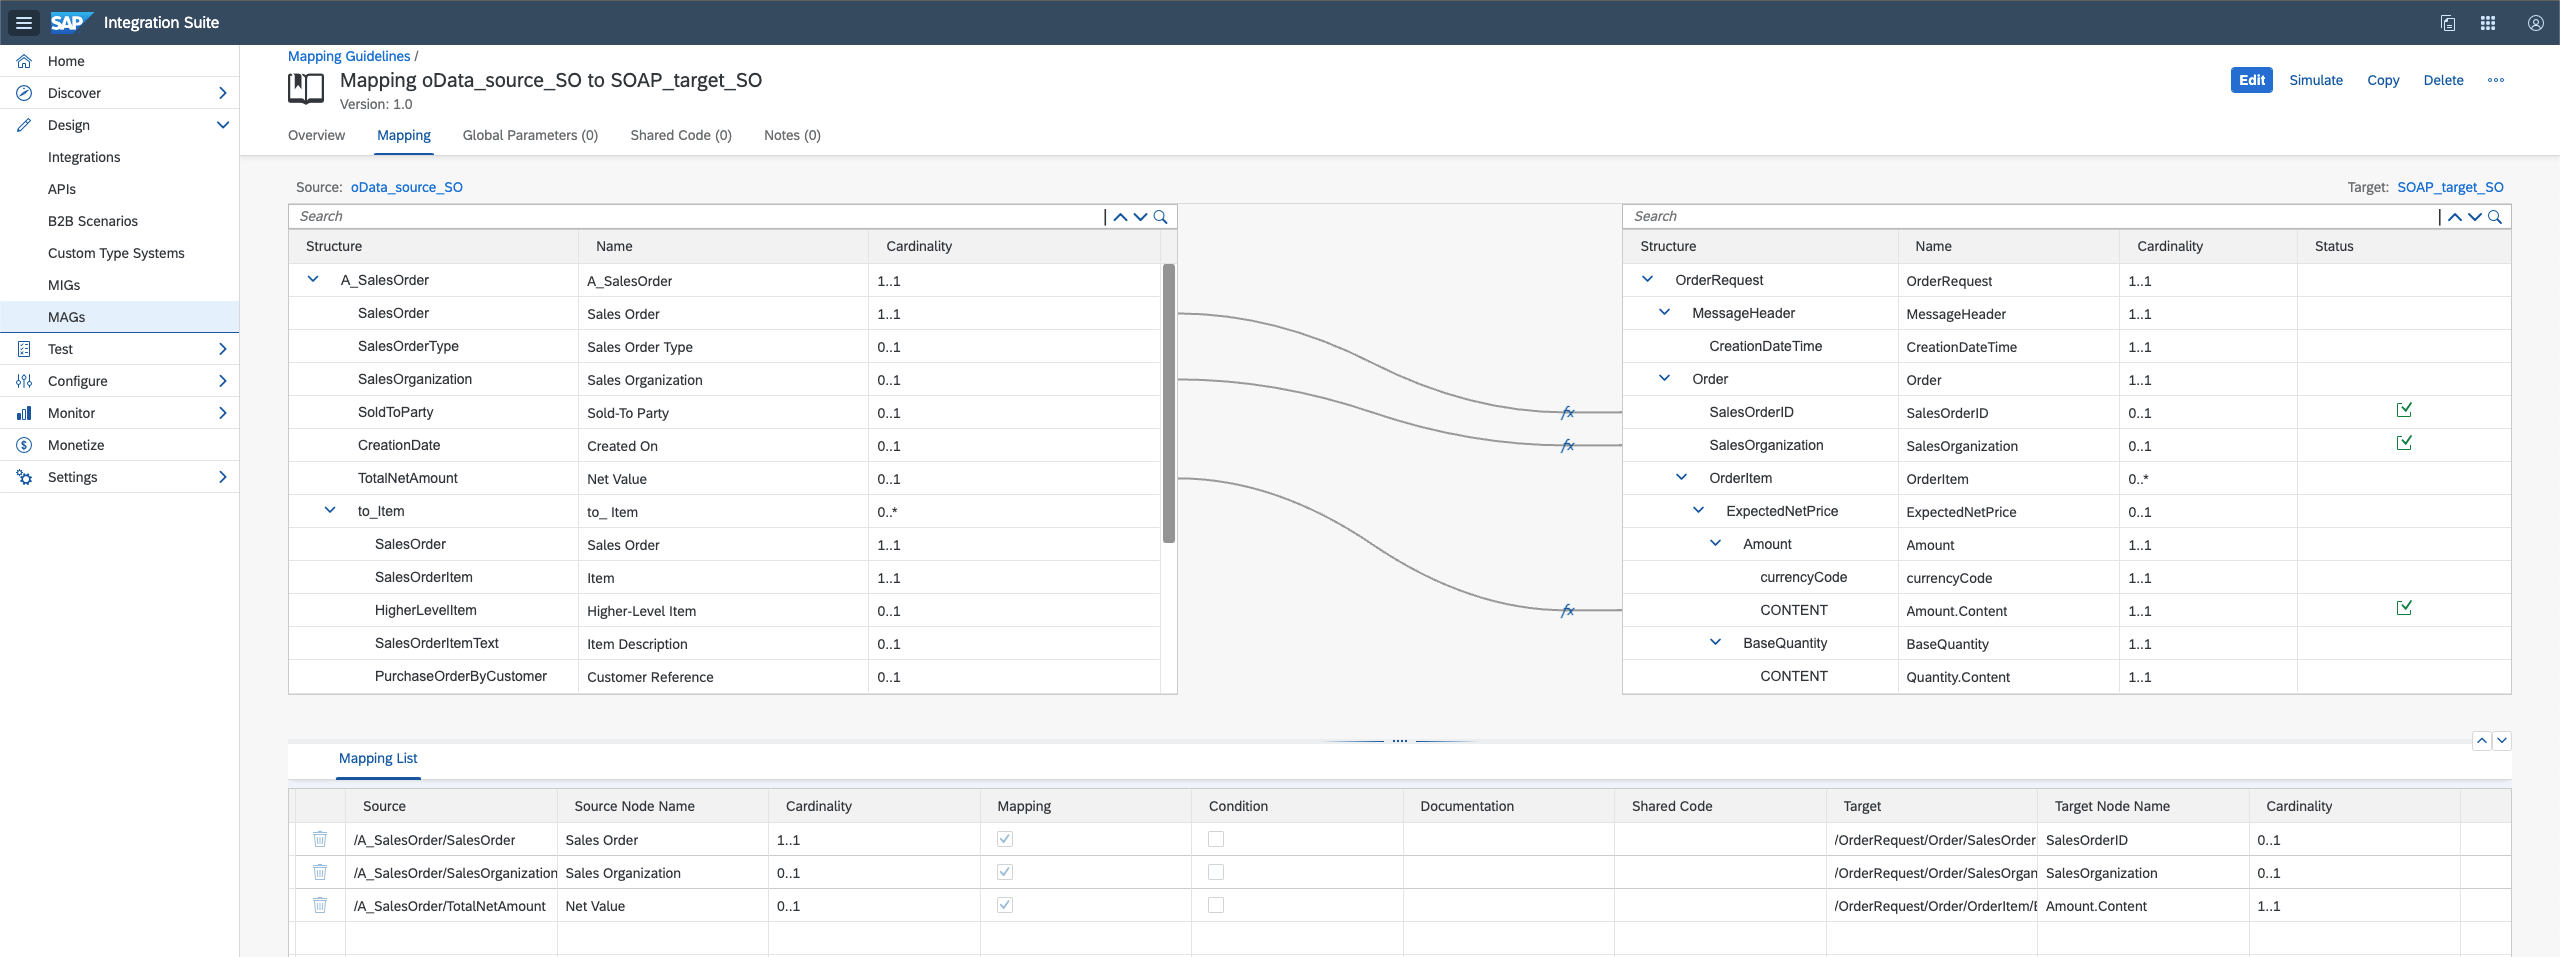
Remember the Slack notification which we did before where we had converted the xml to json and used the Javascript scripting to parse the JSON and get the TotalAmount, now we will do the same without using the converted but using the mapping guidelines from this stage.
To use this MAG in our Sales Order iFlow, let’s export the runtime artifacts from here.

The downloaded runtime artifacts should contain the files for mapping xsl, source and target folder containing both the xsl for pre and post processing.
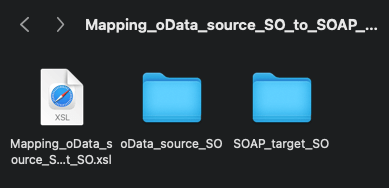
Go to Design -> Integrations, copy the s4hana-slack iFlow and name it ‘s4hana-slack-ia’

In the new iFlow, remove the xml-to-json converter, process data javascript scripting and include the XSLT Mapping thrice.
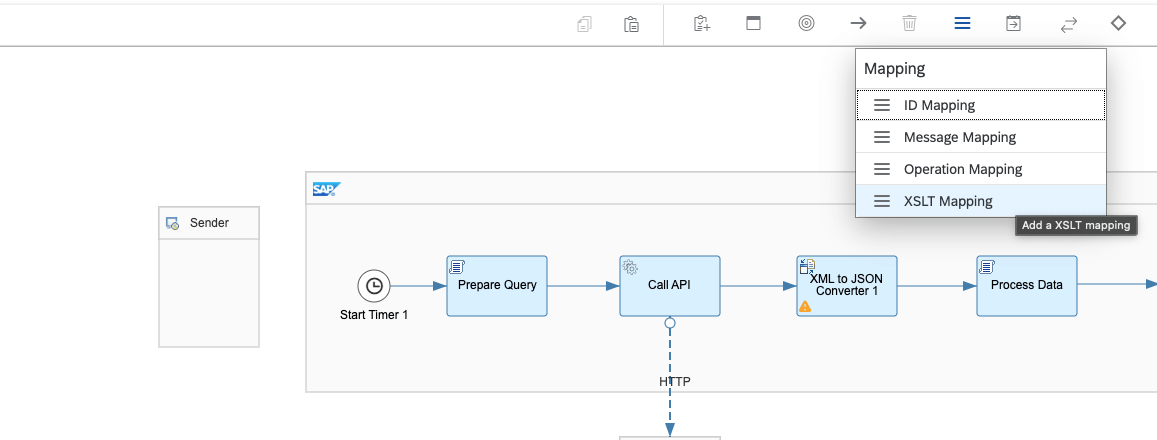
XSLT Mapping is introduced for 1) oData preprocessing (oData_source_SO_preproc.xsl), 2) Mapping oData Source to Target SOAP (Mapping_oData_source_SO_to_SOAP_target_SO.xsl), 3) SOAP postprocessing (SOAP_target_SO_postproc.xsl).

For each of the XSLT Mapping, on the configuration upload the respective processing xsl in the iFlow.
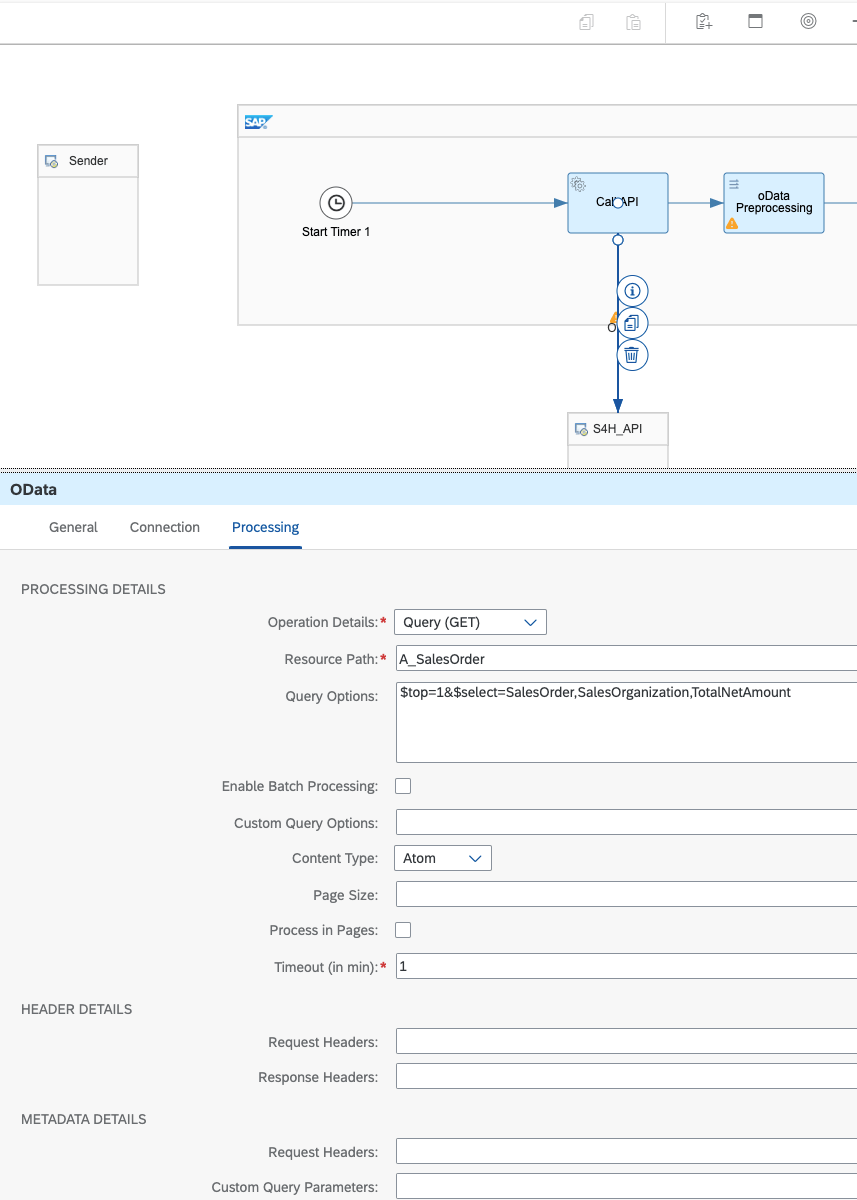
Remember earlier we called the S4HANA API using HTTP adapter, now let’s also change this to oData adapter.
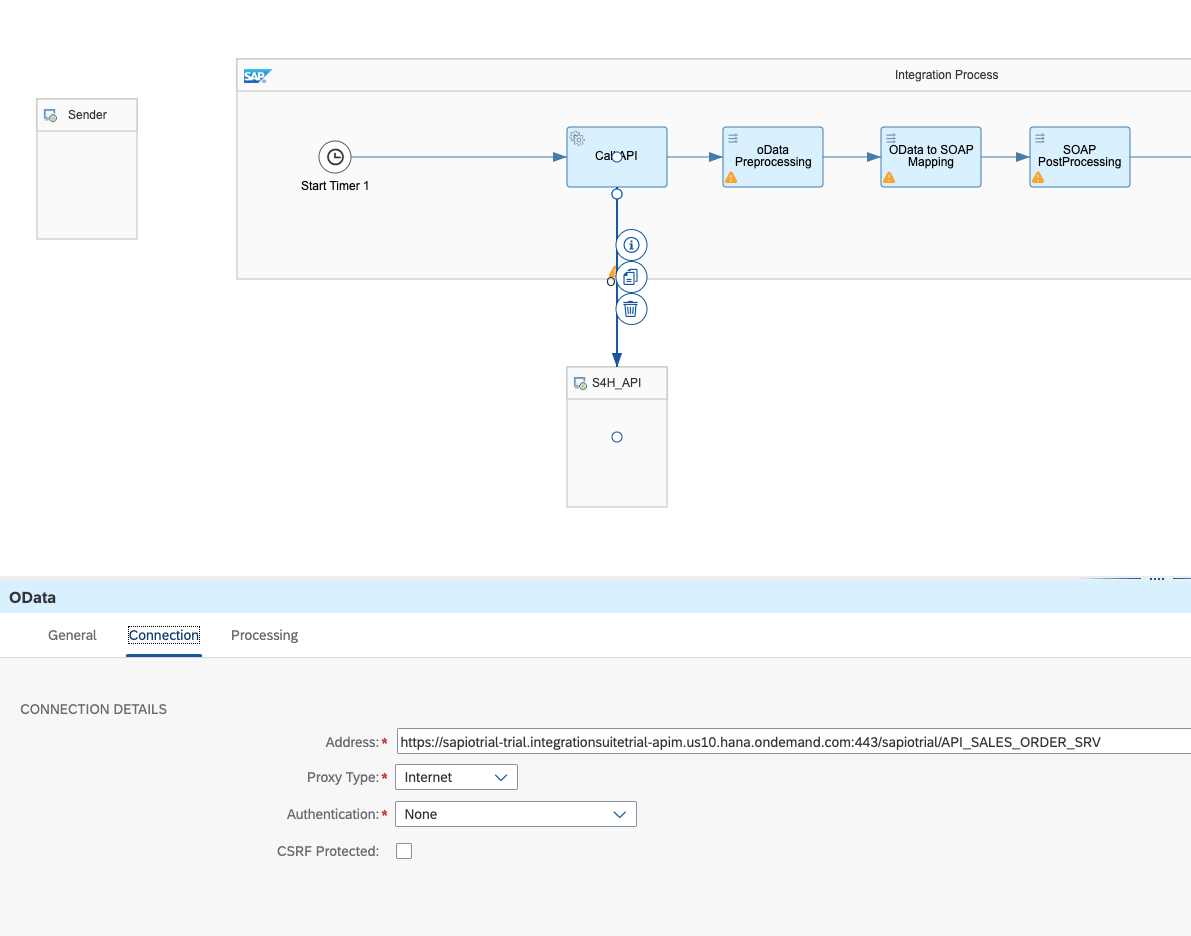
As mentioned earlier, for simplicity I am only going to select the fields which I have done mapping on the MAG via the query $select parameter.
Finally on the Prepare Message step, let’s extract the Amount value from the target SOAP format using XPath.
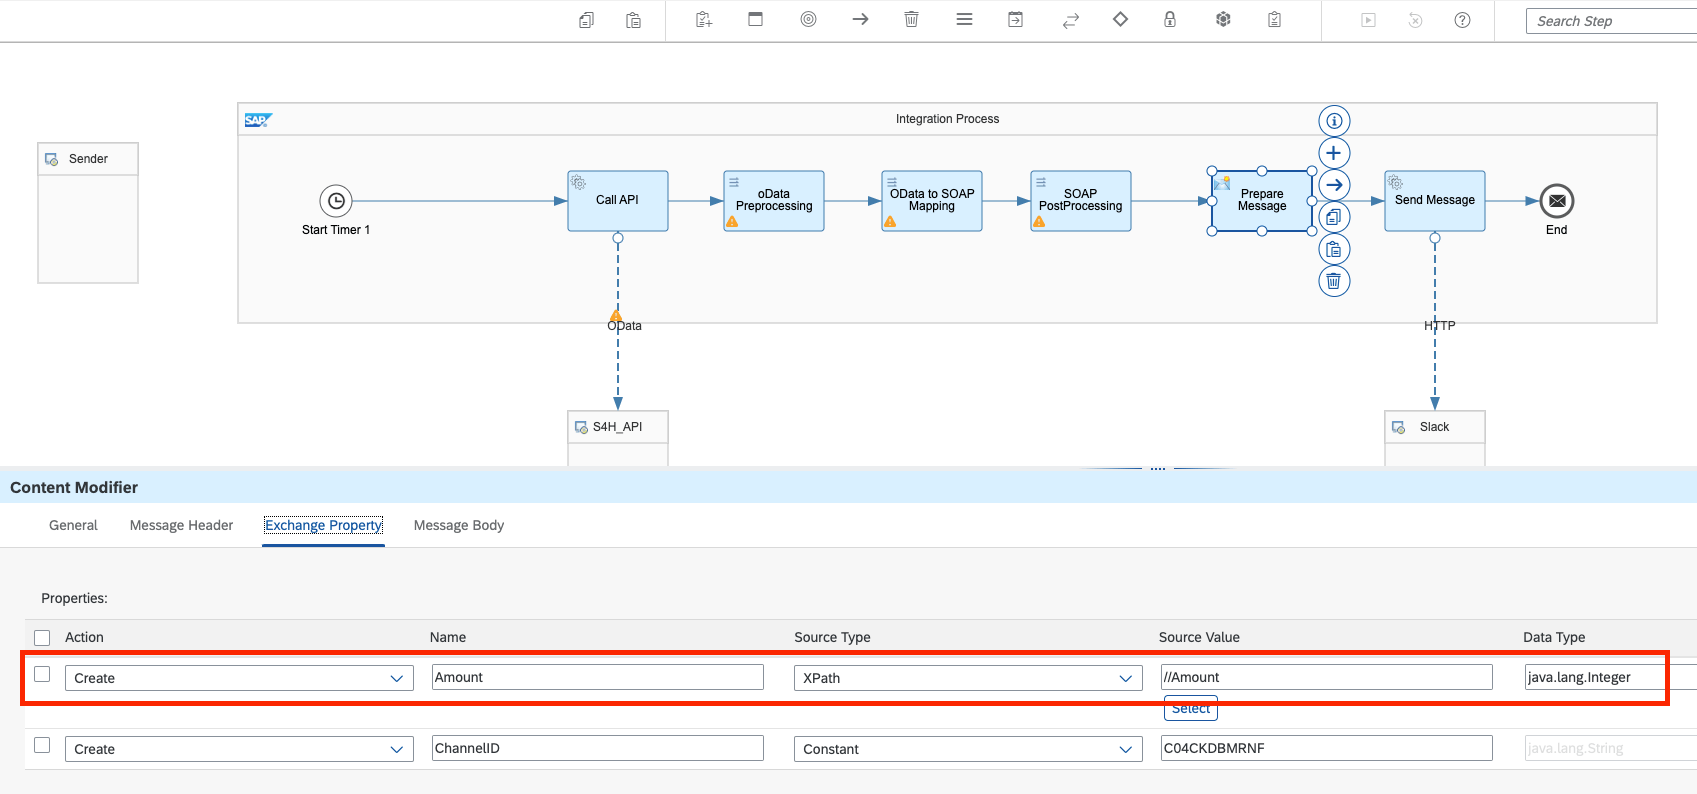
Let’s save and deploy the iFlow. If everything is correct we should see the slack notification like before with the Amount from the Sales Order query.
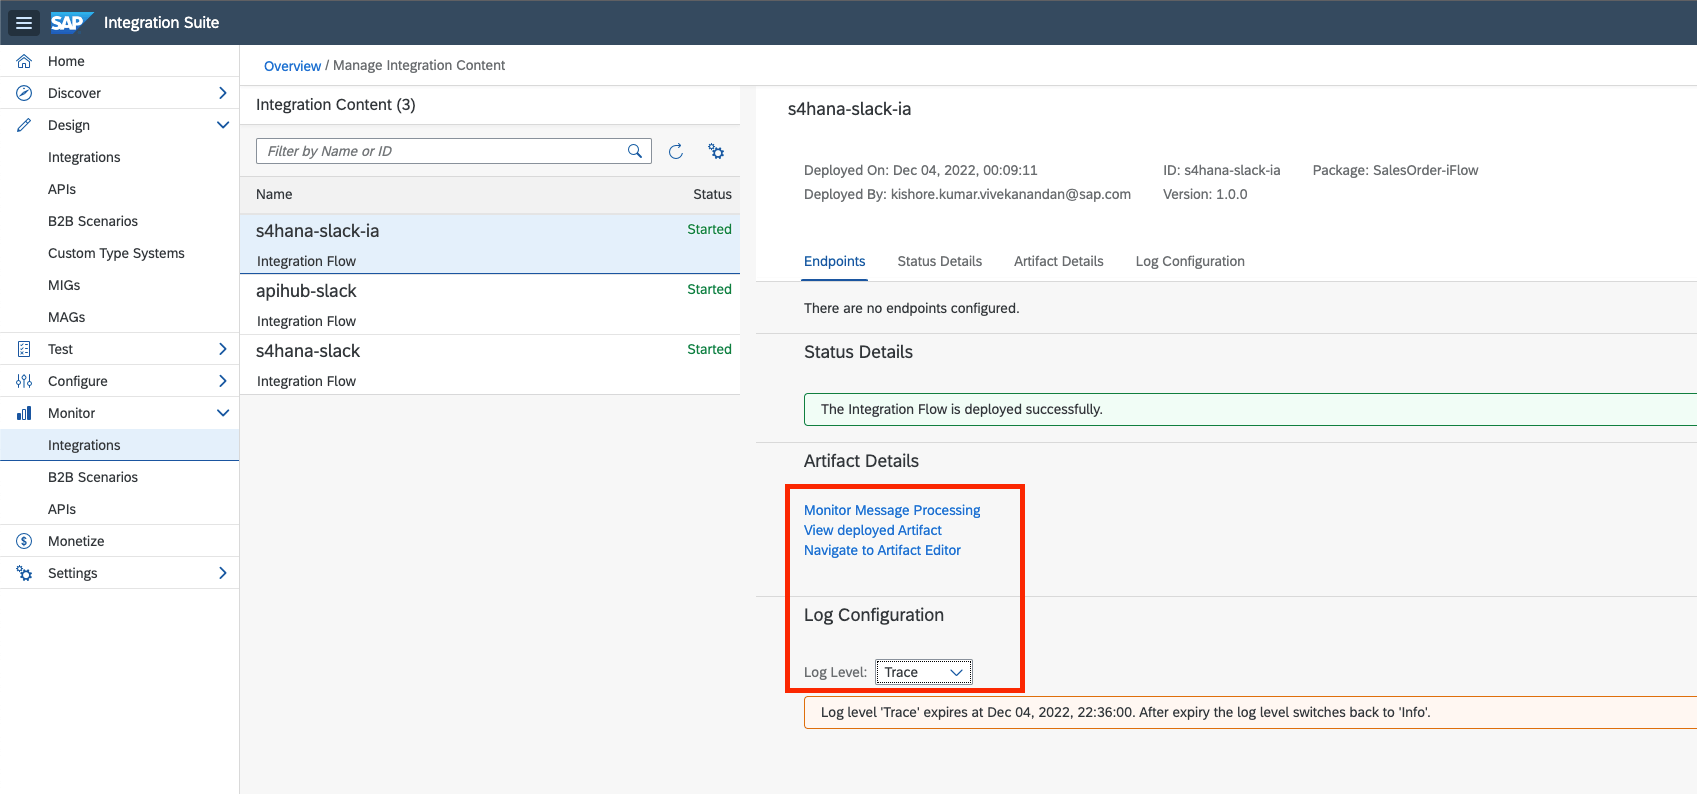
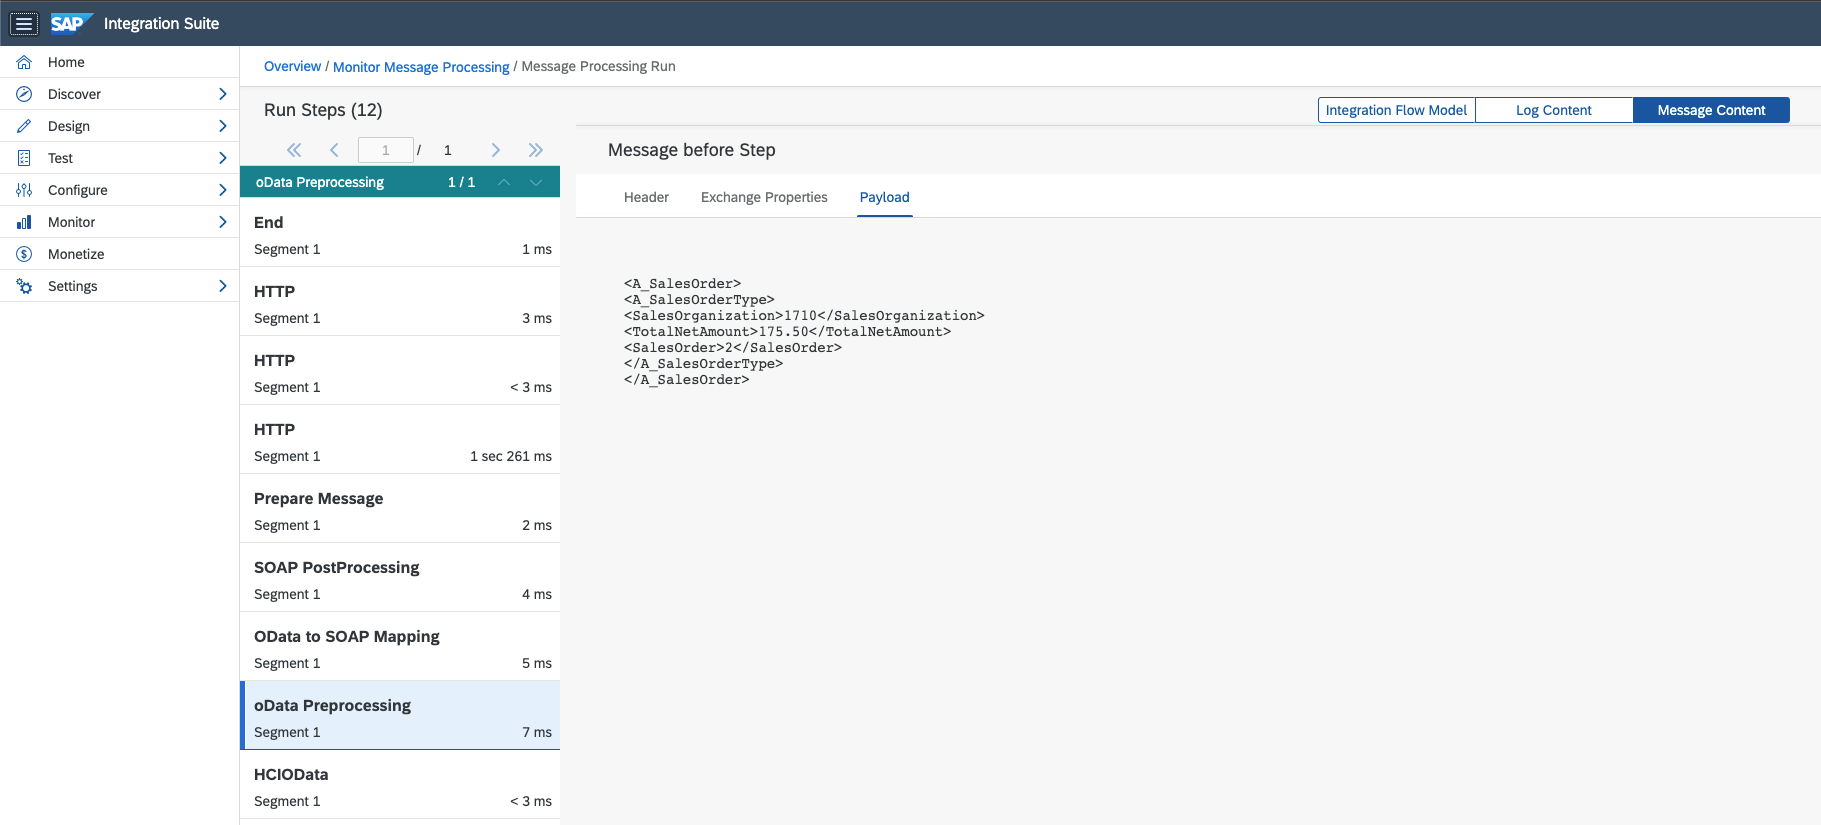
To better visualize the Mapping and the transformation, let’s go to Monitor -> Integrations, enable the ‘Trace’ log level for the iFlow and go to Monitor Message Processing and open the trace.
You can see the Payload at every step of the Integration flow and see the transformation.
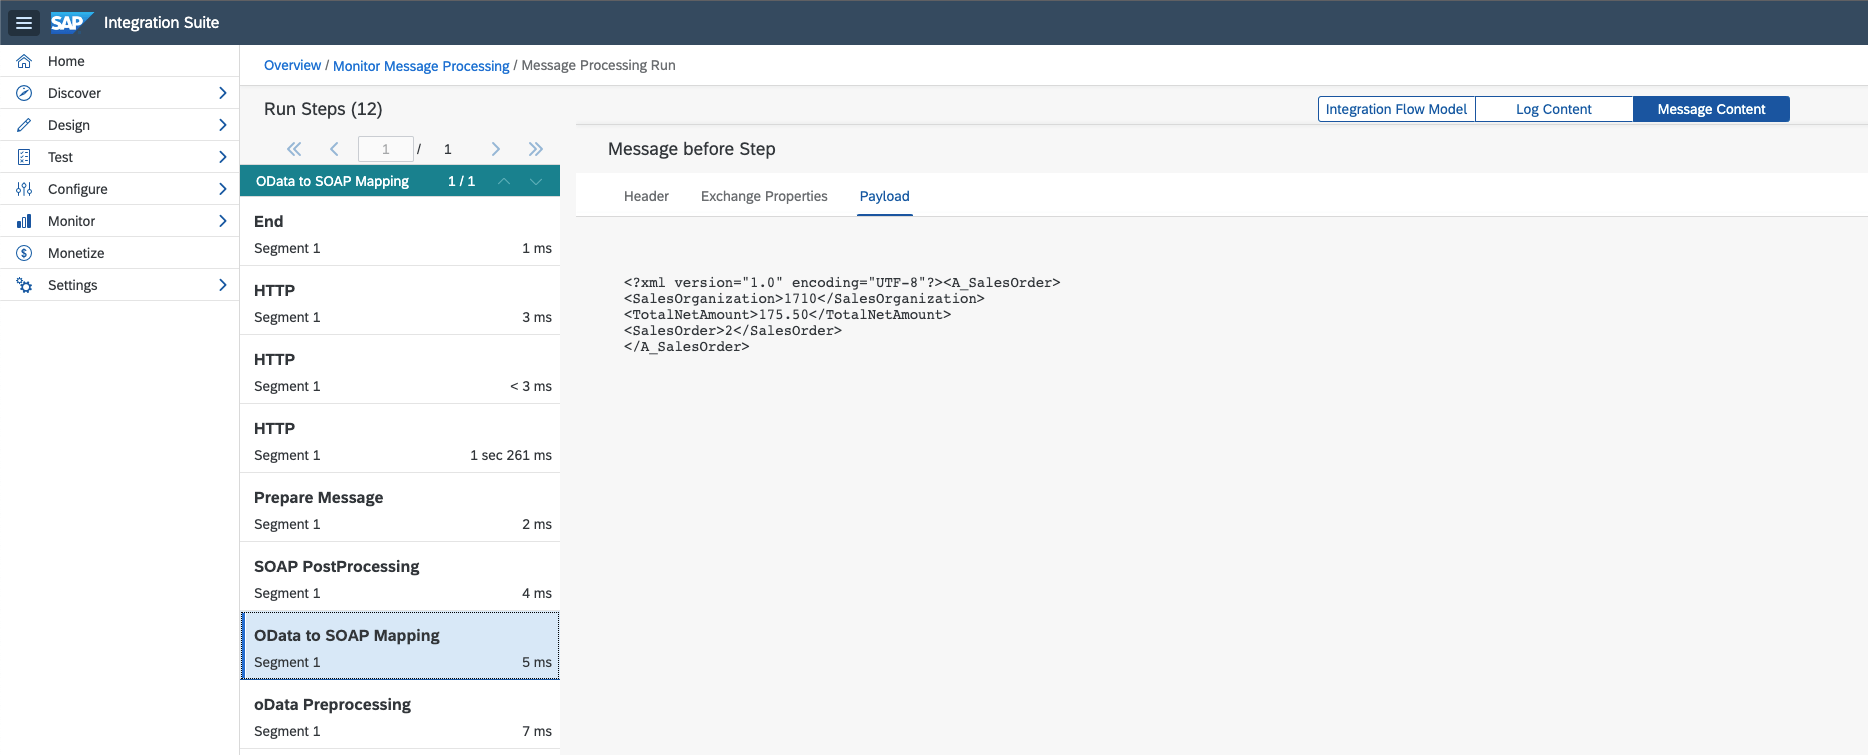


And finally the nice message that you received on the Slack ‘Sales Order’ channel this time.

Ok, I promised for a Bonus demo, definitely if you have stayed until now, then it’s time for the same.
Bonus: Enabling Principal Propagation with X.509 Certificate
You might remember that when we configured the On-Premise system in the Cloud Connector and so far we have been using the Basic Authentication mechanism to allow the communication between the cloud (BTP) to S/4HANA On-Premise system. Now let’s enable the Principal Propagation with X.509 Certification, so the communication can happen directly with the BTP User to On-Premise user without the need for any passwords.
To work with the Principal Propagation, You need a X.509 Certification (Root CA and Intermediate CA). The Root CA is uploaded to the On-Premise System and the Intermediate CA is uploaded to the SAP Cloud Connector and the mapping is enabled in the On-Premise System.
Let’s get started. The detailed description is available here in this blog – https://jamielinux.com/docs/openssl-certificate-authority/index.html, Just for the quick reference, I am including here the openssl commands with relevant config files. While executing the below commands, enter the relevant details for the CA like Country Name, State or Province Name, Locality Name, Organization Name, Organizational Unit Name, Common Name, Email Address (BTP Email Address)
cd Principal Propagation
   cd /root/ca
   openssl genrsa -aes256 -out private/ca.key.pem 4096
   chmod 400 private/ca.key.pem
   openssl req -config openssl.cnf -key private/ca.key.pem -new -x509 -days 7300 -sha256 -extensions v3_ca -out certs/ca.cert.pem
   chmod 444 certs/ca.cert.pem
   openssl x509 -noout -text -in certs/ca.cert.pem


   cd Principal Propagation
   cd /root/ca/intermediate
   mkdir certs crl csr newcerts private
   chmod 700 private
   touch index.txt
   echo 1000 > serial
   echo 1000 > /root/ca/intermediate/crlnumber
   cd /root/ca
   openssl genrsa -aes256 -out intermediate/private/intermediate.key.pem 4096
   chmod 400 intermediate/private/intermediate.key.pem
   openssl req -config intermediate/openssl.cnf -new -sha256 -key intermediate/private/intermediate.key.pem \
      -out intermediate/csr/intermediate.csr.pem
   openssl ca -config openssl.cnf -extensions v3_intermediate_ca -days 3650 -notext -md sha256 \
      -in intermediate/csr/intermediate.csr.pem -out intermediate/certs/intermediate.cert.pem
   chmod 444 intermediate/certs/intermediate.cert.pem
   openssl x509 -noout -text -in intermediate/certs/intermediate.cert.pem
   openssl verify -CAfile certs/ca.cert.pem intermediate/certs/intermediate.cert.pem
   # (optional)
   cat intermediate/certs/intermediate.cert.pem certs/ca.cert.pem > intermediate/certs/ca-chain.cert.pem
   chmod 444 intermediate/certs/ca-chain.cert.pem
By end of these steps you will have the following two files (ca.cert.pem & intermediate.cert.pem).
Convert these .cert.pem files to .pem files. You can do this either using UI based tools like (XCA) or using the openssl commands.
openssl x509 -outform der -in ca.cert.pem -out ca.cert
openssl x509 -outform der -in intermediate.cert.pem -out intermediate.cert
I would prefer to upload these certificates as ‘.p12’ format to the SAP Cloud Connector, hence the below commands to convert the same.
openssl pkcs12 -export -clcerts -in intermediate.crt -inkey intermediate.key -out intermediate.p12The next steps are well explained in detail over the following videos (https://www.youtube.com/watch?v=eo359fUZSJA, https://www.youtube.com/watch?v=cbQ8Fy9TBbY, https://www.youtube.com/watch?v=gt_Ja9ldHnY)
For quick reference and completeness, I have mentioned here the steps. Choose as you may wish however you wanted to continue.
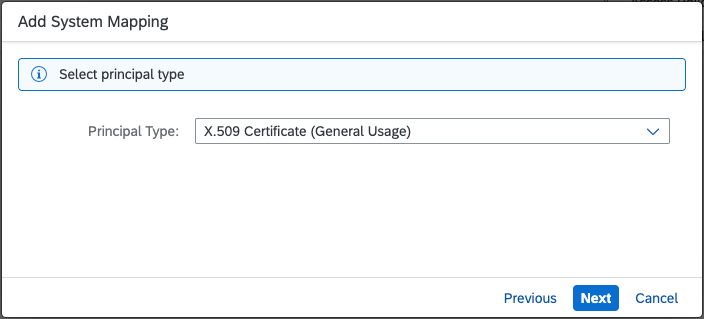
Open the SAP Cloud Connector, go to the ‘Cloud To On-Premise’ configuration and add the S/4HANA On-Premise system again by enabling the ‘X.509 Certificate (General Usage)’ in the Principal Type with the virtual host ‘s4hana-pp’.
Go to the PRINCIPAL PROPAGATION tab and click on Synchronise button to get the Trust Configuration from the connected Subaccount.

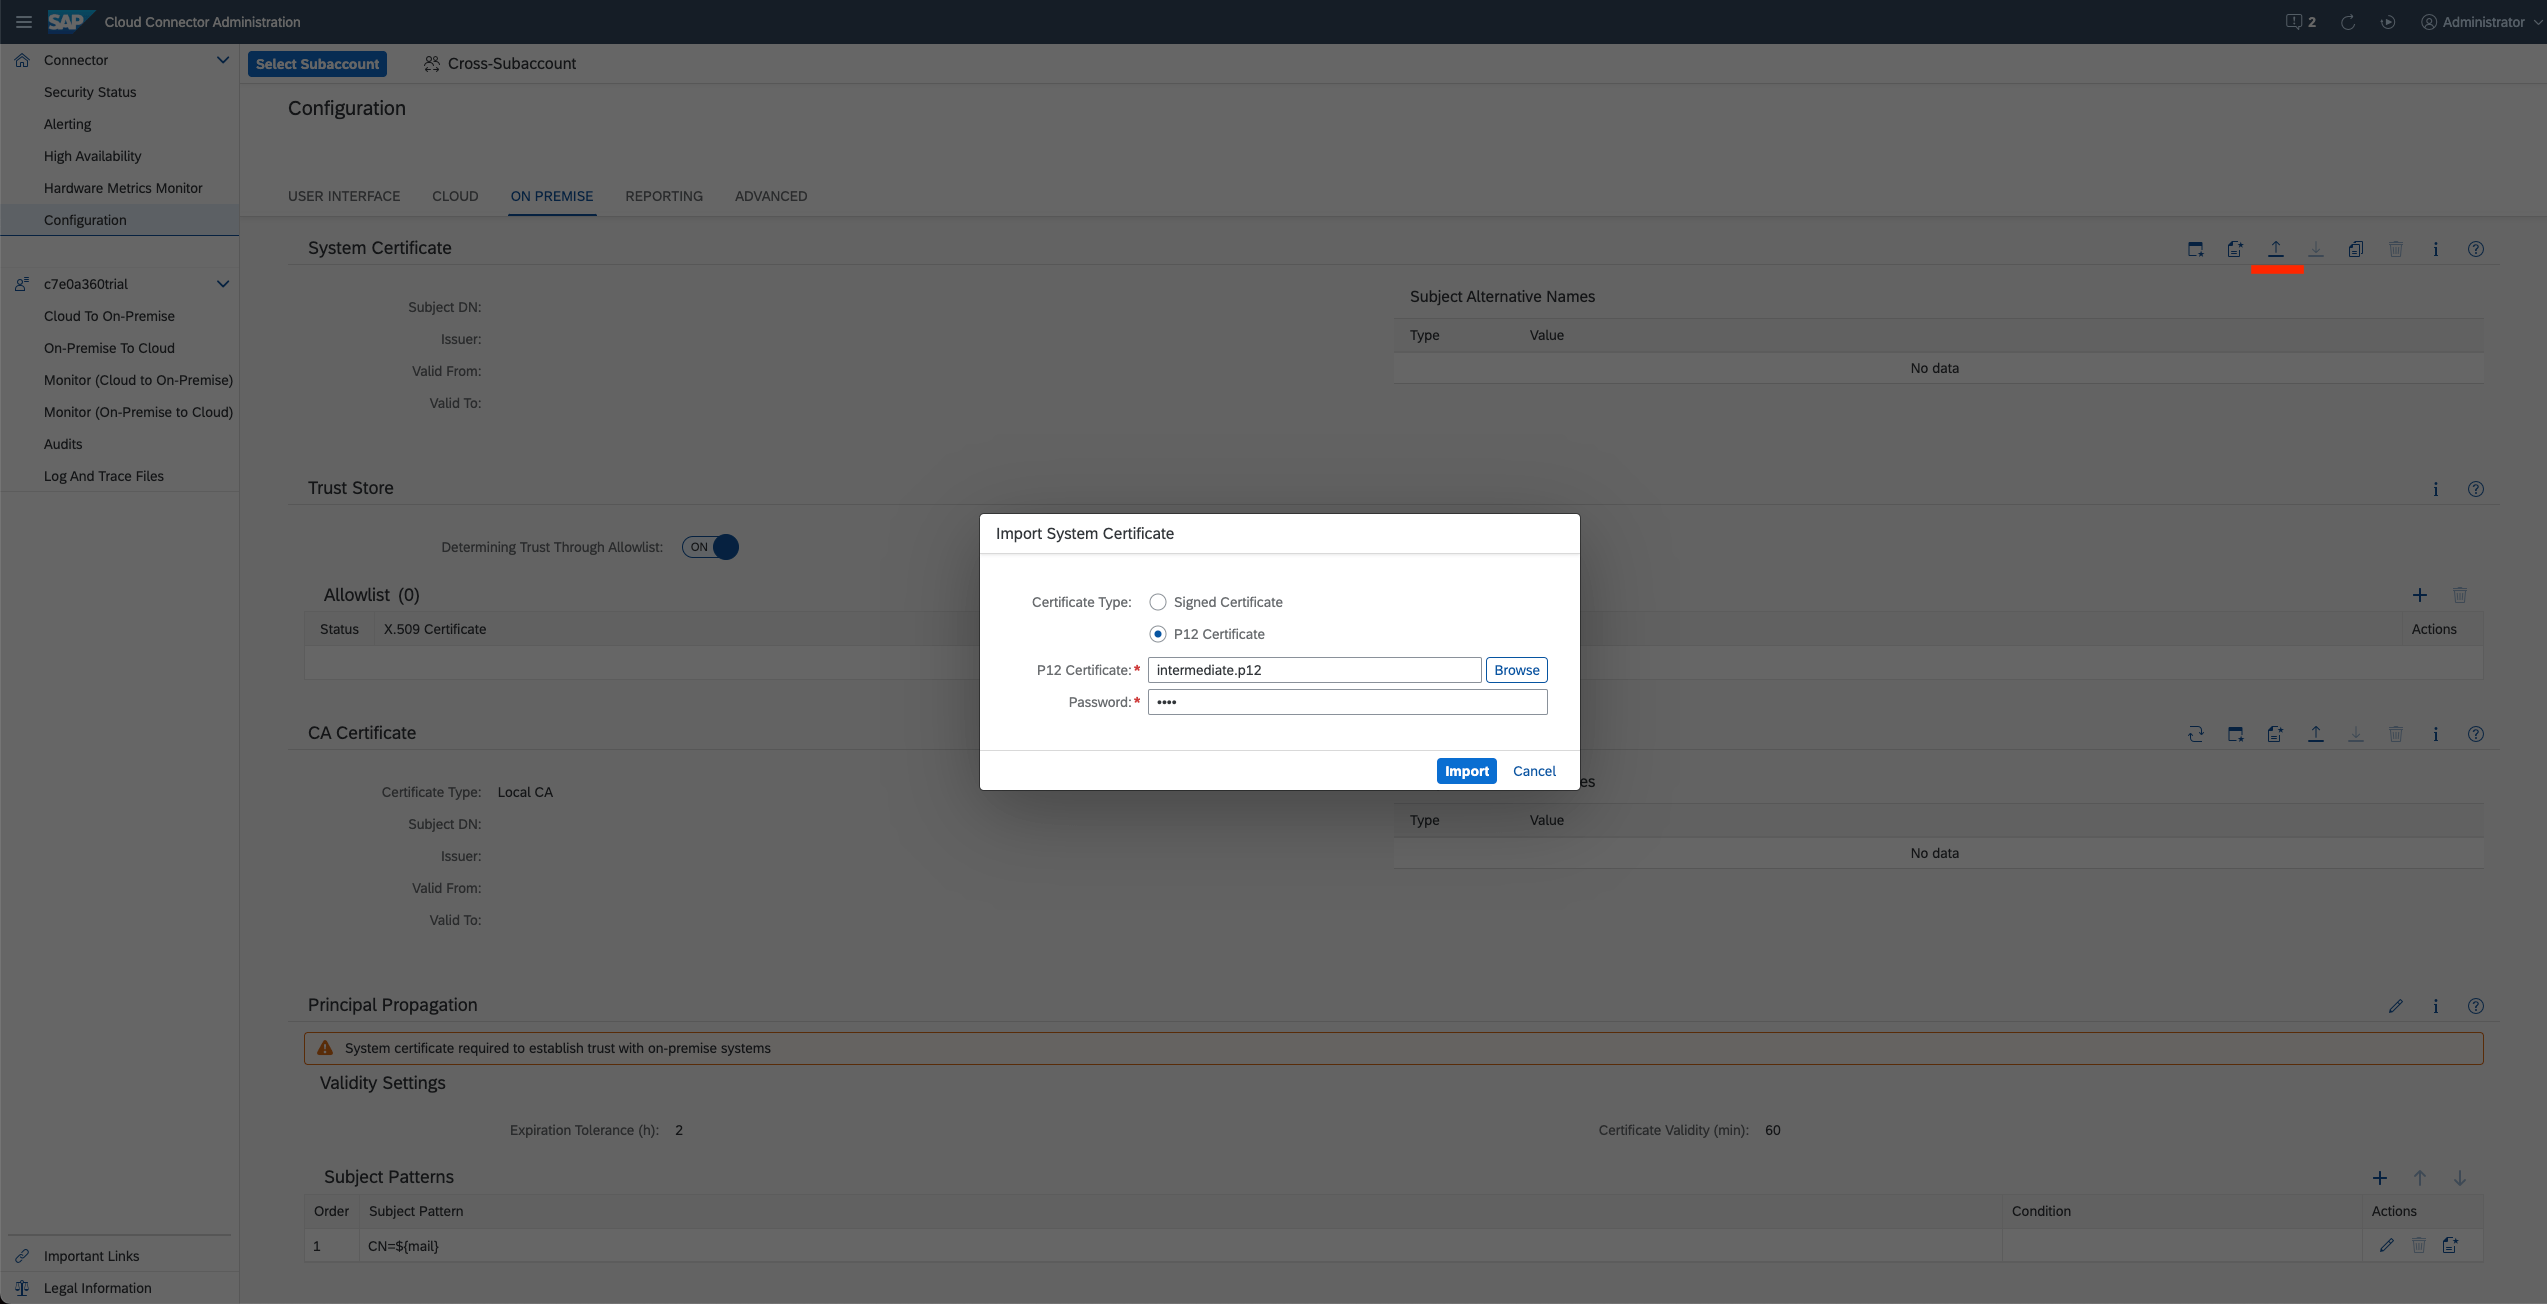
go to Configuration -> ON PREMISE, for the System Certificate click on ‘Import a Certificate’ and import the intermediate.p12
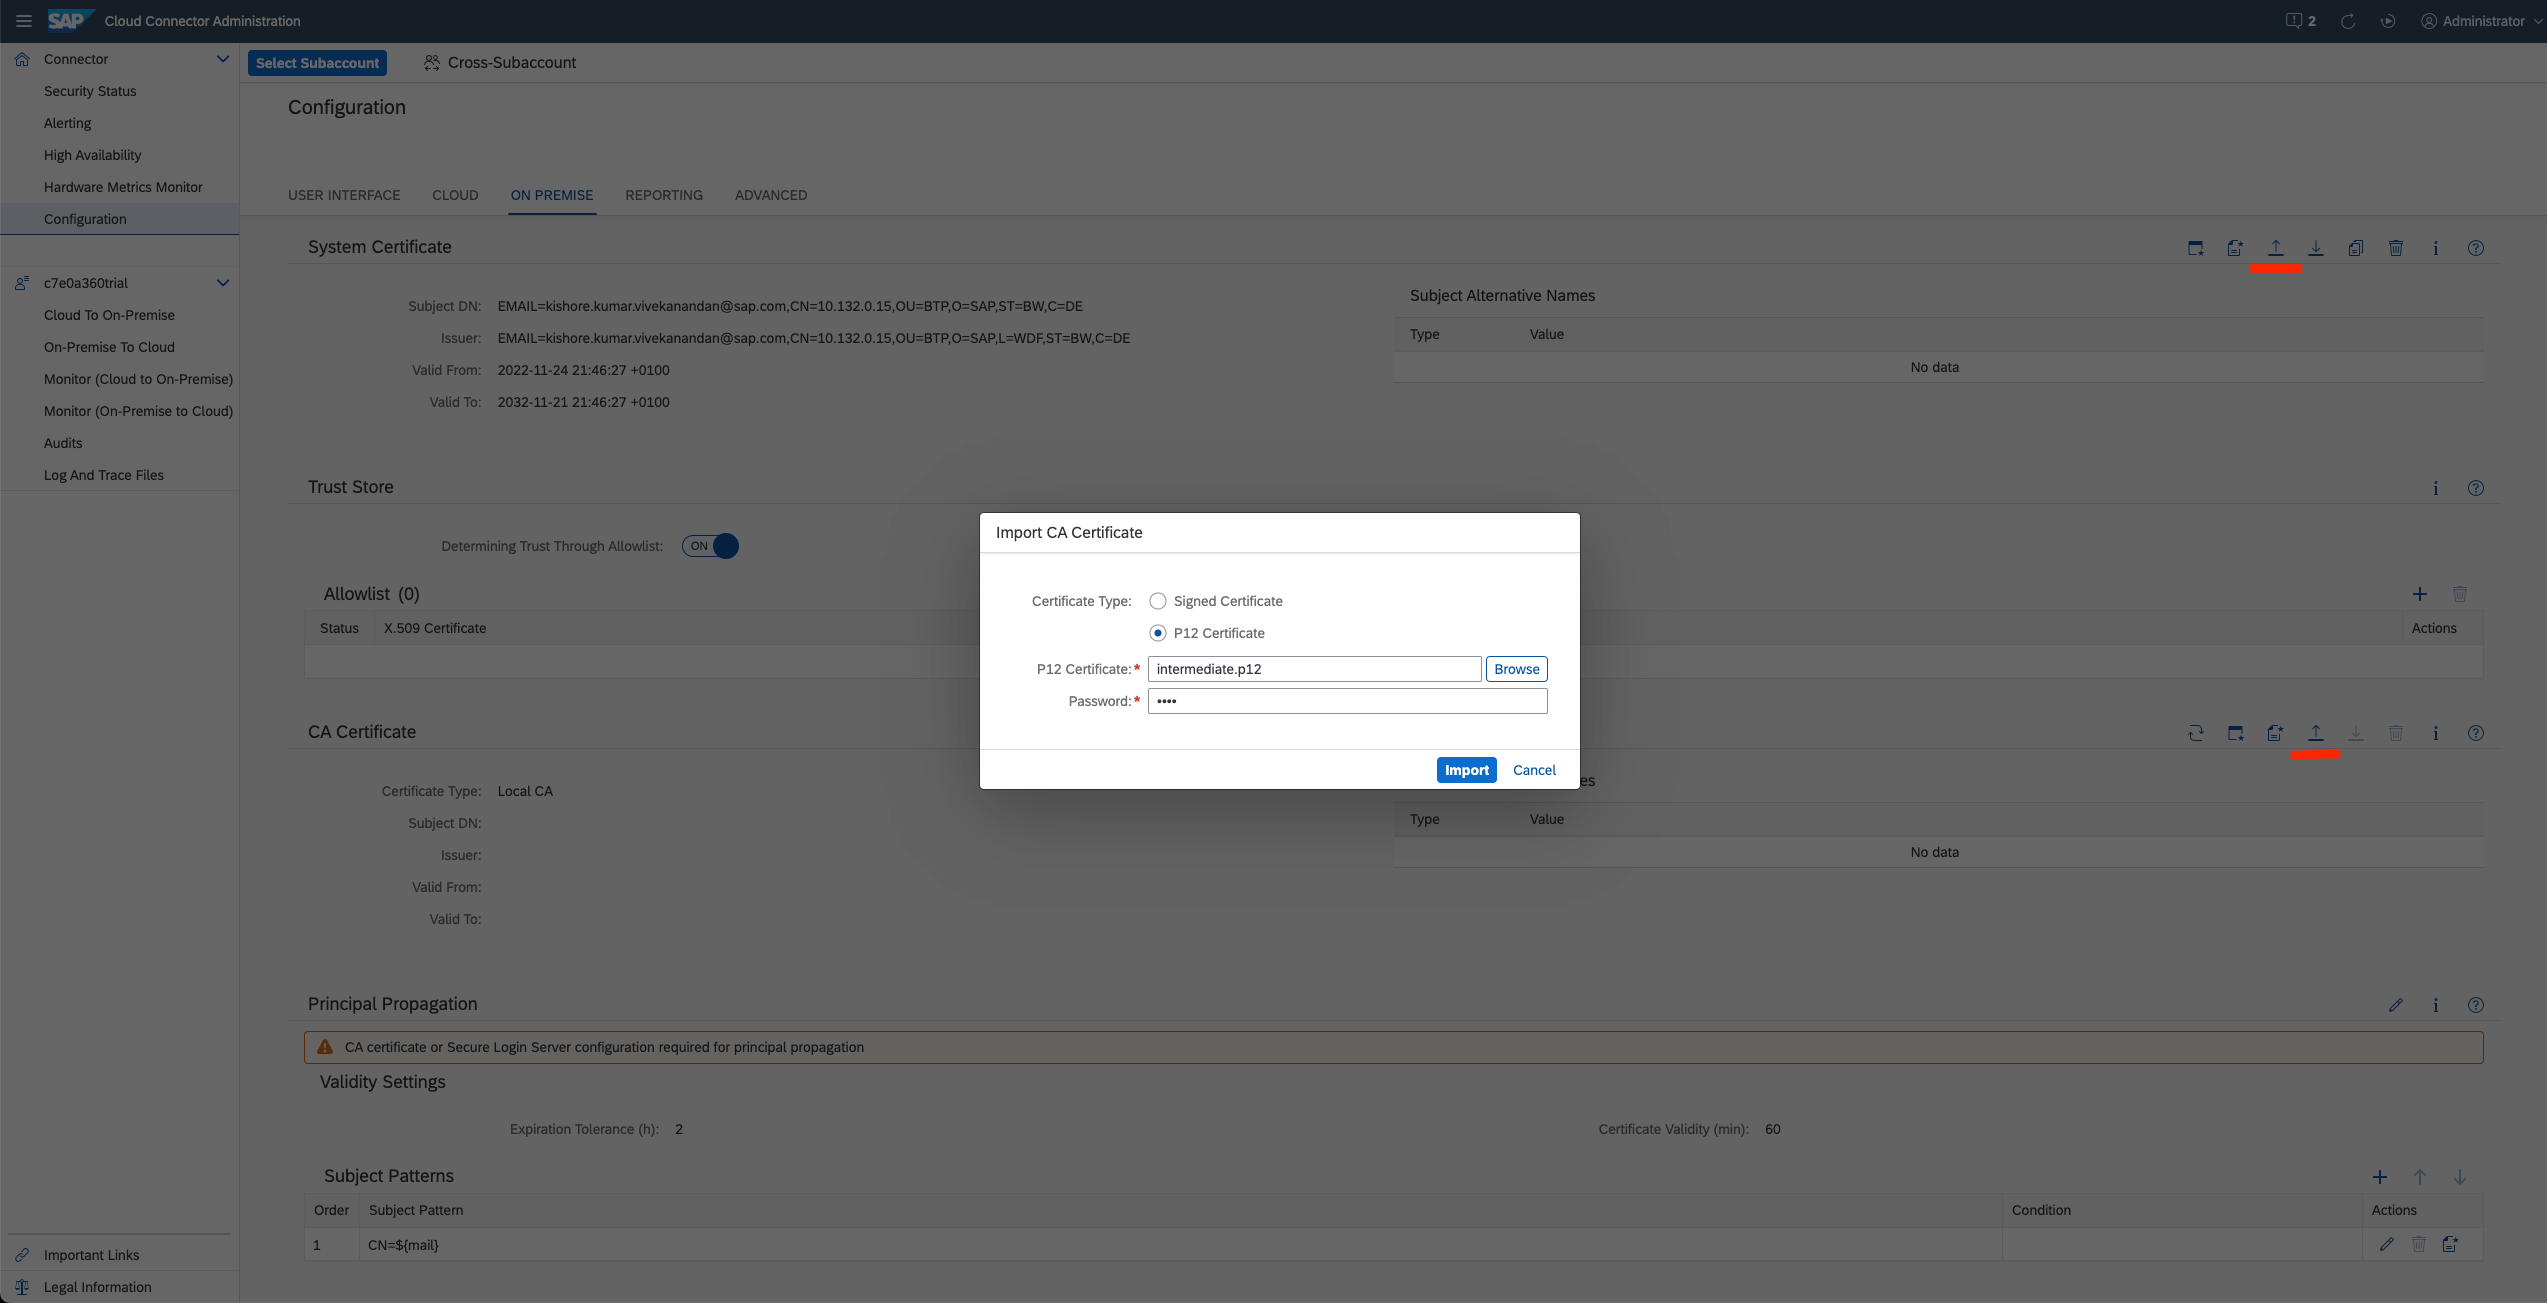
Do the same as well for the CA Certificate importing the intermediate.p12.
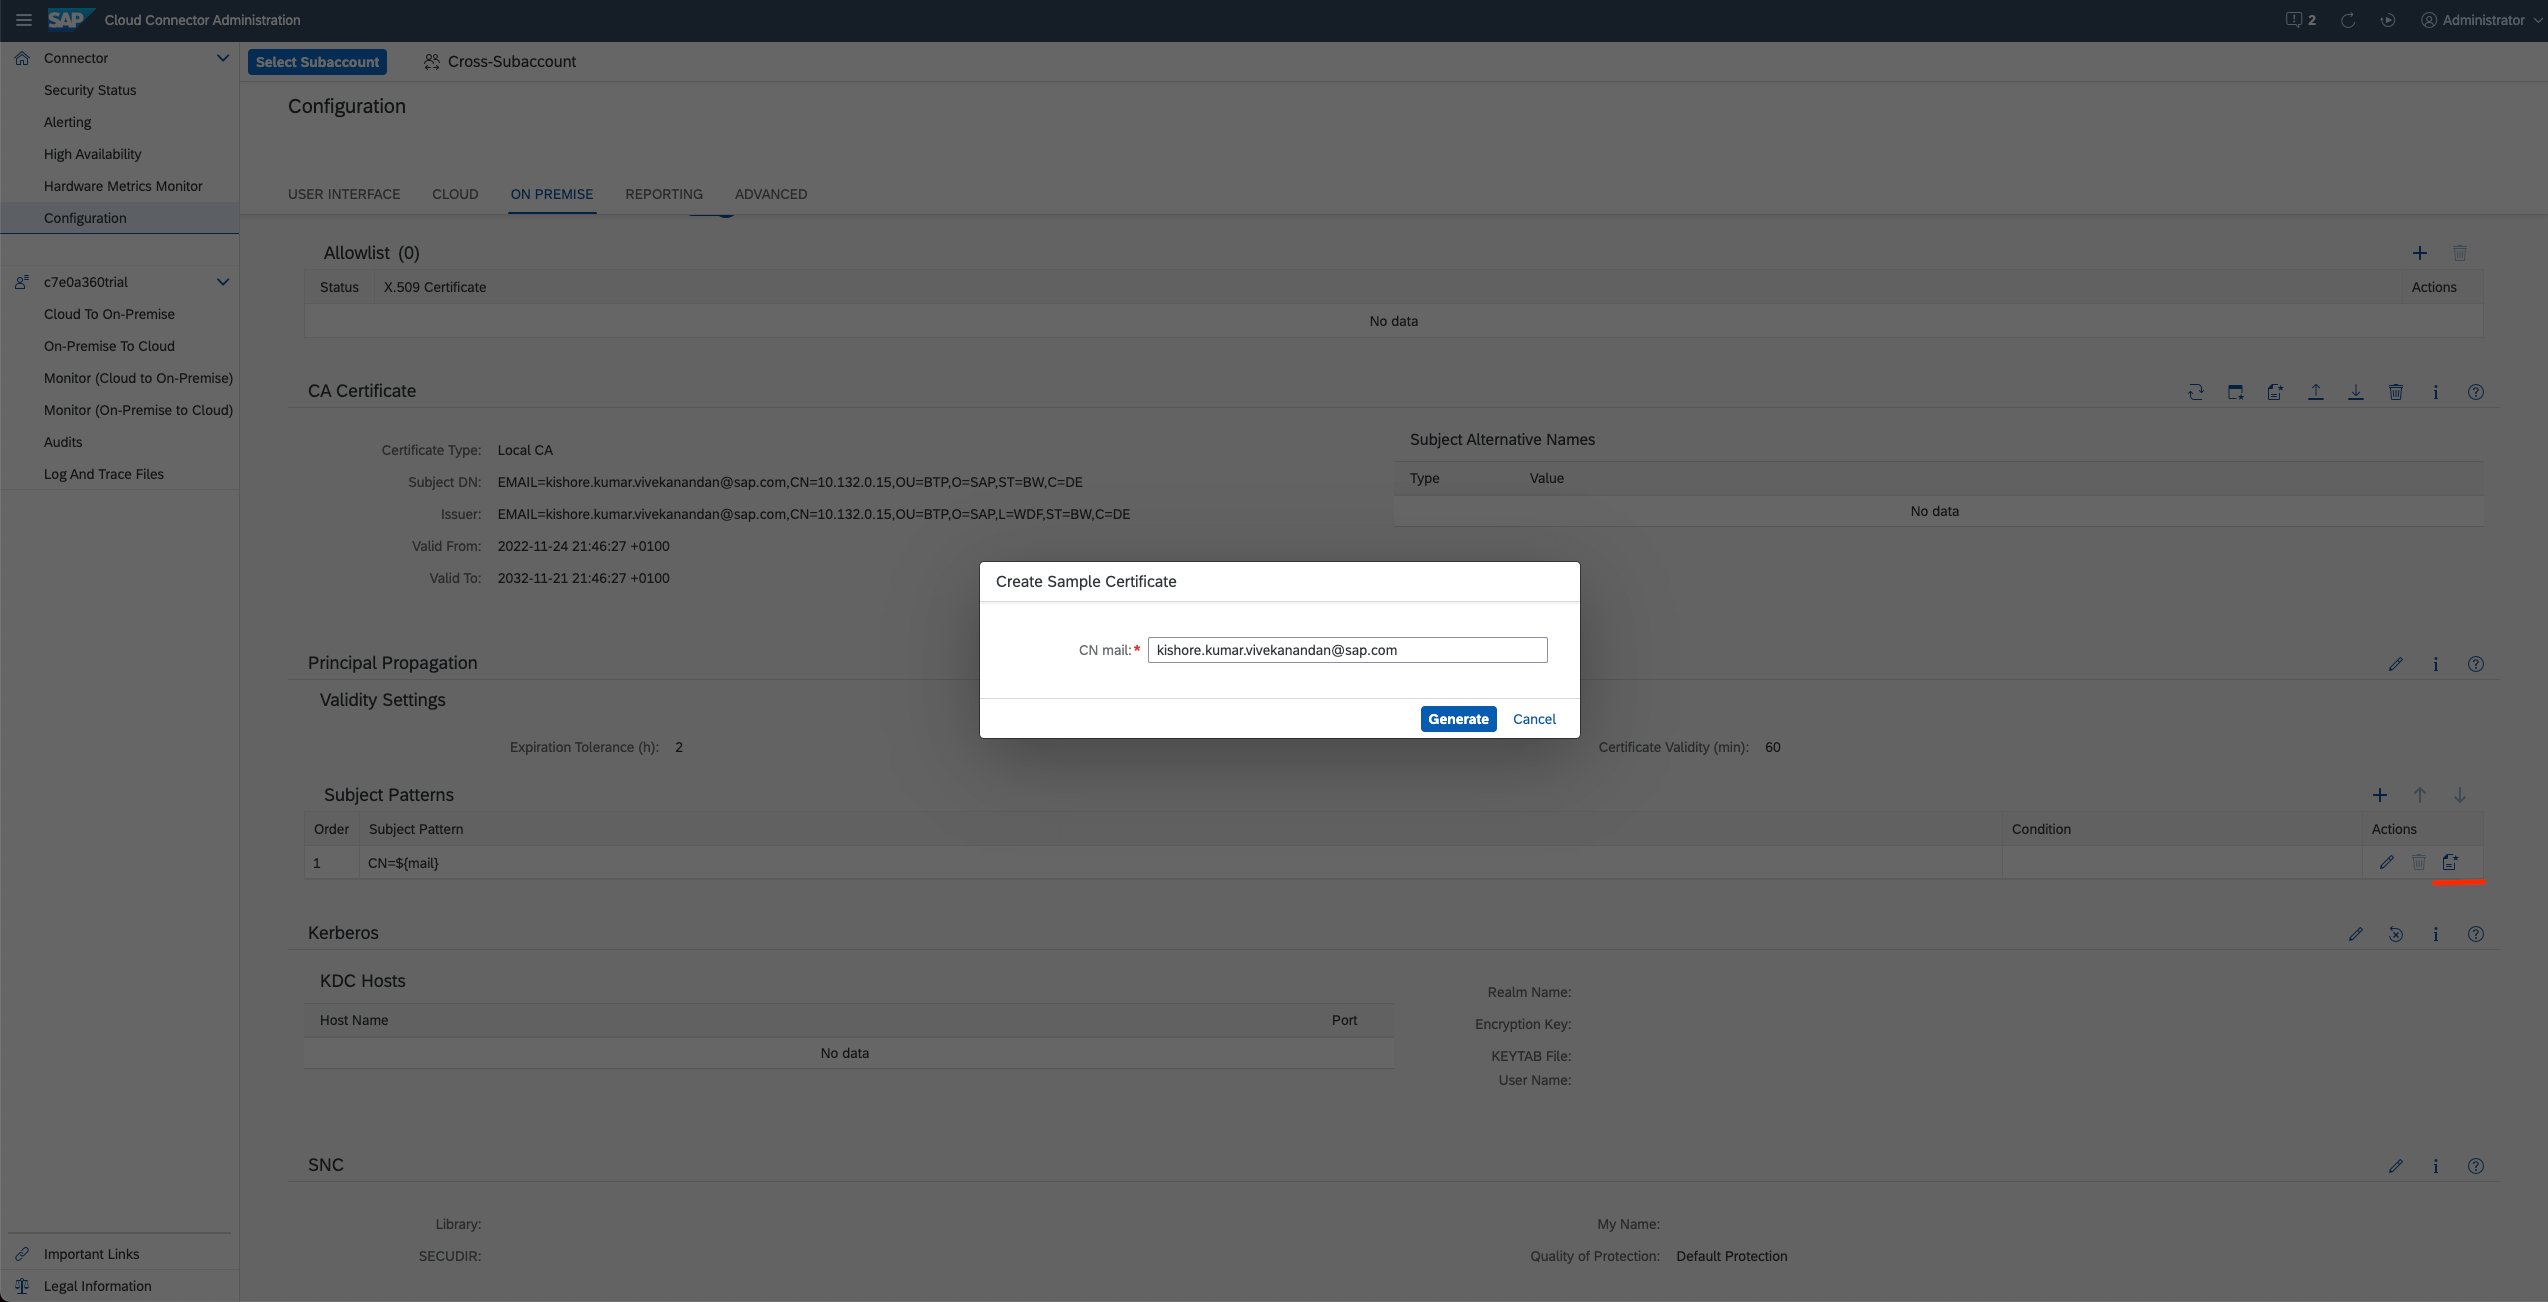
In the Principal Propagation, using the Subject Patterns CN=${mail}, create a sample certificate and enter your email address (BTP Email address, the same which is used during the certificate generation process) and download it.
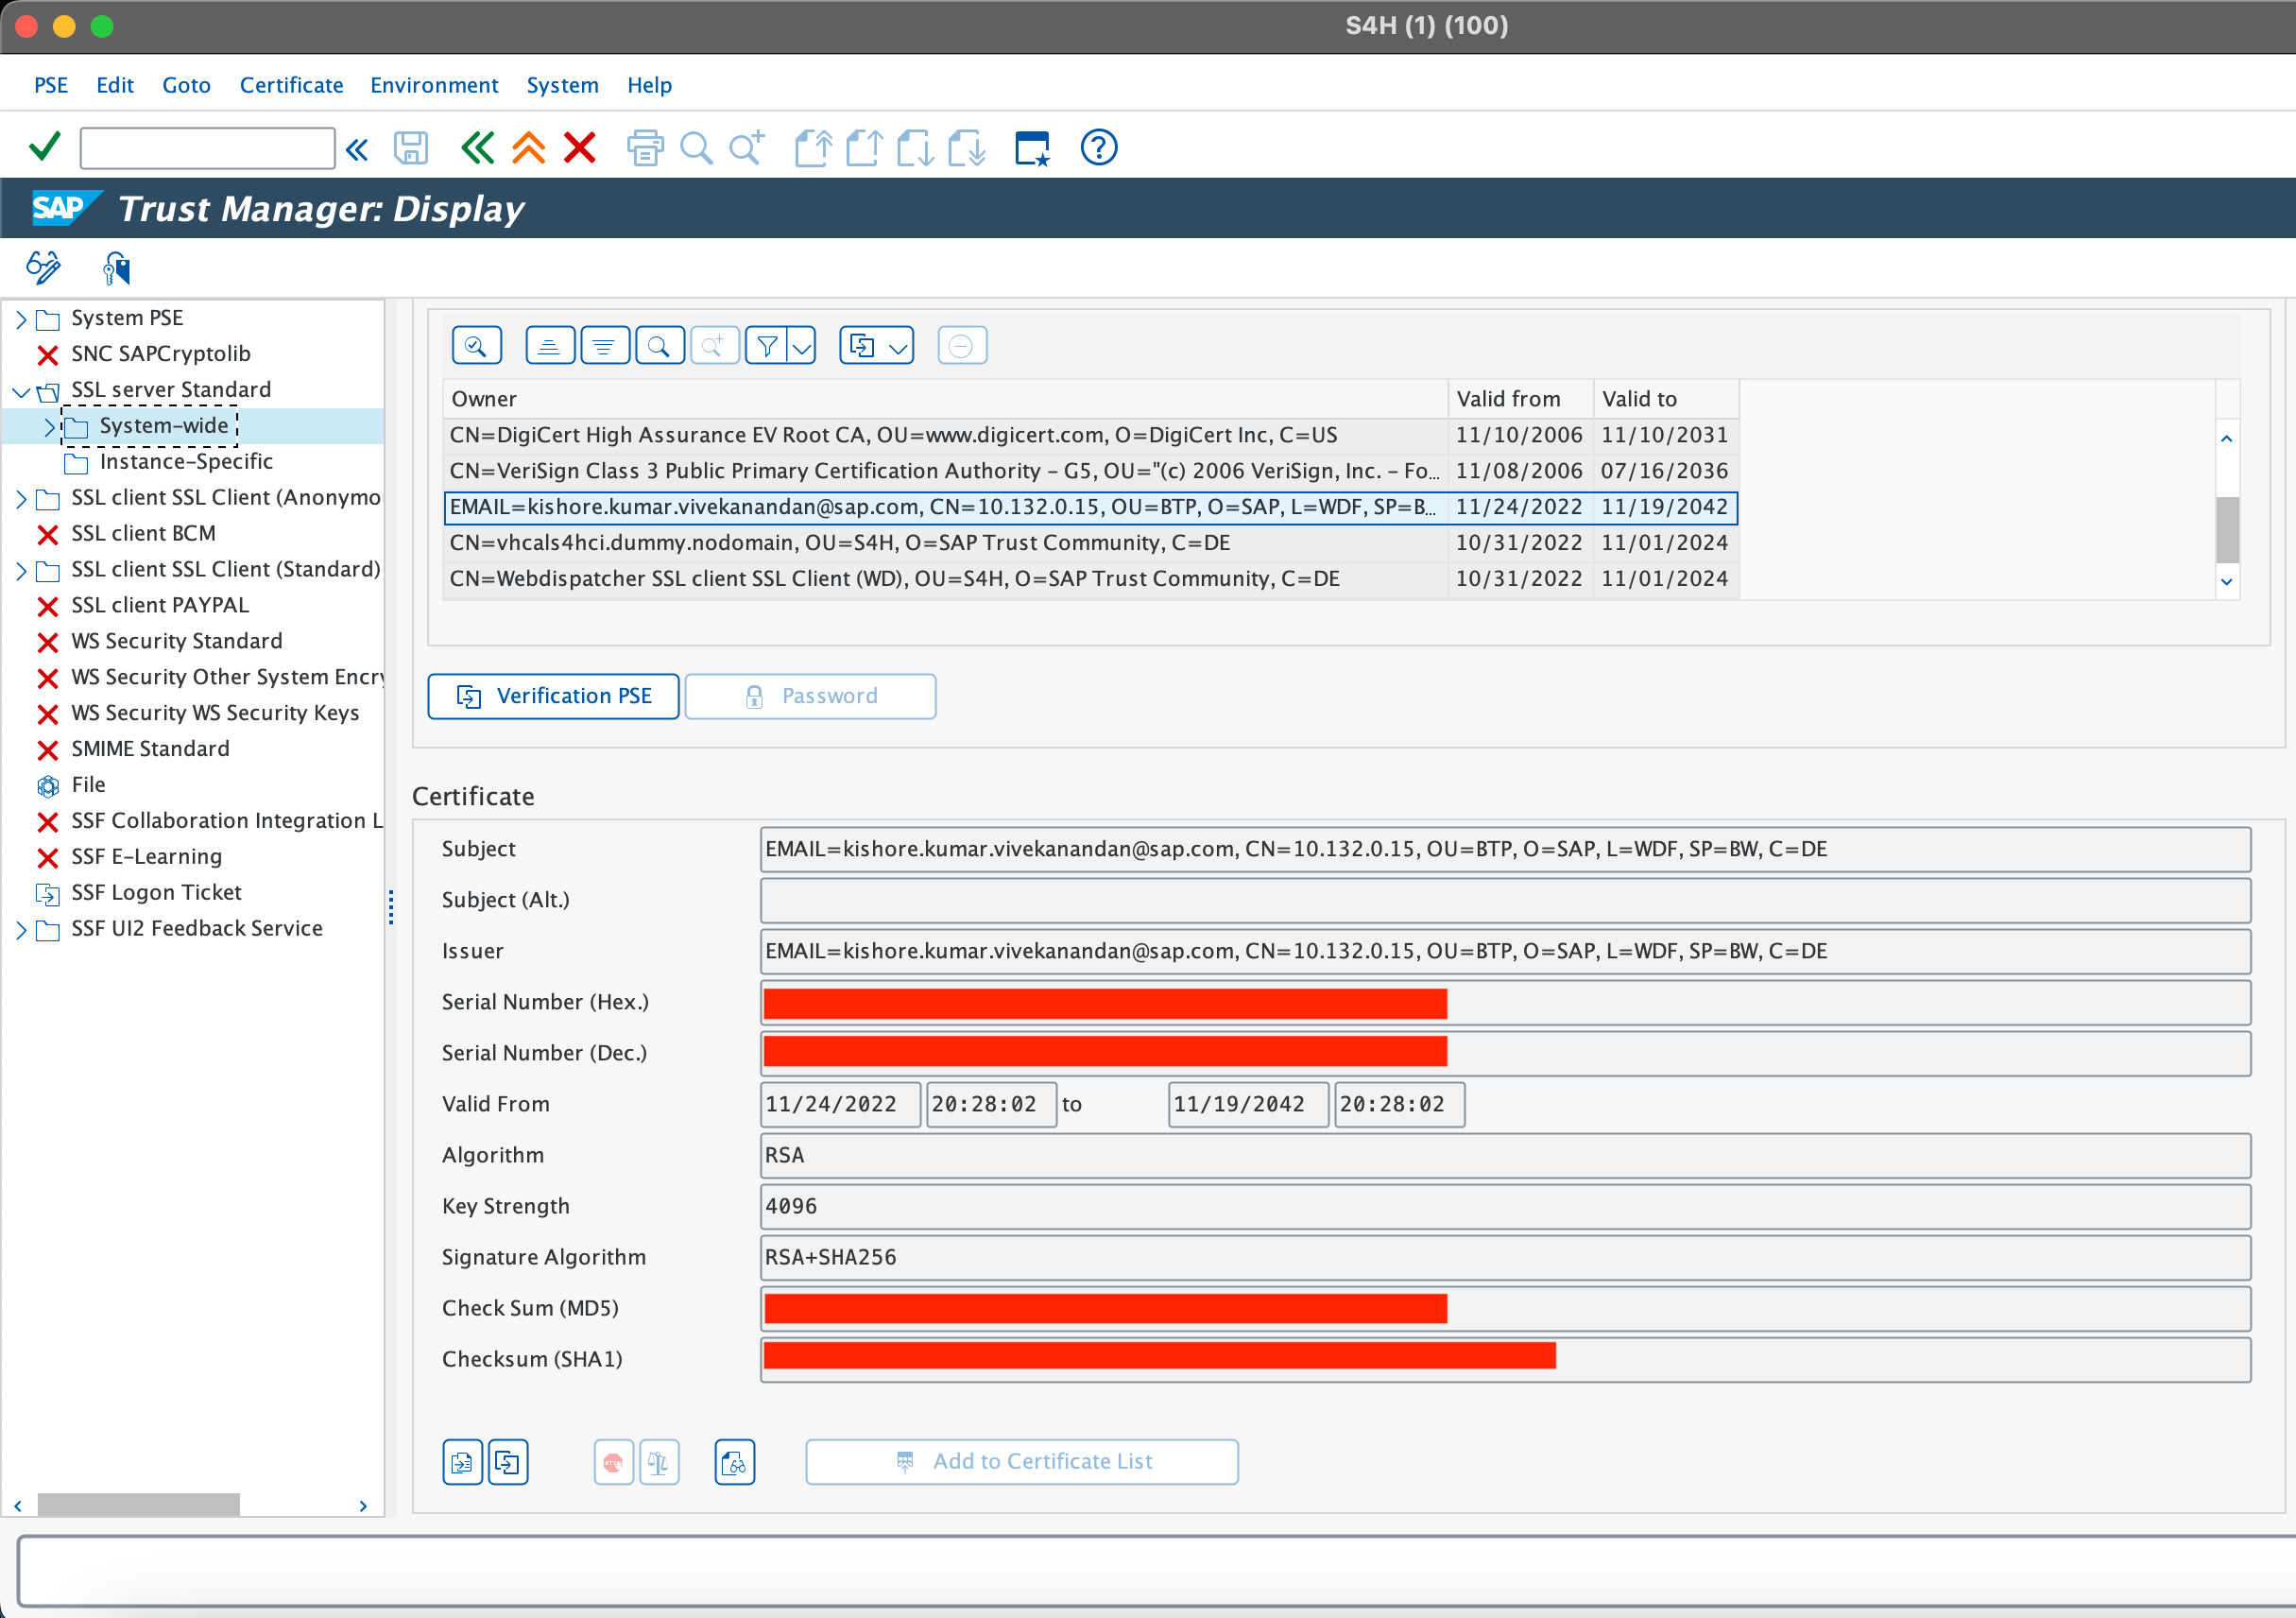
Now go to the On-Premise ABAP system, open the transaction STRUST and Import the Root CA ‘ca.crt’ under ‘SSL server Standard’ -> ‘System-wide’ -> select your system and Add to Certificate List.
Go to the Transaction RZ10 and select the profile of your Instance, select ‘Extended Maintenance’ and click on Change to add the following parameters. Hint: The value of this parameters should be the same from the SAP Cloud Connector CA Certificate attributes.
login/certificate_mapping_rulebased – 1
icm/HTTPS/verify_client – 1
icm/HTTPS/trust_client_with_subject – <From SCC>

icm/HTTPS/trust_client_with_issuer – <From SCC>
Save the changes and Activate the profile.
Go to transaction SMICM and on Administration -> ICM -> Hard Shut Down -> Global. Hint: In case of S/4HANA CAL do Administration -> ICM -> Exit Soft -> Global for the Parameters to take effect.
You can check the same from Goto -> Parameters -> Display to check if everything is updated.
Go to transaction CERTRULE, on an Edit mode, click on Import Certificate and upload the file ‘scc_sample_cert.der’ which was downloaded before from SCC from the Principal Propagation option.
After importing click on the ‘Rule’ button and set the Certificate Attribute as CN=’BTP EMAIL Address’.
Save on top and you should see the Mapping Status and User Status as Successful (in GREEN) Certificate Mapped with rule ‘index of the rule’ & Mapped user exists.
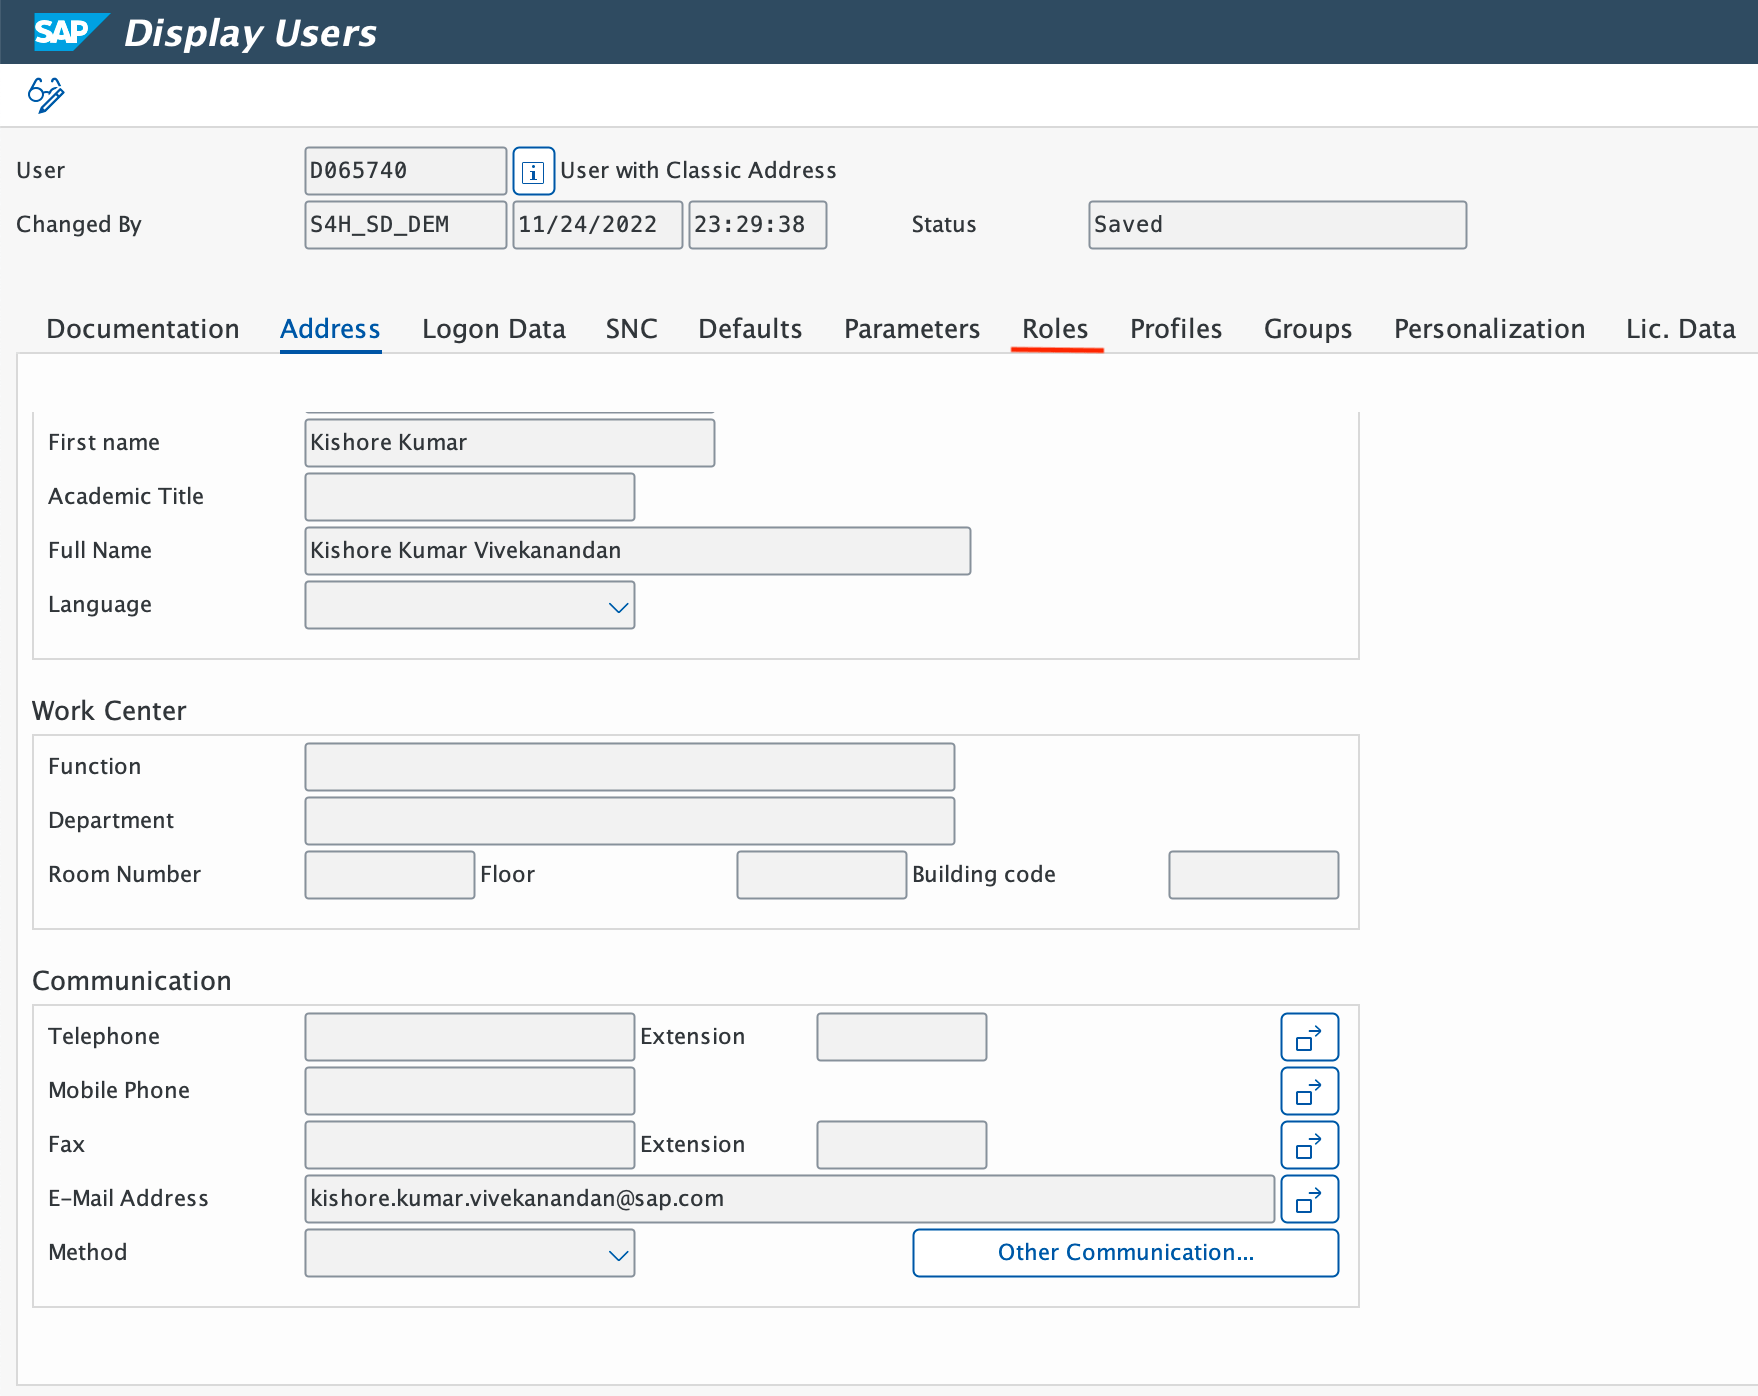
Go to transaction SU01 to check your Principal Propagation User with BTP Email mapped to it, also has all the necessary roles assigned to talk to Sales Order scenario.
Go back to BTP Cockpit, update the destination in your subaccount to connect with S/4HANA Principal Propagation enabled entry (virtual host: s4hana-pp) from SCC.

Go to SAP Business Application Studio and update the destination (s4hana-pp) on your Sales Order Fiori Application in ui5.yaml.
server:
customMiddleware:
- name: fiori-tools-proxy
afterMiddleware: compression
configuration:
ignoreCertError: false # If set to true, certificate errors will be ignored. E.g. self-signed certificates will be accepted
ui5:
path:
- /resources
- /test-resources
url: https://ui5.sap.com
backend:
- scp: true
path: /sap
url: http://s4hana-pp:44300
destination: s4hana-pp
Save and Run your Fiori Application from Business Application Studio.
Now go to On-Premise ABAP system and to the transaction SM05 to check the logged in session details. You should be able to see your Principal Propagation User worked with X.509 certificate instead of the password based Basic Authentication (KW).

