Introduction:
This blog post explains the new functionality of posting GR in EWM and ERP using the MIGO transaction code or Goods movement app simultaneously..
There are few other blog posts already available in the community related to other scenarios to post the synchronous goods movement.
This feature is available in S/4 2020 FSP01 embedded system onwards.
The synchronous goods movement functionality is available for multiple document types such as production order/process order/purchase order/STO/scheduling agreement/reservations/etc. related to Goods Receipt and Goods Issues based on the scenario.
With this functionality, the goods receipt process can be done based on the external procurement ((for example, based on purchase orders or scheduling agreements)) in the Extended Warehouse Management (EWM) embedded and in the ERP system in SAP S/4HANA at the same time without the creation of the inbound delivery and warehouse request documents.
This functionality comes in handy when you have the fixed bin or know the bins related to the specific products in the warehouse. The warehouse worker can directly perform the confirmation if there are no VAS or the QI activities. This will reduce the overall time taken to complete the putaway process.
The user can perform IM and EWM related good receipts simultaneously using the same purchase order.
The Goods movement app can also be used to post the goods movement document.
Synchronous Goods Movement is not available in decentralized EWM based on SAP S/4HANA.
Advantages:
- This process allows to perform the direct putaway if the user knows the destination bin.
- Using this approach, the system avoids creating multiple warehouse related documents.
- Avoids open queues due to synchronous posting of the document.
- The errors can be analyzed online while performing the goods movement. The system doesn’t post the document if there are errors in either of the systems.
- No inventory mismatch between the systems since the posting happens synchronous
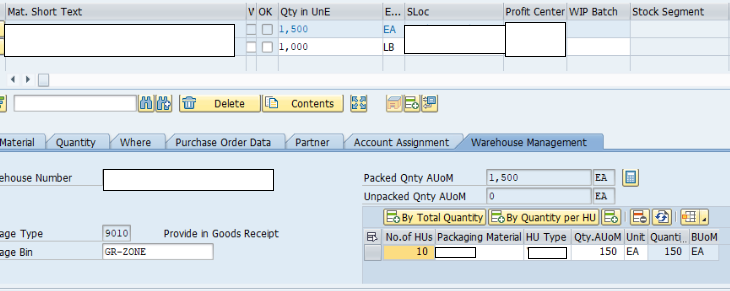
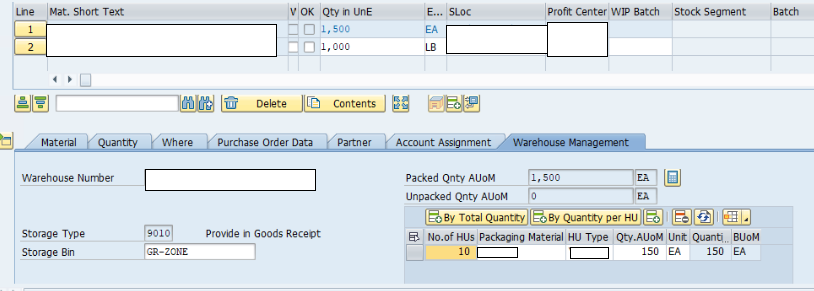
- The HU can be created using the multiple packing functionalities. Manual packing is also possible using the warehouse management tab.
- No inbound delivery documents.
- Mix GR for MM-IM and EWM storage locations in one posting.
Deployments:
- EWM in S/4HANA OP 2020 FPS1
- EWM in S/4HANA CE 2011
- Not supported in decentralized EWM.
Prerequisites:
- The configuration related to synchronous goods movement is activated ( It comes pre-activated in system).
- No Confirmation Control Key maintained in the document to trigger this functionality.
- The packaging specifications/packing instructions are created for the auto generation of the HUs.
Configuration Steps :
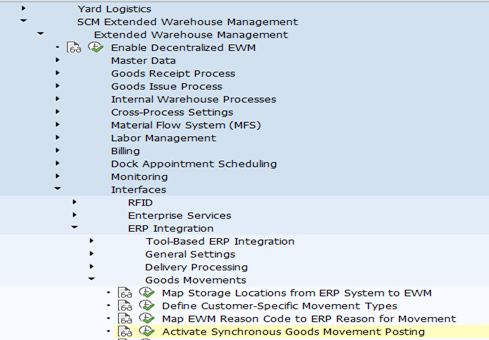
- Activate Synchronous Goods Movement Posting.
- IMG Path – SPRO –> IMG –> SCM Extended Warehouse Management –> Extended Warehouse Management –> Interfaces –> ERP Integration –> Goods Movements –> Activate Synchronous Goods Movement Posting.
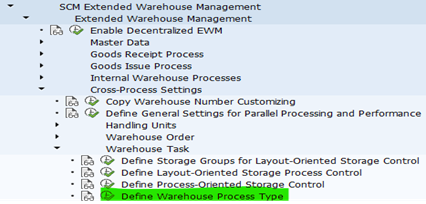
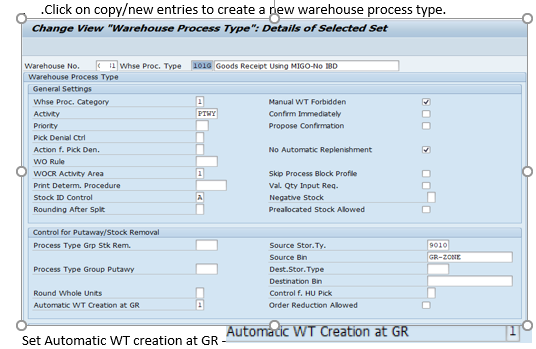
- Create Warehouse Process type for Goods Receipt from MIGO
- IMG Path – SPRO –> IMG –> SCM Extended Warehouse Management –> Extended Warehouse Management –> Cross-Process Settings –> Warehouse Task –> Define Warehouse Process Type
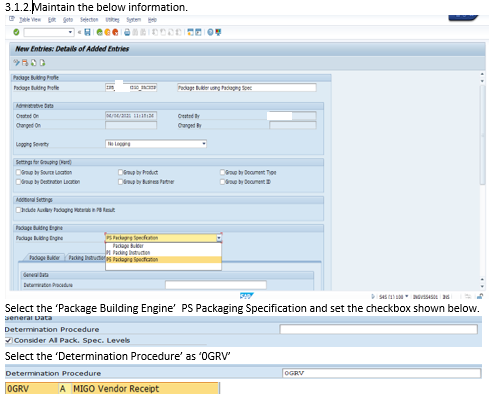
- Maintain Package Building Profile/Define Package Building Profile.
- Packaging proposal can be either from
- Packaging Specification
- Packing Instruction
- Package Builder
- Packaging Specification
- IMG Path – SPRO –> IMG –> Transportation Management –> Planning –> Package Building –> Define Package Building Profile.
- EWM Packaging Specifications
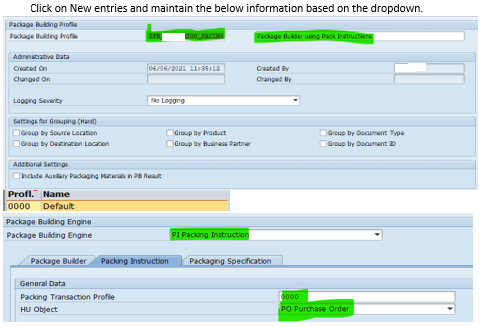
- Packaging proposal can be either from
- ERP Packaging Instructions
- Package Builder – N/A
Note :- The above config can be viewed in EWM node as well with the minimal information.
IMG Path – SPRO –> IMG –> SCM Extended Warehouse Management –> Extended Warehouse Management –>Goods Issue Process –> Cartonization Planning –> Package Building –> Define Package Building Profile.
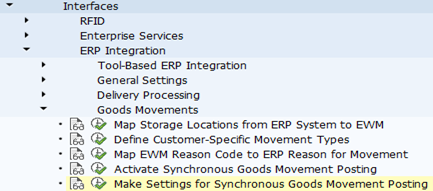
- Make Settings for Synchronous Goods Movement Posting
- IMG Path – SPRO –> IMG –> SCM Extended Warehouse Management –> Extended Warehouse Management –> Interfaces –> ERP Integration –> Goods Movements –> Make Settings for Synchronous Goods Movement Posting
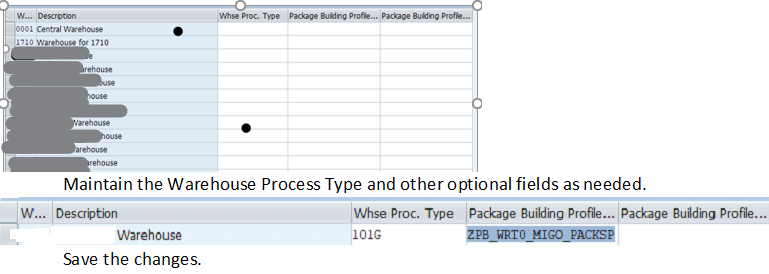
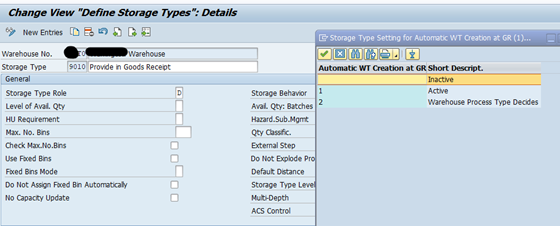
- Define/Update Storage Type – Created a separate storage type for this scenario.
- IMG Path – SPRO –> IMG –> SCM Extended Warehouse Management –> Extended Warehouse Management – Master Data – Define Storage Types
- Update the value of Automatic WT Creation at GR with 2 (Warehouse Process Type Decides)
- Define Control Indicators for Determining Warehouse Process Types.
- IMG Path – SPRO –> IMG –> SCM Extended Warehouse Management –> Extended Warehouse Management – Cross-Process Settings – Warehouse Task – Determine Warehouse Process Type

- Determine Warehouse Process Type.
- IMG Path – SPRO –> IMG –> SCM Extended Warehouse Management –> Extended Warehouse Management – Cross-Process Settings – Warehouse Task – Determine Warehouse Process Type
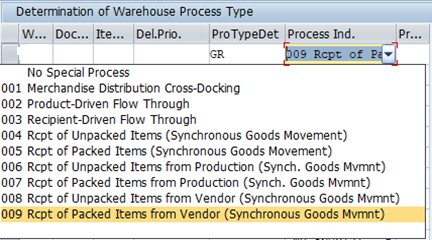

- Determine Warehouse Process Type
- IMG Path – SPRO –> IMG –> SCM Extended Warehouse Management –> Extended Warehouse Management – Goods Receipt Process – Strategies – Storage Type Search – Specify Storage Type Search Sequence for Putaway

- Goods receipt bin – how it is determined
- Staging Area and Door Determination. (/SCWM/STADET_IN)
- Goods Movement Bin from the warehouse process type (WPT)- Done above.
- Staging Area and Door Determination. (/SCWM/STADET_IN)
Master Data Set up :
- Staging Area and Door Determination.
- Maintain Product with the Product Type Control Indicator.
- Run the transaction code /N/SCWM/STADET_IN or follow the SAP Easy Access Path. SAP Menu – Logistics – SCM Extended Warehouse Management – Extended Warehouse Management – Settings – Shipping and Receiving – /SCWM/STADET_IN – Staging Area and Door Determination (Inbound)
- Note – Ship From can be maintained for this. The staging area group/staging area and warehouse door are created already.
- Run the transaction code /N/SCWM/STADET_IN or follow the SAP Easy Access Path. SAP Menu – Logistics – SCM Extended Warehouse Management – Extended Warehouse Management – Settings – Shipping and Receiving – /SCWM/STADET_IN – Staging Area and Door Determination (Inbound)
- Maintain Product with the Product Type Control Indicator.

- Access Sequence to Staging Areas and Door Determination
- Run the transaction code /N/SCWM/STADET_AS or follow the SAP Easy Access Path. SAP Menu – Logistics – SCM Extended Warehouse Management – Extended Warehouse Management – Settings – Shipping and Receiving – (/SCWM/STADET_AS – Access Sequence to Staging Areas and Door Determination

- Maintain Product with the Product Type Control Indicator (/N/SCWM/MAT1).

- Select the tab Warehouse Data and the below screen will be displayed.


For testing Purposes both the Packaging Specification and Packaging instructions are created
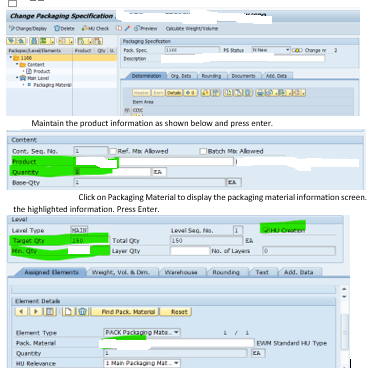
- Maintain Packaging Specification –
- Run the transaction code /N/SCWM/PACKSPEC or follow the SAP Easy Access Path. SAP Menu – Logistics – SCM Extended Warehouse Management – Extended Warehouse Management – Master Data – Packaging Specification – /SCWM/PACKSPEC – Maintain Packaging Specification – Create a pack spec with the below information
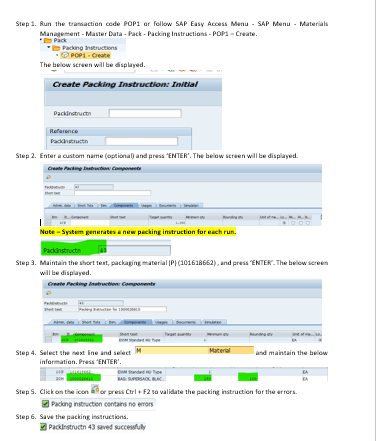
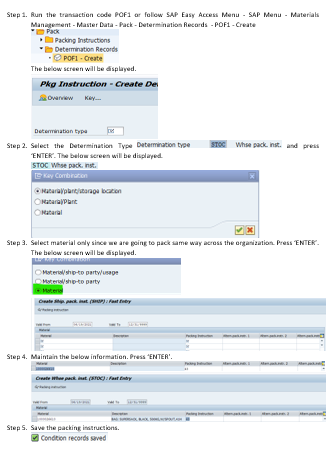
- Maintain Packing Instruction – POP1/POF1 Transaction Codes
- Packing Instructions – POP1
- Pack Determination Records – POF1
Testing –
The below scenarios are covered in this blog spots.
- Synchronous Goods Movement Posting using Staging Area (packaging specifications/packing instructions/Manual)
- Synchronous Goods Movement Posting using Direct Putaway (No Staging Area) – Direct Destination bin
- Synchronous Goods Movement Posting Cancellation
Synchronous Goods Movement Posting using Staging Area
- Purchase Order Creation – Create a PO without maintaining a confirmation control key.


- GR Posting –
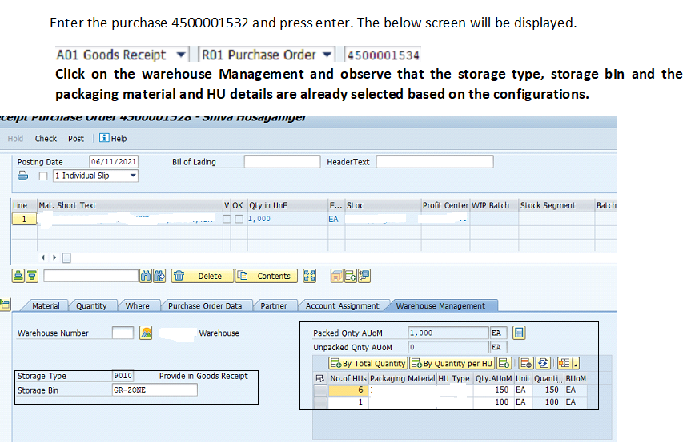
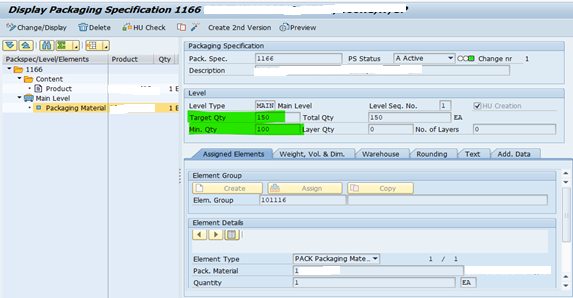
Note – 7 HU are created. 1 HU 150 each and min 100 each. The order is 1000. 6 full HUs and 1 partial.
- Pack spec details
- Post the GR document by following all the steps.

- Display the Good Receipt Document
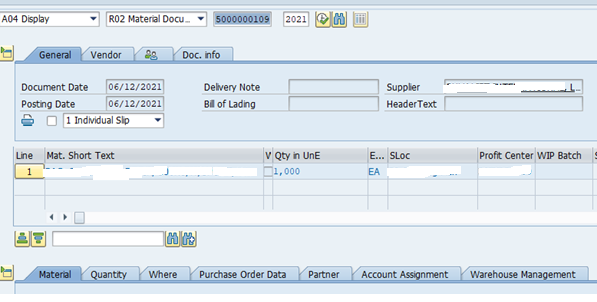
- Select the Warehouse Management tab, the system will display the warehouse task created in EWM along with the storage type and the associated bin.
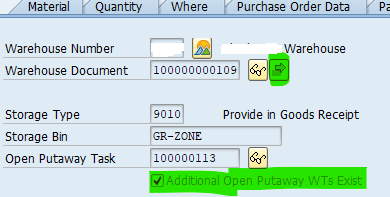
- Click on ‘Multiple Selection’ icon to open the warehouse task in EWM. The system will display the below information.

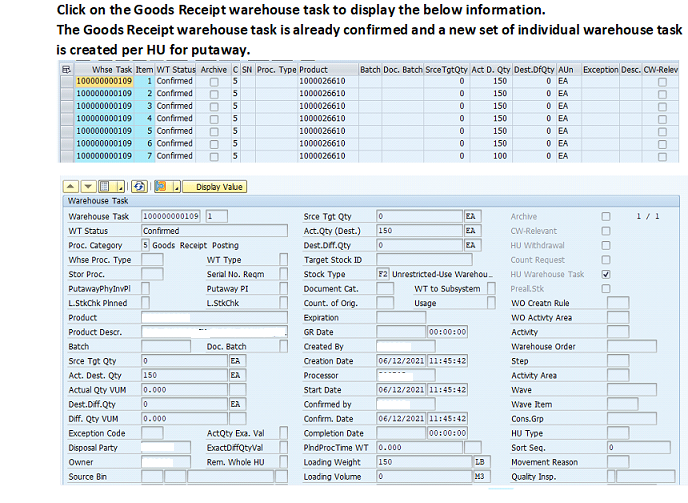
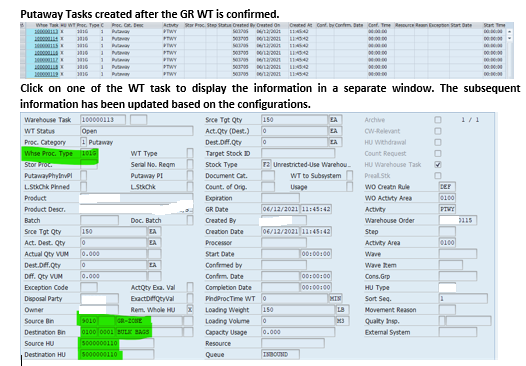
- Confirm the putaway by following the steps (not explained)
Note : – The HU creation based on
- Packaging Specifications
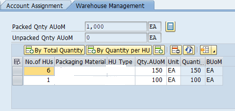
- Packing Instructions

- Manual HU Creations
- By Total Quantity
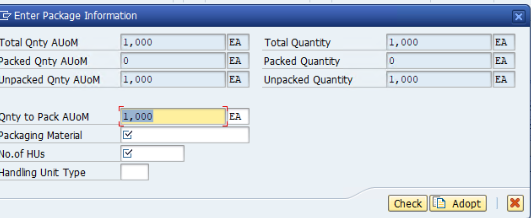
- Enter the packaging material and No of HUs, the system divides the total quantity by no of HUs.
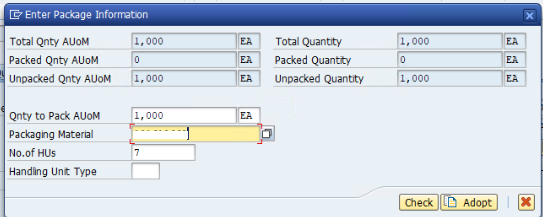
- The system doesn’t consider the preferred UOM rather it divides the GR quantity by no of HUs to calculate the number of HUs.
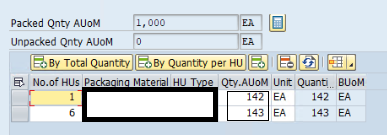
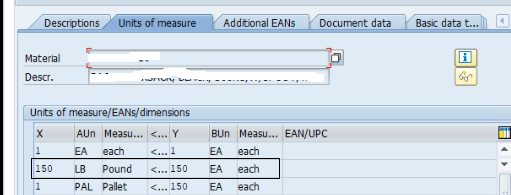
- By Quantity per HU
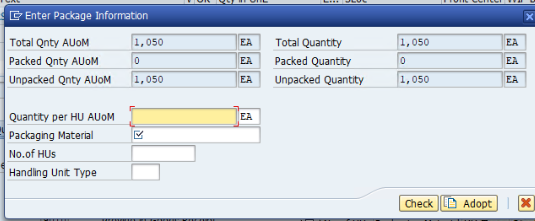
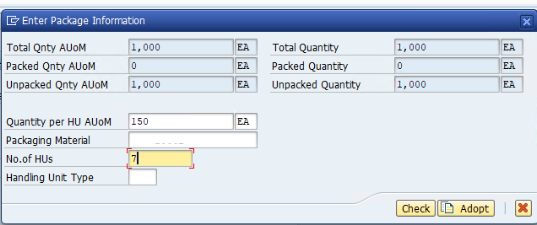
- The system assigns the number of HUs based on the quantity per HU AUOM.

Synchronous Goods Movement Posting using Direct Putaway (No Staging Area) – Direct Destination bin
Note – Only relevant screenshots are attached.
- PO Creation –

- GR Posting –
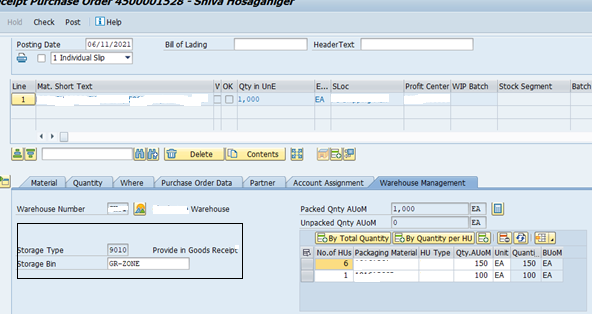
- Change the system proposed storage bin to the destination bin by dropdown and press enter to display the below information.

- Post the Goods Receipt-

- Display the Goods Receipt Document –
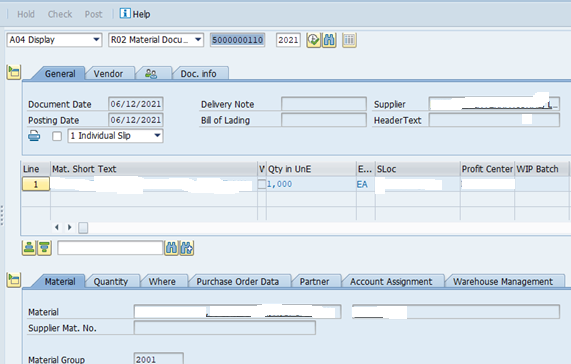
- Select the Warehouse Management tab, the system will display the warehouse task created in EWM along with the storage type and the associated bin.

- Note – there is no (multiple selection) icon since there are no open Putaway tasks and also the Open Putaway Task field is hidden.
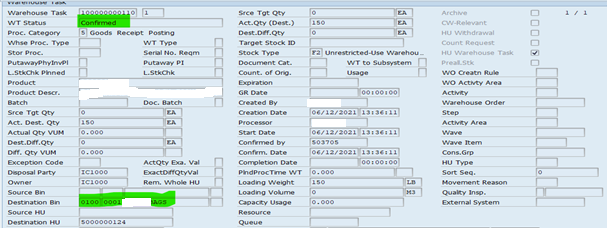
- Click on (Display Warehouse Document) icon to open the warehouse task in EWM. The system will display the below information.

- Select on one of the WT task to display the information in the below window. The subsequent information has been updated based on the configurations.
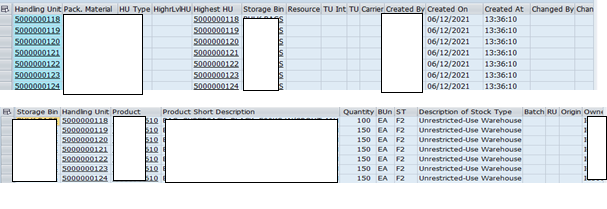
- Check the stock in the warehouse monitor based on the HUs created.
Synchronous Goods Movement Posting Cancellation after Goods Receipt Posting.
- PO has been created 4500001547 and the GR was posted with document number 5000000169.
- The GR was completed for the Purchase Order document.

- GR Cancellation using MIGO or Fiori App.
- Enter the GR document and execute.
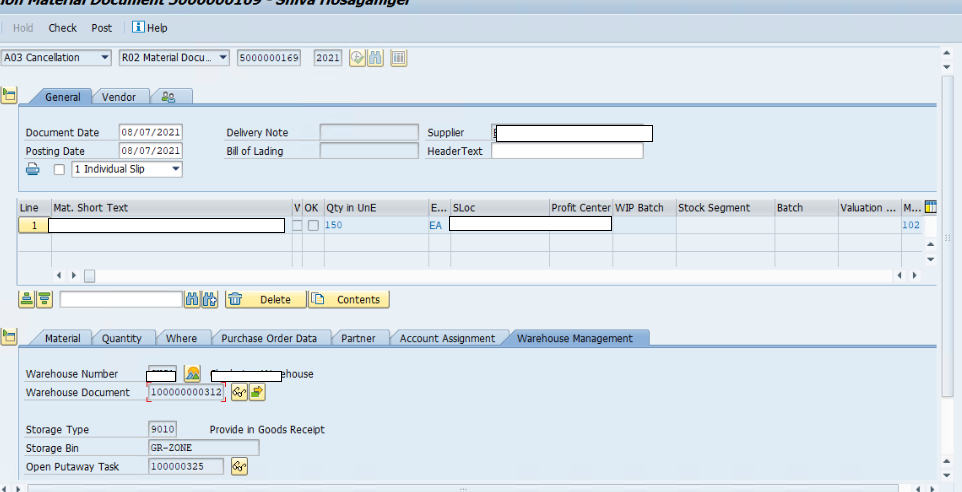
- Flag the item OK and the click on Post. The system displays the below message.

- Display GR Cancellation Document using MIGO or Fiori App.
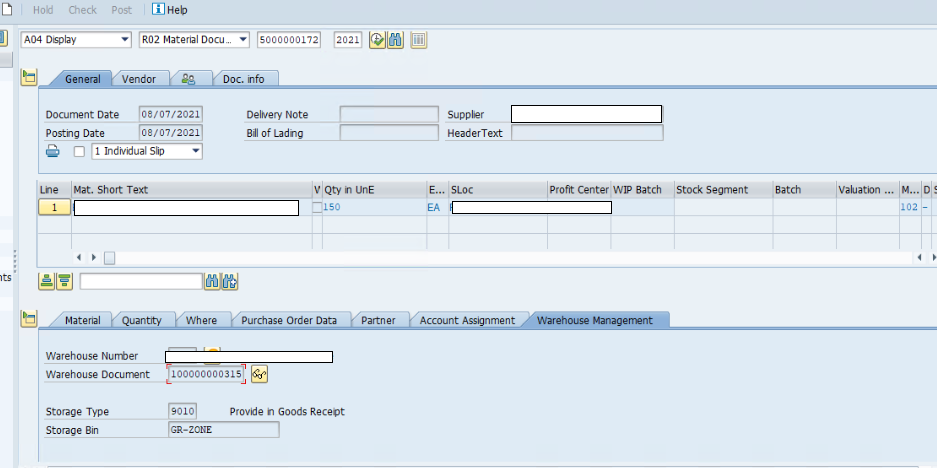
- Click on Display Warehouse Document

- HU Status – The HU is marked for the deletion.

Synchronous Goods Movement Posting Cancellation after Putaway
- PO has been created 4500001541 and the GR was posted with document number 5000000168.
- The putaway was completed for the GR document.
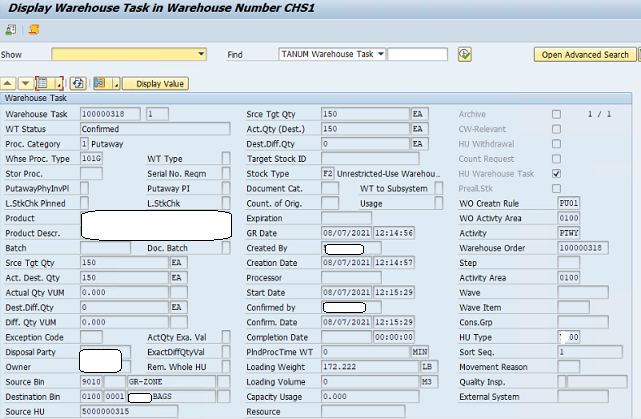
- Stock details in the bin for the HUs created.

- GR Cancellations using MIGO or Fiori App.
- Enter the GR document and execute.
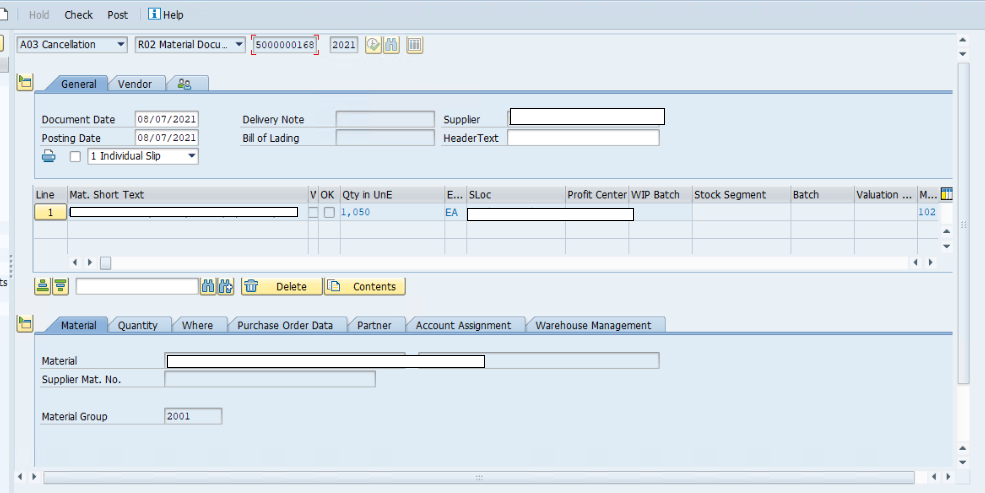
- Flag the item OK and the click on Post. The system displays the below message

Mix GR for MM-IM and EWM storage locations in one posting
- Create A PO with IM and EWM managed storage locations in same plant.
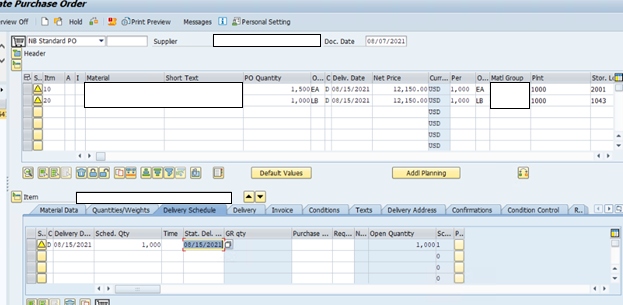

- Create GR for the PO created above.
- EWM managed storage location item details
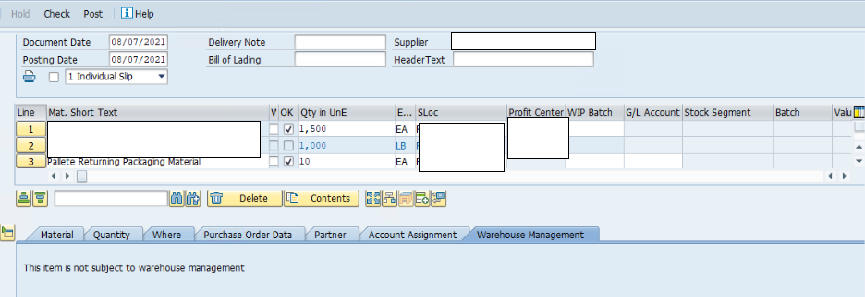
- IM managed storage location item details
- Flag the items OK and the click on Post. The system displays the below message.

- Display GR Document using MIGO or Fiori App.
- Item 10 – EWM managed storage location details
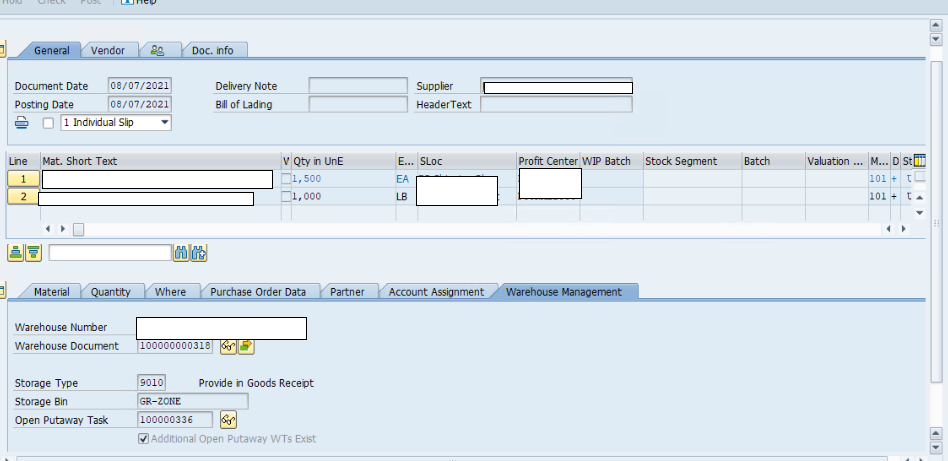
Warehouse Document Details
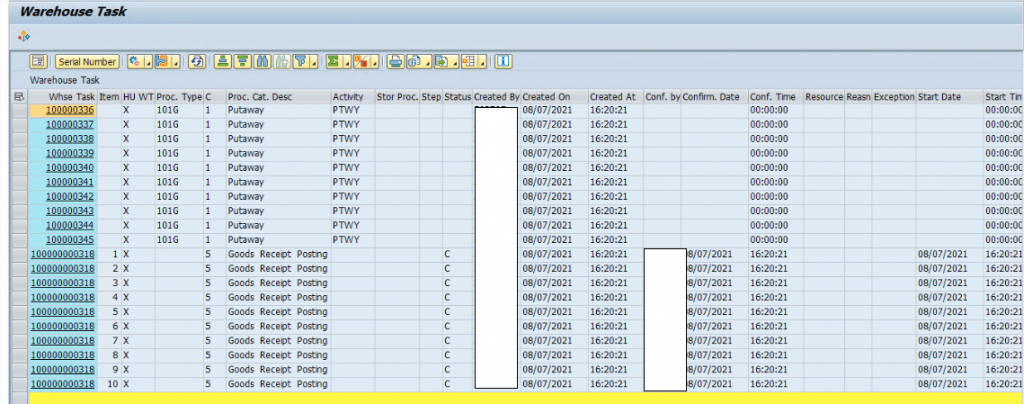
- Continue the warehouse processing to complete the putaway.
- Item 20 – IM managed storage location details

Technical Information
Warehouse Management Tab Enhancement Information
- Enhancement Spot – MB_MIGO_BADI_INT
- BADI – MB_MIGO_BADI_INT
- Standard Enhancement/BADI Implementation – /SCWM/EI_MIGO_WHSE_TAB_S4.
- Classes used in BADI implementations

- Related class
- /SCWM/CL_MIGO_PACK_S4 – Warehouse Management Tab in MIGO – Packaging Service

- MM07MFB9_BUCHEN_FOLGEDATEN

Synchronous Goods Movement Posting Class –
/SCWM/CL_EWM_GOODSMVT_SYNC – Include – MM07MFB9_BUCHEN_AUSFUEHREN
Observations :
- if the GR is completed, but the putaway is not yet completed, then the system deletes HU and moves the warehouse document to Goods Issue status.
- If the GR and putaway are both completed and the user tries to cancel the goods receipt, then the system displays an error message.

- This functionality doesn’t support manual addition of any EWM managed materials such as return packaging materials etc. It displays the below error.

- BAPI ‘BAPI_GOODSMVT_CREATE’ doesn’t support the HU based goods receipt. But this BAPI has the warehouse related fields added in the item structure.
