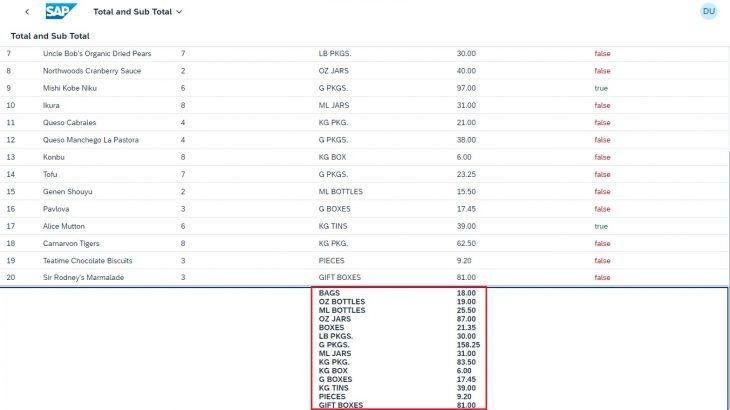
Objective: This blog post provides insights about the Total and Sub-Total of a Numerical Units in a Table using Northwind Service and how to implement in SAP Business Application Studio environment.
In this blog post, I’ll demo about Total and Sub-Total of a Numerical Units in a Table using Northwind Service.
Northwind Service: Northwind Service is an OData Sample service and consumed in SAP UI5 and Fiori Applications.
Responsive Table: The responsive table automatically adjusts its appearance and behaviour based on the available screen size, making it suitable for both desktop and mobile applications.
Use Case: The Total and Sub-total Concept in a table is commonly used in scenarios where you need to display aggregated values for columns like Amount/Prices based on certain criteria like Quantity,Unit ect. For this case i came up with this solution.
In this scenario, we’ll assume a simple sales order table with columns like Product, Quantity, Unit and Price.
So, let’s get started,
Step 1: Creating an Application in Projects Folder
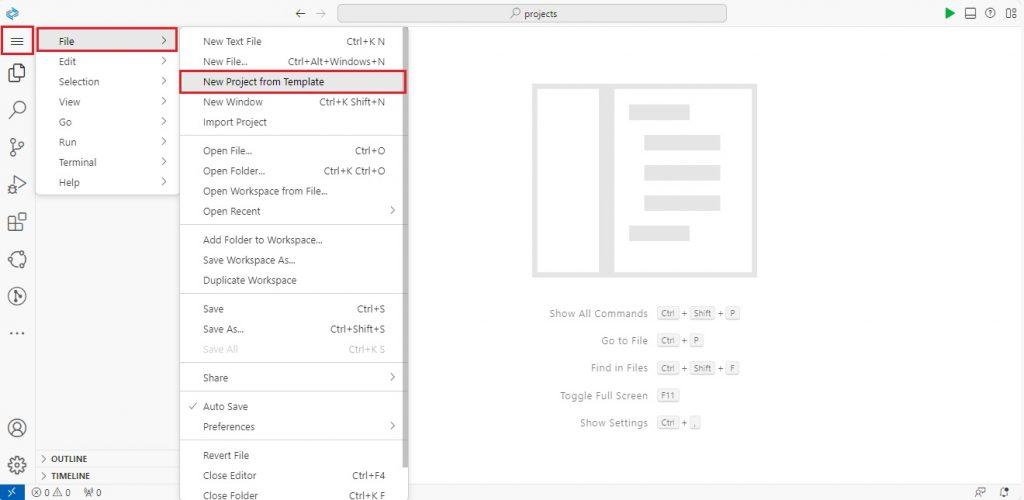
- Click on File, “New Project from Template” option.
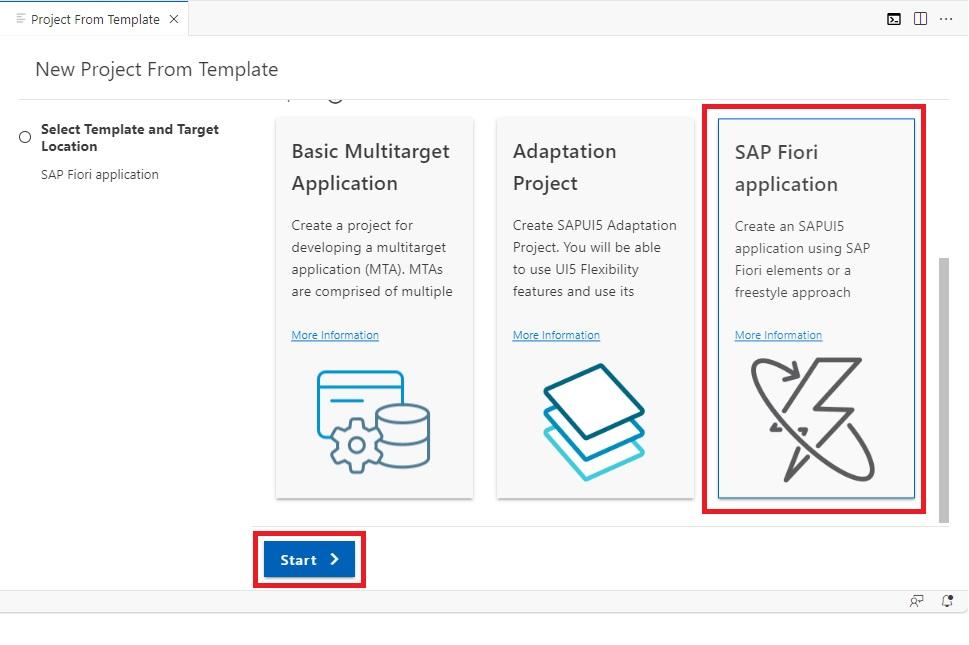
- Select “SAP Fiori application” Template and click on Start Button.
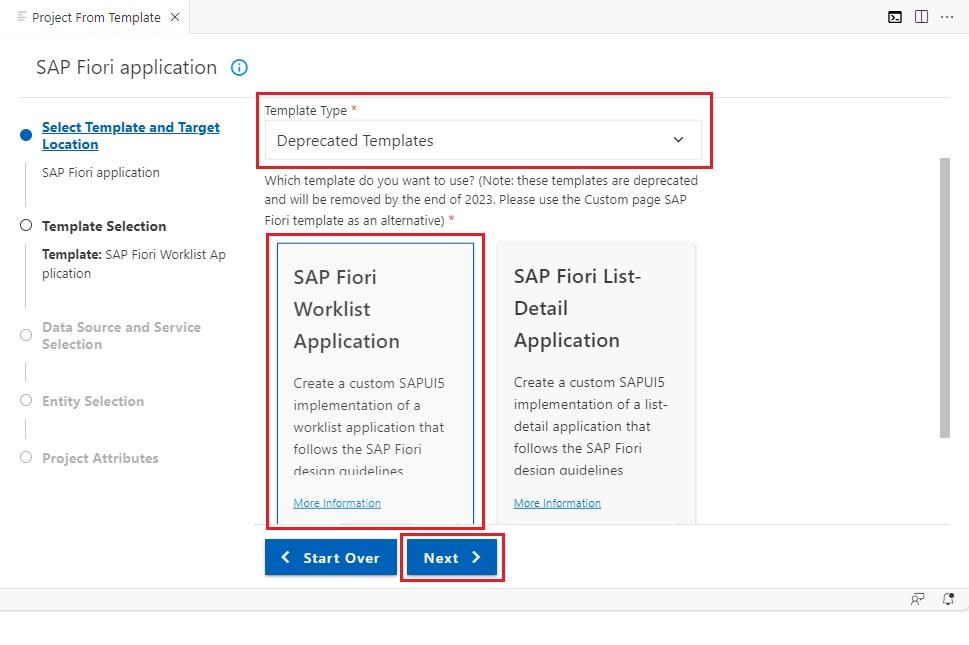
- Select “SAP Fiori Worklist Application” Template and click on Next Button.
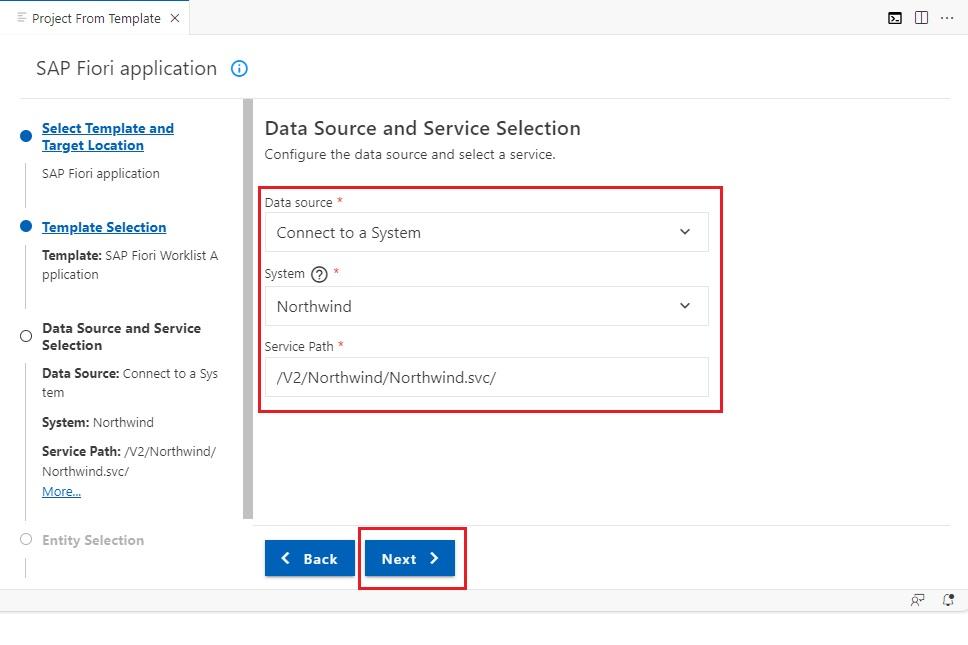
- Select: In Data source- “Connect to System”.
In System- “Northwind” Destination.
Give Service Path of Northwind Service- “/V2/Northwind/Northwind.svc/”
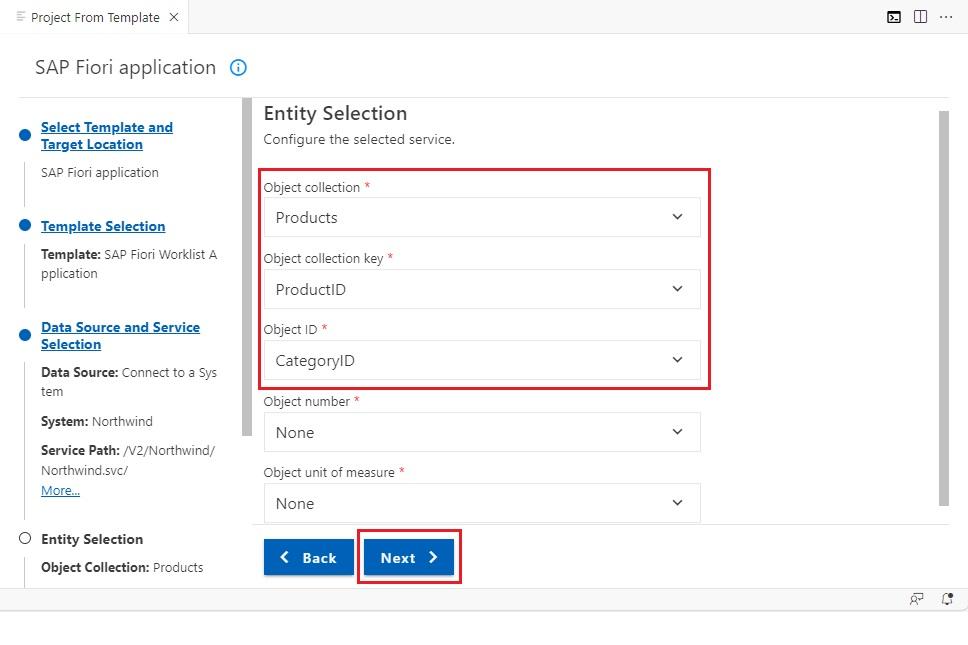
- In Entity Selection,
Select: Object Collection- Products Entity Set.
Object Collection Key- ProductID Property.
Object ID- CategoryID Property.
Ater giving all the required details click on the Next Button.
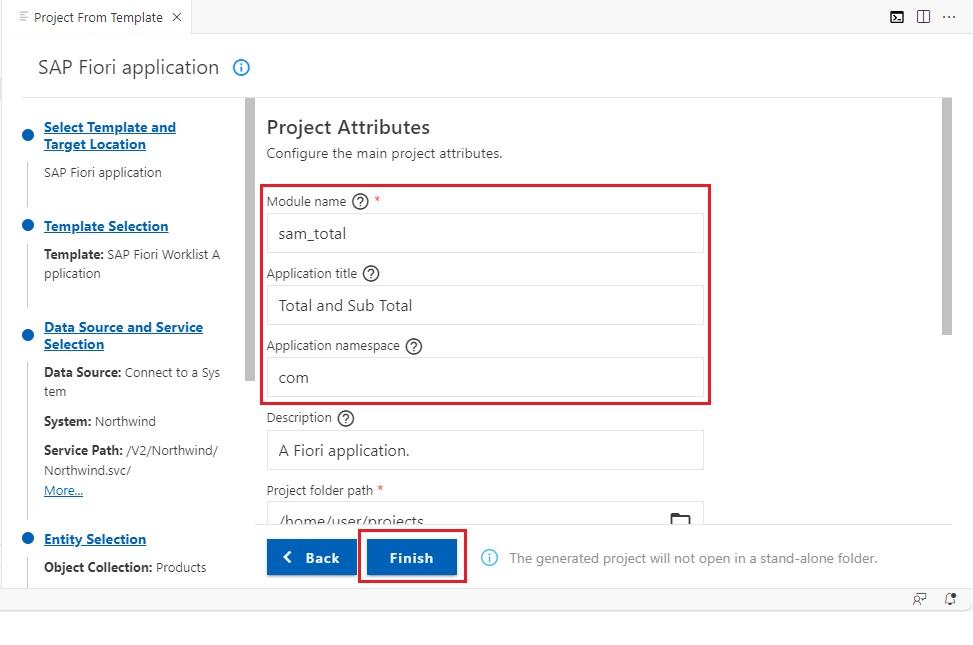
- In Project Attributes give required details and click on Finish Button.
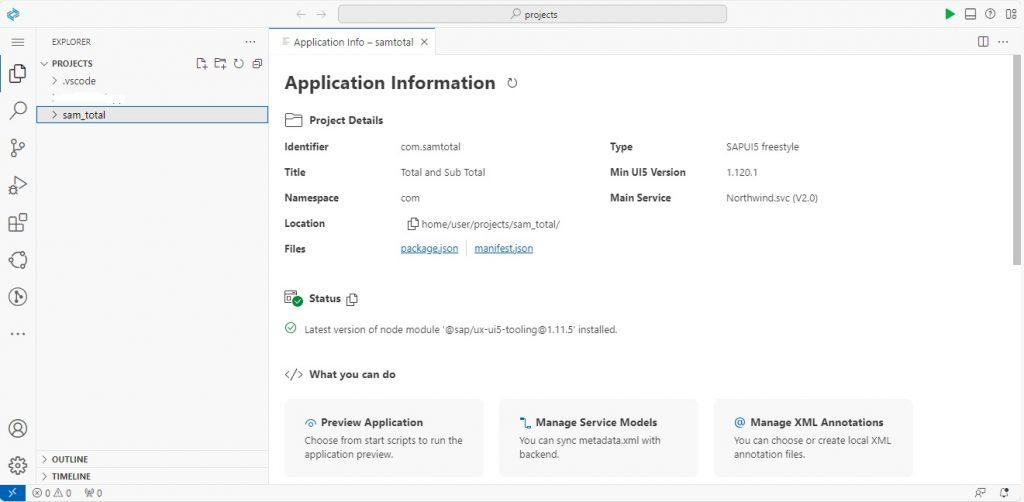
- Application Created Successfully.
Step 2: Developing Application
Worklist XML View:
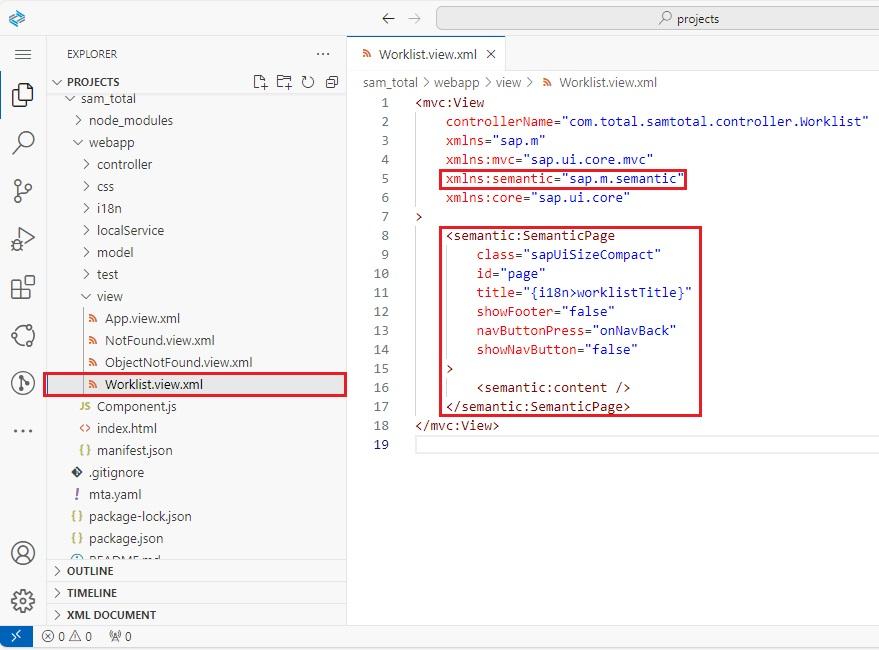
- Using Semantic Page Control instead of Native Page.
- The SemanticPage control helps in creating a unified page structure for Fiori applications. It includes header content, content area, and a footer, providing a standardized layout for applications.
- Give Semantic Page Name Space Library- xmlns:semantic=”sap.m.semantic”.
- Implementing Sematic Page as shown in below image:
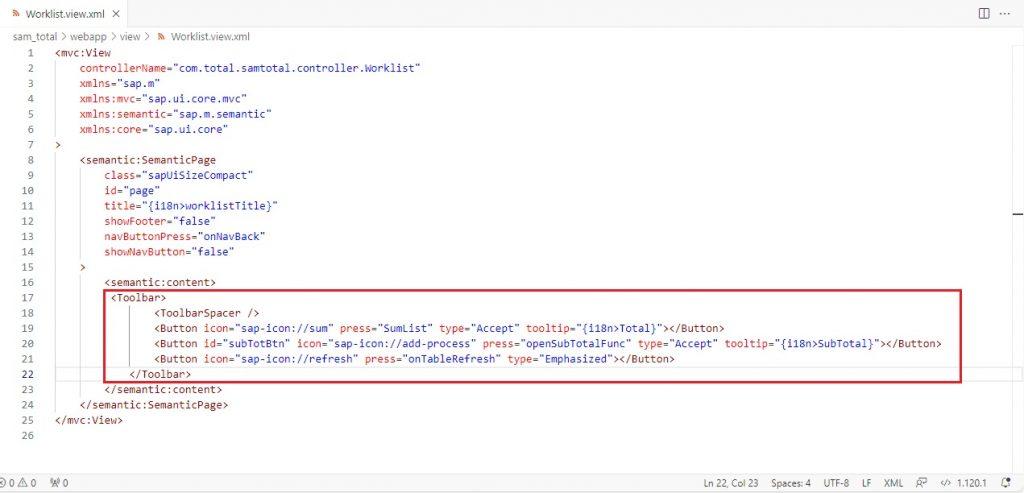
- Added Toolbar Control in Semantic Page and added Three Buttons in it.
- Buttons are Total Button, Sub-Total Button and Refresh Button.
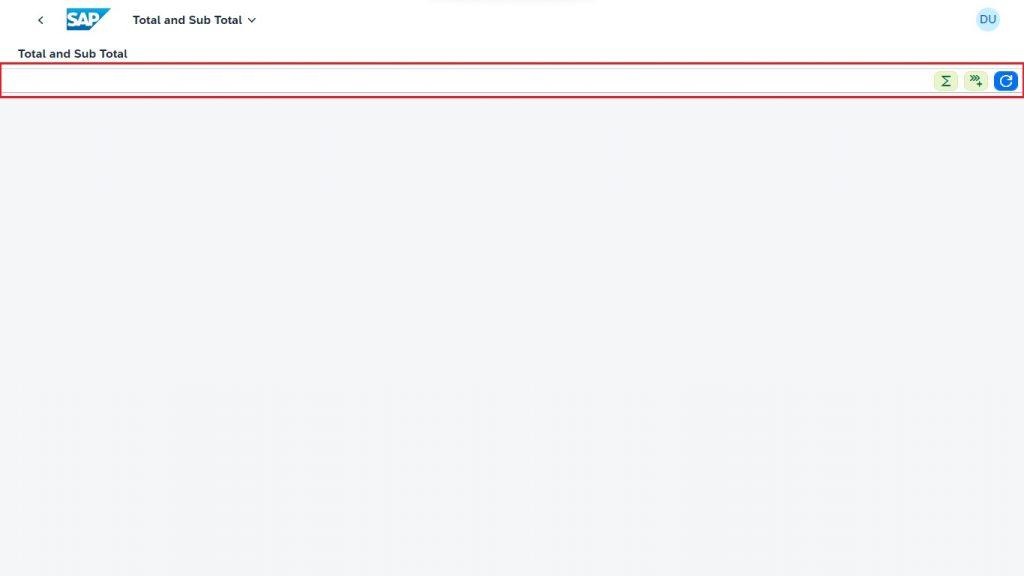
Output Screen:
- Output showing Toolbar with Three Buttons in Semantic Page.
- Now let’s add Responsive Table Control for Displaying Products Data.
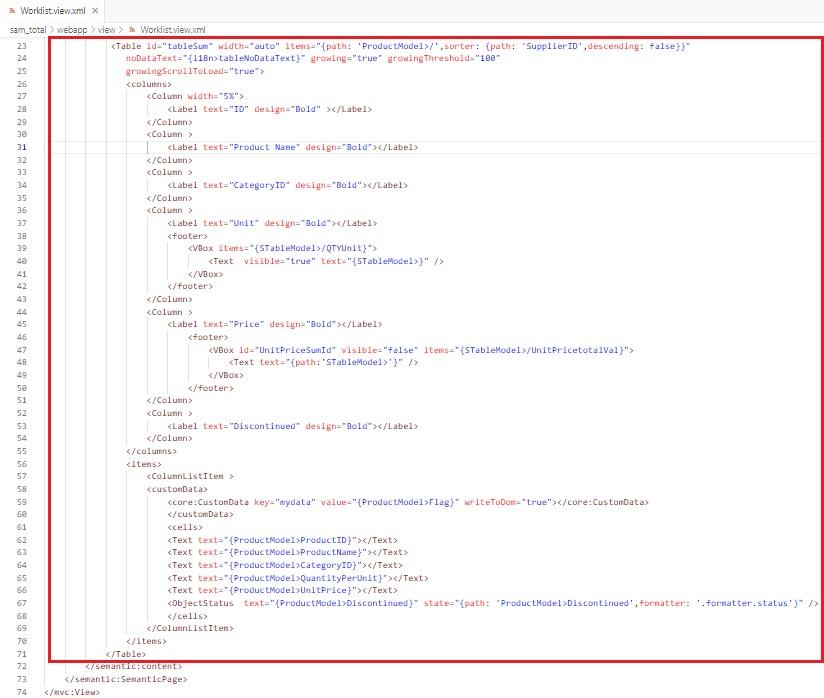
- Added footer in column for displaying the Subtotal for the price.
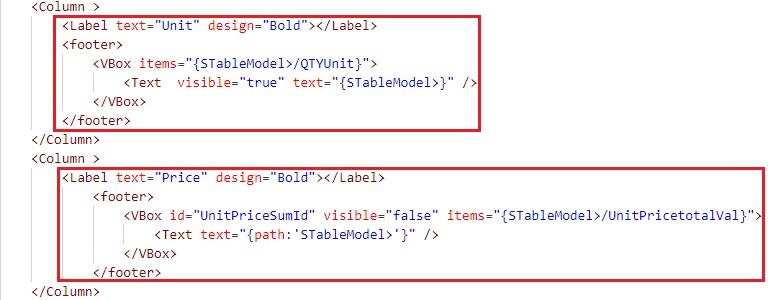
XML CODE SNIPPET:
<mvc:View controllerName="com.total.samtotal.controller.Worklist"
    xmlns="sap.m"
    xmlns:mvc="sap.ui.core.mvc"
    xmlns:semantic="sap.m.semantic"
    xmlns:core="sap.ui.core">
    <semantic:SemanticPage class="sapUiSizeCompact" id="page" title="{i18n>worklistTitle}" showFooter="false" navButtonPress="onNavBack" showNavButton="false">
        <semantic:content>
            <Toolbar>
                <ToolbarSpacer />
                <Button icon="sap-icon://sum" press="SumList" type="Accept" tooltip="{i18n>Total}"></Button>
                <Button id="subTotBtn" icon="sap-icon://add-process" press="openSubTotalFunc" type="Accept" tooltip="{i18n>SubTotal}"></Button>
                <Button icon="sap-icon://refresh" press="onTableRefresh" type="Emphasized"></Button>
            </Toolbar>
            <Table id="tableSum" width="auto" items="{path: 'ProductModel>/',sorter: {path: 'SupplierID',descending: false}}" noDataText="{i18n>tableNoDataText}" growing="true" growingThreshold="100" growingScrollToLoad="true">
                <columns>
                    <Column width="5%">
                        <Label text="ID" design="Bold"></Label>
                    </Column>
                    <Column >
                        <Label text="Product Name" design="Bold"></Label>
                    </Column>
                    <Column >
                        <Label text="CategoryID" design="Bold"></Label>
                    </Column>
                    <Column >
                        <Label text="Unit" design="Bold"></Label>
                        <footer>
                            <VBox items="{STableModel>/QTYUnit}">
                                <Text visible="true" text="{STableModel>}" />
                            </VBox>
                        </footer>
                    </Column>
                    <Column >
                        <Label text="Price" design="Bold"></Label>
                        <footer>
                            <VBox id="UnitPriceSumId" visible="false" items="{STableModel>/UnitPricetotalVal}">
                                <Text text="{path:'STableModel>'}" />
                            </VBox>
                        </footer>
                    </Column>
                    <Column >
                        <Label text="Discontinued" design="Bold"></Label>
                    </Column>
                </columns>
                <items>
                    <ColumnListItem >
                        <customData>
                            <core:CustomData key="mydata" value="{ProductModel>Flag}" writeToDom="true"></core:CustomData>
                        </customData>
                        <cells>
                            <Text text="{ProductModel>ProductID}"></Text>
                            <Text text="{ProductModel>ProductName}"></Text>
                            <Text text="{ProductModel>CategoryID}"></Text>
                            <Text text="{ProductModel>QuantityPerUnit}"></Text>
                            <Text text="{ProductModel>UnitPrice}"></Text>
                            <ObjectStatus text="{ProductModel>Discontinued}" state="{path: 'ProductModel>Discontinued',formatter: '.formatter.status'}" />
                        </cells>
                    </ColumnListItem>
                </items>
            </Table>
        </semantic:content>
    </semantic:SemanticPage>
</mvc:View>
Getting Northwind Serivce Data:
- In Life Cycle Method- onInit() Function just give the Read Call for Products Entity of Northwind Service.
- Read Call for Products Entity Set from Northwind service.
- In Read Call we just Split the QuantityPerUnit Property.
- We just show QuantityPerUnit property Units without Value in the column.
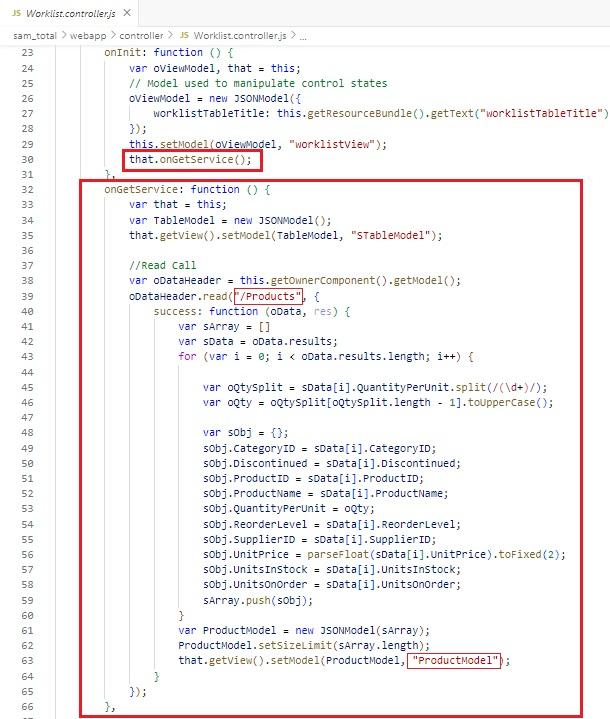
Controller Code:
sap.ui.define([
    "./BaseController",
    "sap/ui/model/json/JSONModel",
    "../model/formatter",
    "sap/ui/model/Filter",
    "sap/ui/model/FilterOperator",
    "sap/ui/model/Sorter"
], function (BaseController, JSONModel, formatter, Filter, FilterOperator, Sorter) {
    "use strict";

    return BaseController.extend("com.total.samtotal.controller.Worklist", {

        formatter: formatter,

        /* =========================================================== */
        /* lifecycle methods                                           */
        /* =========================================================== */

        /**
         * Called when the worklist controller is instantiated.
         * @public
         */
        onInit: function () {
            var oViewModel, that = this;
            // Model used to manipulate control states
            oViewModel = new JSONModel({
                worklistTableTitle: this.getResourceBundle().getText("worklistTableTitle")
            });
            this.setModel(oViewModel, "worklistView");
            that.onGetService();
        },
        onGetService: function () {
            var that = this;
            var TableModel = new JSONModel();
            that.getView().setModel(TableModel, "STableModel");

            //Read Call
            var oDataHeader = this.getOwnerComponent().getModel();
            oDataHeader.read("/Products", {
                success: function (oData, res) {
                    var sArray = []
                    var sData = oData.results;
                    for (var i = 0; i < oData.results.length; i++) {

                        var oQtySplit = sData[i].QuantityPerUnit.split(/(\d+)/);
                        var oQty = oQtySplit[oQtySplit.length - 1].toUpperCase();

                        var sObj = {};
                        sObj.CategoryID = sData[i].CategoryID;
                        sObj.Discontinued = sData[i].Discontinued;
                        sObj.ProductID = sData[i].ProductID;
                        sObj.ProductName = sData[i].ProductName;
                        sObj.QuantityPerUnit = oQty;
                        sObj.ReorderLevel = sData[i].ReorderLevel;
                        sObj.SupplierID = sData[i].SupplierID;
                        sObj.UnitPrice = parseFloat(sData[i].UnitPrice).toFixed(2);
                        sObj.UnitsInStock = sData[i].UnitsInStock;
                        sObj.UnitsOnOrder = sData[i].UnitsOnOrder;
                        sArray.push(sObj);
                    }
                    var ProductModel = new JSONModel(sArray);
                    ProductModel.setSizeLimit(sArray.length);
                    that.getView().setModel(ProductModel, "ProductModel");
                }
            });
        },


    });
});
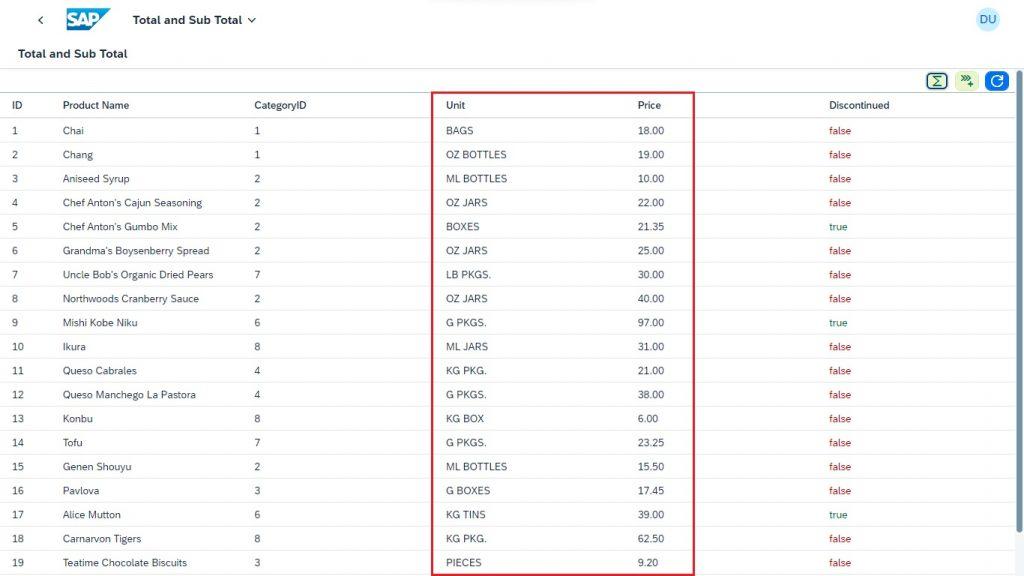
Output Screen:
- Here we can see only Units in Units Column without value and price.
Total Button Logic:
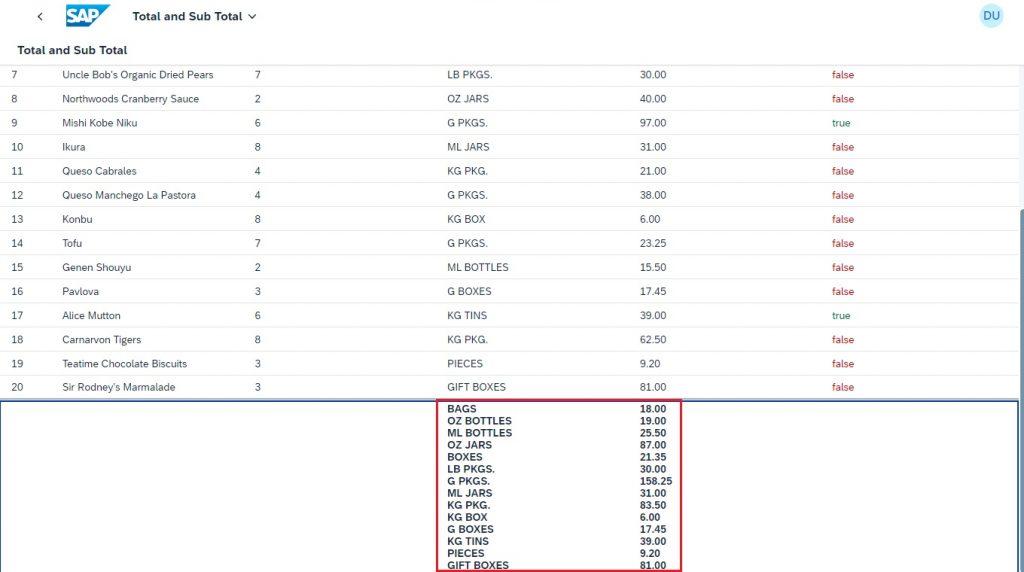
- Now can see Code of Total Sum for the Unit and Price Columns in Table.
- Here “SumList” Function is an event of Total Button in Toolbar of XML view.
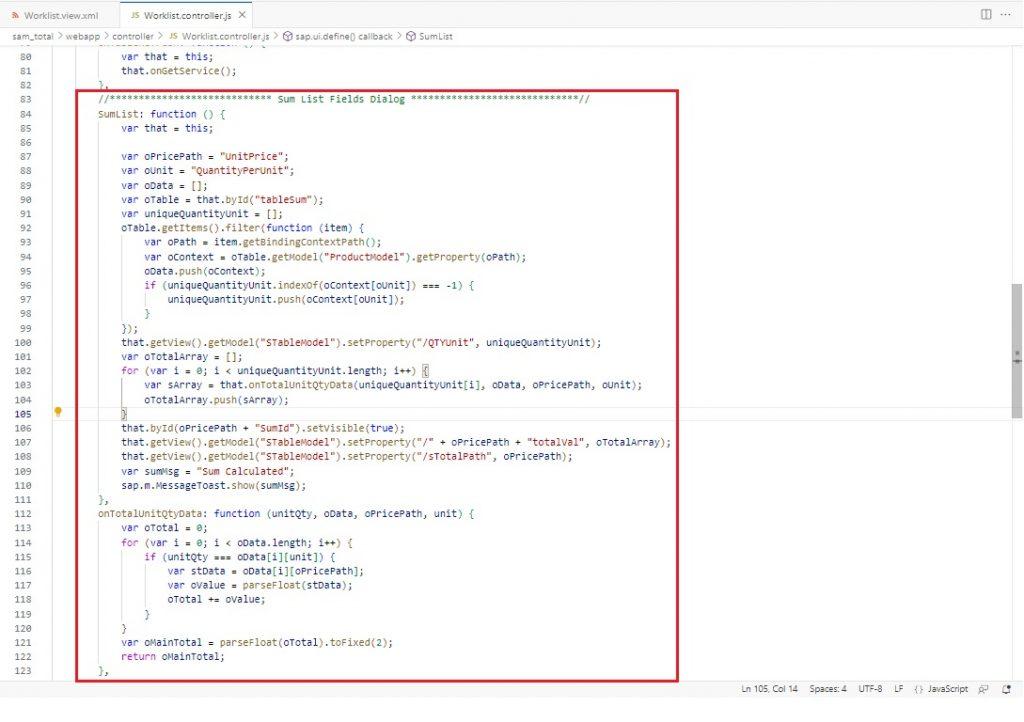
Controller Code:
//**************************** Sum List Fields Dialog *****************************//
        SumList: function () {
            var that = this;

            var oPricePath = "UnitPrice";
            var oUnit = "QuantityPerUnit";
            var oData = [];
            var oTable = that.byId("tableSum");
            var uniqueQuantityUnit = [];
            oTable.getItems().filter(function (item) {
                var oPath = item.getBindingContextPath();
                var oContext = oTable.getModel("ProductModel").getProperty(oPath);
                oData.push(oContext);
                if (uniqueQuantityUnit.indexOf(oContext[oUnit]) === -1) {
                    uniqueQuantityUnit.push(oContext[oUnit]);
                }
            });
            that.getView().getModel("STableModel").setProperty("/QTYUnit", uniqueQuantityUnit);
            var oTotalArray = [];
            for (var i = 0; i < uniqueQuantityUnit.length; i++) {
                var sArray = that.onTotalUnitQtyData(uniqueQuantityUnit[i], oData, oPricePath, oUnit);
                oTotalArray.push(sArray);
            }
            that.byId(oPricePath + "SumId").setVisible(true);
            that.getView().getModel("STableModel").setProperty("/" + oPricePath + "totalVal", oTotalArray);
            that.getView().getModel("STableModel").setProperty("/sTotalPath", oPricePath);
            var sumMsg = "Sum Calculated";
            sap.m.MessageToast.show(sumMsg);
        },
        onTotalUnitQtyData: function (unitQty, oData, oPricePath, unit) {
            var oTotal = 0;
            for (var i = 0; i < oData.length; i++) {
                if (unitQty === oData[i][unit]) {
                    var stData = oData[i][oPricePath];
                    var oValue = parseFloat(stData);
                    oTotal += oValue;
                }
            }
            var oMainTotal = parseFloat(oTotal).toFixed(2);
            return oMainTotal;
        },
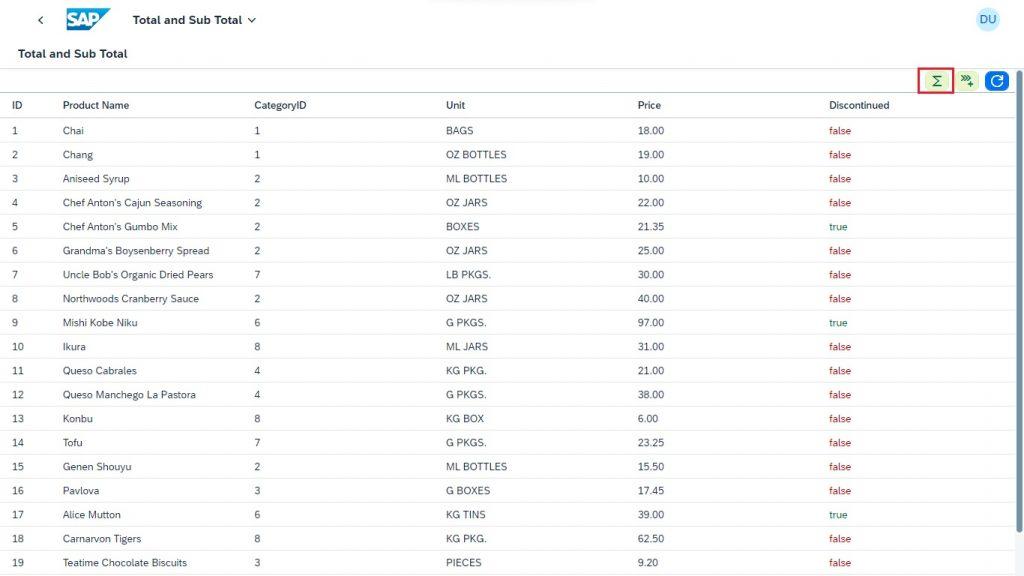
Output Screen:
- Click on The Total Button to see the Total of Unit &Price in Custom footer of Table.
Sub-Total Button Logic:
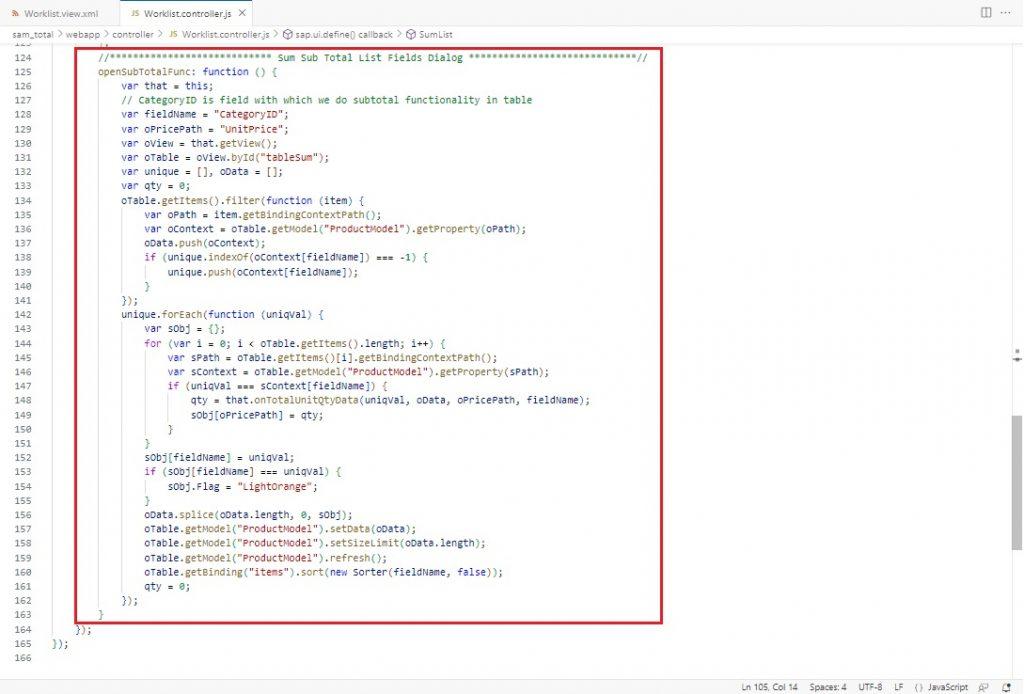
- Now can see Code of Sub-Total Sum for the Unit and Price Columns in Table.
- Here “openSubTotalFun” Function is an event of Sub-Total Button in Toolbar of XML view.
Controller Code:
//**************************** Sum Sub Total List Fields Dialog *****************************//
        openSubTotalFunc: function () {
            var that = this;
            // CategoryID is field with which we do subtotal functionality in table
            var fieldName = "CategoryID";
            var oPricePath = "UnitPrice";
            var oView = that.getView();
            var oTable = oView.byId("tableSum");
            var unique = [], oData = [];
            var qty = 0;
            oTable.getItems().filter(function (item) {
                var oPath = item.getBindingContextPath();
                var oContext = oTable.getModel("ProductModel").getProperty(oPath);
                oData.push(oContext);
                if (unique.indexOf(oContext[fieldName]) === -1) {
                    unique.push(oContext[fieldName]);
                }
            });
            unique.forEach(function (uniqVal) {
                var sObj = {};
                for (var i = 0; i < oTable.getItems().length; i++) {
                    var sPath = oTable.getItems()[i].getBindingContextPath();
                    var sContext = oTable.getModel("ProductModel").getProperty(sPath);
                    if (uniqVal === sContext[fieldName]) {
                        qty = that.onTotalUnitQtyData(uniqVal, oData, oPricePath, fieldName);
                        sObj[oPricePath] = qty;
                    }
                }
                sObj[fieldName] = uniqVal;
                if (sObj[fieldName] === uniqVal) {
                    sObj.Flag = "LightOrange";
                }
                oData.splice(oData.length, 0, sObj);
                oTable.getModel("ProductModel").setData(oData);
                oTable.getModel("ProductModel").setSizeLimit(oData.length);
                oTable.getModel("ProductModel").refresh();
                oTable.getBinding("items").sort(new Sorter(fieldName, false));
                qty = 0;
            });
        }
CSS Code for Table row Colour:
tr[data-mydata="LightOrange"]{
    background: #FFD898 !important;
    }
tr[data-mydata="None"]{
    background: #f7f7f7 !important;
}
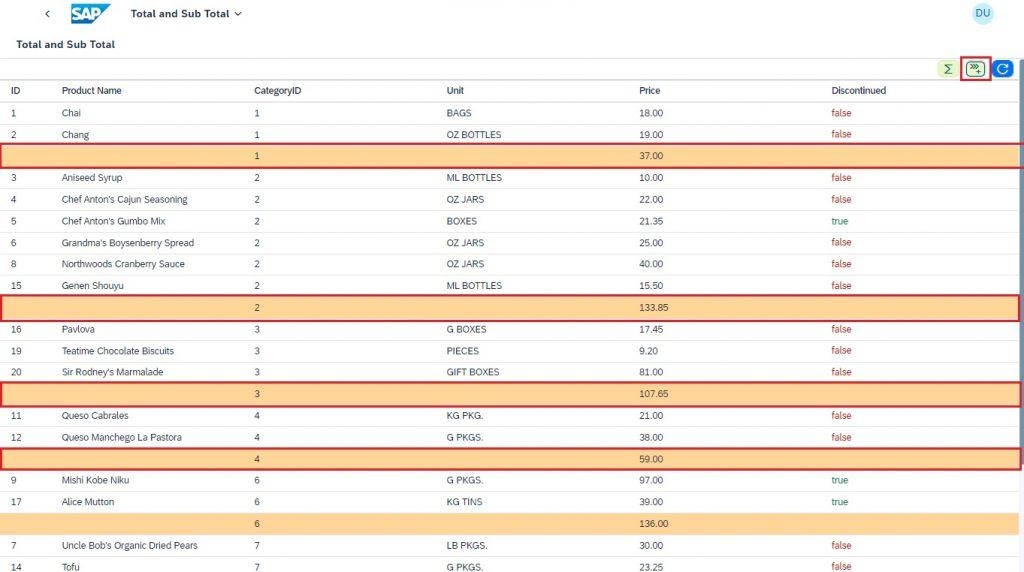
Output Screen:
- Click on the Sub-Total Button for Displaying Sub-Totals of Price in Custom Footer of Table.
Refresh Button Logic:
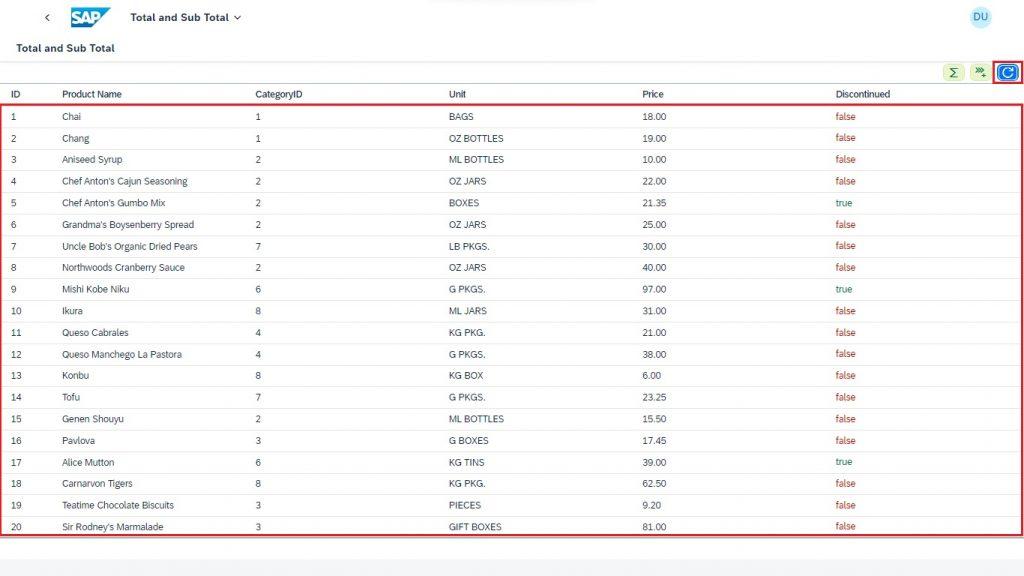
- Click on the Refresh Button to Refresh/Clear Totals and Sub-Total in Table.
Controller Code:
/*** Event handler for refresh event/ Refreshing Table */
        onTableRefresh: function () {
            var that = this;
            that.onGetService();
        },
Output Screen:
Conclusion:
We had seen how to do Total and Sub-Total of Units with Values in a Table using Northwind Service.
NOTE: Displaying Table data using Northwind Service.
