Introduction
In this blog post, I would like to share some insights for generating OpenXML documents by use of the RESTful Application Programming Model with Cloud-released development objects. With this app, you will be able to upload .docx templates and fill them with information from you CDS view (could be used for generating invoices, business documents and so on…).
Prerequesites
- SAP BTP ABAP environment or an S/4 system to your disposal.
- Eclipse IDE installed on your local machine with the ABAP Development Tools.
Shortcut with abapGit:
For those who are using abapGit, feel free to check out the code from my GitHub repo!
Step 1:
Create a database table with the following config (hint: do not forget to generate custom domains for mime type and attachment type)
@EndUserText.label : 'Invoice for document generation'
@AbapCatalog.enhancement.category : #EXTENSIBLE_ANY
@AbapCatalog.tableCategory : #TRANSPARENT
@AbapCatalog.deliveryClass : #A
@AbapCatalog.dataMaintenance : #RESTRICTED
define table zmri_invoice {

  key client            : abap.clnt not null;
  key invoice           : ebeln not null;
  comments              : abap.char(30);
  attachment            : zmriattachment;
  mimetype              : zmimetype;
  filename              : zfilename;
  purchaseorder         : abap.char(30);
  price                 : abap.dec(8,2);
  local_created_by      : abp_creation_user;
  local_created_at      : abp_creation_tstmpl;
  local_last_changed_by : abp_locinst_lastchange_user;
  local_last_changed_at : abp_locinst_lastchange_tstmpl;
  last_changed_at       : abp_lastchange_tstmpl;

}
Step 2:
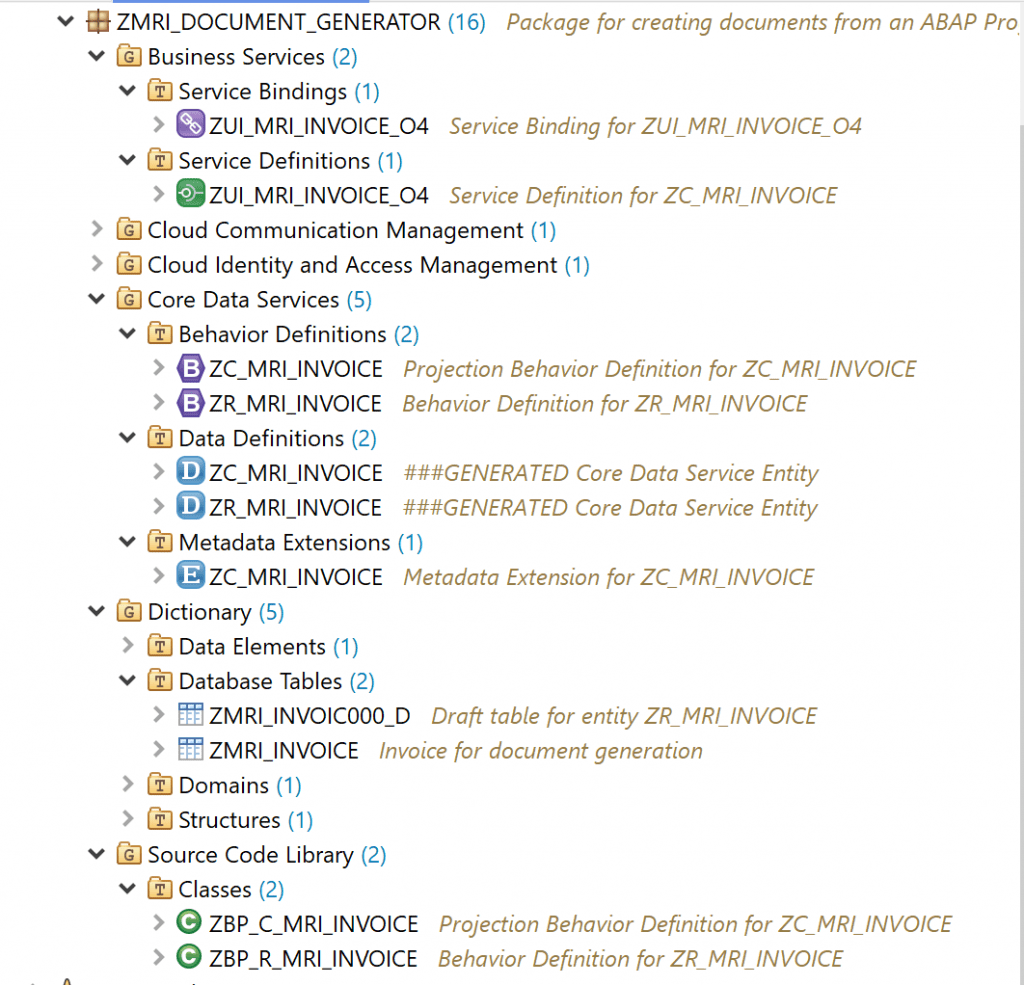
Generate ABAP repository objects by right-clicking on the previously created database table.
Choose the ABAP RESTful Application Programming Model (OData UI Service) variant.
Step 3
Create a custom action in your Behavior Definition:
managed implementation in class ZBP_R_MRI_INVOICE unique;
strict ( 2 );
with draft;
define behavior for ZR_MRI_INVOICE alias ZrMriInvoice
persistent table ZMRI_INVOICE
draft table ZMRI_INVOIC000_D
etag master LocalLastChangedAt
lock master total etag LastChangedAt
authorization master( global )

{
  field ( mandatory : create )
   Invoice;

  field ( readonly )
   LocalCreatedBy,
   LocalCreatedAt,
   LocalLastChangedBy,
   LocalLastChangedAt,
   LastChangedAt;

  field ( readonly : update )
   Invoice;


  create;
  update;
  delete;

  action ( features : global ) createMSWordInvoice ;

  draft action Activate optimized;
  draft action Discard;
  draft action Edit;
  draft action Resume;
  draft determine action Prepare;


  mapping for ZMRI_INVOICE
  {
    Invoice = invoice;
    Comments = comments;
    Attachment = attachment;
    Mimetype = mimetype;
    Filename = filename;
    PurchaseOrder = purchaseOrder;
    Price = price;
    LocalCreatedBy = local_created_by;
    LocalCreatedAt = local_created_at;
    LocalLastChangedBy = local_last_changed_by;
    LocalLastChangedAt = local_last_changed_at;
    LastChangedAt = last_changed_at;
  }
}
Step 4:
Implement the custom action in your behaviour implementation class:
CLASS lhc_zr_mri_invoice DEFINITION INHERITING FROM cl_abap_behavior_handler.
  PRIVATE SECTION.

    CLASS-DATA: mt_data TYPE zmri_invoice.

    DATA:
          lv_content   TYPE xstring,
          lo_zip       TYPE REF TO cl_abap_zip.

    METHODS:
      get_global_authorizations FOR GLOBAL AUTHORIZATION
        IMPORTING
        REQUEST requested_authorizations FOR ZrMriInvoice
        RESULT result,

      get_global_features FOR GLOBAL FEATURES
        IMPORTING
        REQUEST requested_features FOR ZrMriInvoice
        RESULT result,

      createMSWordInvoice FOR MODIFY
        IMPORTING keys FOR ACTION ZrMriInvoice~createMSWordInvoice.

ENDCLASS.

CLASS lhc_zr_mri_invoice IMPLEMENTATION.

  METHOD get_global_authorizations.
*  This method does not need an implementation
  ENDMETHOD.

  METHOD createMSWordInvoice.

*     Select document to be filled
    SELECT * FROM zc_mri_invoice
     FOR ALL ENTRIES IN @keys
     WHERE invoice      = @keys-invoice
     INTO CORRESPONDING FIELDS OF @MT_data.
    ENDSELECT.

*     Create zip class instance
    lo_zip = NEW cl_abap_zip( ).

*     Search for main document part
    DATA lv_index TYPE string VALUE 'word/document.xml'.

*     Load attachment into zip class object
    lo_zip->load( zip = mt_data-attachment check_header = abap_false ).

*     Fetch the binaries of the XML part in the attachment
    lo_zip->get(
    EXPORTING
      name   = lv_index
    IMPORTING
      content = lv_content
    ).


* Convert the binaries of the xml into a string
    DATA(lv_string) = xco_cp=>xstring( lv_content
      )->as_string( xco_cp_character=>code_page->utf_8
      )->value.

* Search for the text to be replaced and fill with the information in your data set
    REPLACE FIRST OCCURRENCE OF '<InvoiceNumber>' IN lv_string
    WITH mt_data-Invoice.

    REPLACE FIRST OCCURRENCE OF '<Purchase Order>' IN lv_string
    WITH mt_data-PurchaseOrder.

    REPLACE FIRST OCCURRENCE OF '<Comments>' IN lv_string
    WITH mt_data-Comments.

    DATA lv_price TYPE string.
    lv_price = mt_data-Price.

    REPLACE FIRST OCCURRENCE OF '<Price>' IN lv_string
    WITH lv_price.

* Convert the changed XML string into binaries
    DATA(lv_new_content) = xco_cp=>string( lv_string )->as_xstring( xco_cp_character=>code_page->utf_8
    )->value.

* Delete "old" main document part from the zip file
    lo_zip->delete(
    EXPORTING
      name   = lv_index
    ).

* Add "new" main document part to the zip file
    lo_zip->add(
    EXPORTING
      name   = lv_index
      content = lv_new_content
    ).

* Save the new zip file
    DATA(lv_new_file) = lo_zip->save( ).

* Upload changed docx file
    MODIFY ENTITIES OF zr_mri_invoice IN LOCAL MODE ENTITY ZrMriInvoice
      UPDATE SET FIELDS WITH
      VALUE #( (
          Invoice = mt_data-Invoice
          Attachment = lv_new_file
      )  )
    FAILED failed.

    APPEND VALUE #( %msg = new_message_with_text( severity = if_abap_behv_message=>severity-success text = 'Template successfully filled...' ) ) TO reported-ZrMriInvoice.
  ENDMETHOD.

  METHOD get_global_features.
* This method does not need to be implemented
  ENDMETHOD.


ENDCLASS.
Explanation: In this implementation class, the cl_abap_zip class (which is released for cloud development) is used to load the .docx template. If you didn’t already know, a .docx file is basically a ZIP-file. In order to get the main document part, we need to fetch the “word/document.xml” file within the zip object by applying the lo_zip->get() method. This method returns an XSTRING which has to be converted into an UTF-8 encoded string, for us to modify the content of the main document part. For the binary-to-string conversions the xco_cp class is used, which is part of the XCO library (I can only recommend using this library as it has some great features). Afterwards the converted XML-string has to be modified with the invoice details from your CDS view. The modified XML-string has to be converted back into binaries, by use of the same class. The last step is to delete the “old” main document part from the zip object and add the new document content to the zip object. Now update the attachment field in your CDS entity and that’s it. Your app should now be able to populate a .docx-file with information from your CDS view.
Step 5:
Create a metadata extension and a service binding for your Fiori Frontend and test the application:
@Metadata.layer: #CORE
@UI: { headerInfo: {
typeName: 'Invoice',
typeNamePlural: 'Invoices',
title: { type: #STANDARD, value: 'Invoice' },
         description: { type: #STANDARD, value: 'Invoice' } },
         presentationVariant: [{
         sortOrder: [{ by: 'Invoice', direction: #ASC }],
         visualizations: [{type: #AS_LINEITEM}] }] }
annotate view ZC_MRI_INVOICE with
{
  .facet: [    {
                label: 'General Information',
                id: 'GeneralInfo',
                type: #COLLECTION,
                position: 10
                },
                     { id:            'Invoicedet',
                    purpose:       #STANDARD,
                    type:          #IDENTIFICATION_REFERENCE,
                    label:         'Invoice Details',
                    parentId: 'GeneralInfo',
                    position:      10 } ]

  : { lineItem:       [ { position: 10, importance: #HIGH , label: 'Invoice Number'} ] ,
          identification: [ { position: 10 , label: 'Invoice Number' } ] }
  Invoice;
  : { lineItem:       [ { position: 20, importance: #HIGH , label: 'Purchase Order'} ] ,
           identification: [ { position: 20 , label: 'Purchase Order Number' } ] }
  PurchaseOrder;
  : { lineItem:       [ { position: 20, importance: #HIGH , label: 'Price'} ] ,
           identification: [ { position: 20 , label: 'Price' } ] }
  Price;
  : { lineItem:       [ { position: 20, importance: #HIGH , label: 'Comments'} ] ,
           identification: [ { position: 20 , label: 'Comments' } ] }
  Comments;
  :
  { lineItem:       [ { position: 30, importance: #HIGH , label: 'Attachment'}, { type: #FOR_ACTION, dataAction: 'createMSWordInvoice' , label: 'Create Invoice' } ],
    identification: [ { position: 20 , label: 'Attachment' }]
  }
  Attachment;

  .hidden: true
  MimeType;

  .hidden: true
  Filename;


}
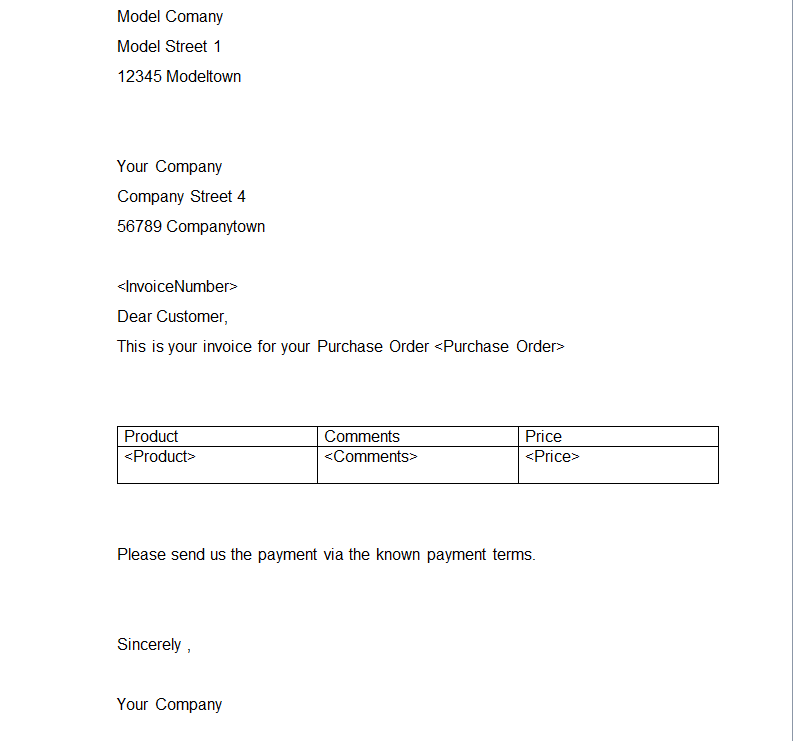
Test the application by creating an entry and uploading a docx-template.
The template could look something like this:
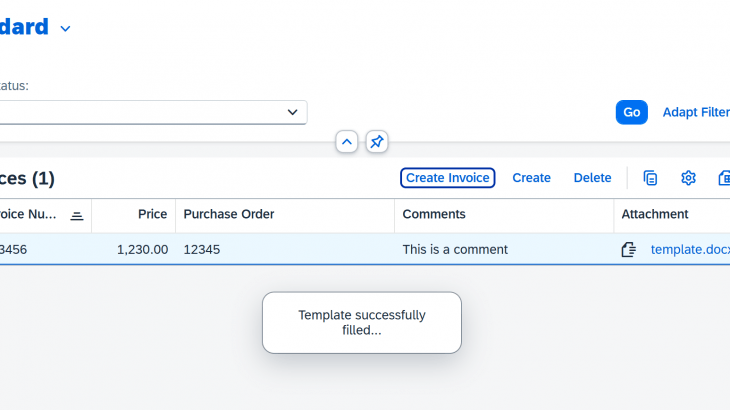
Now select the entry and use the custom action to fill the template with your data:
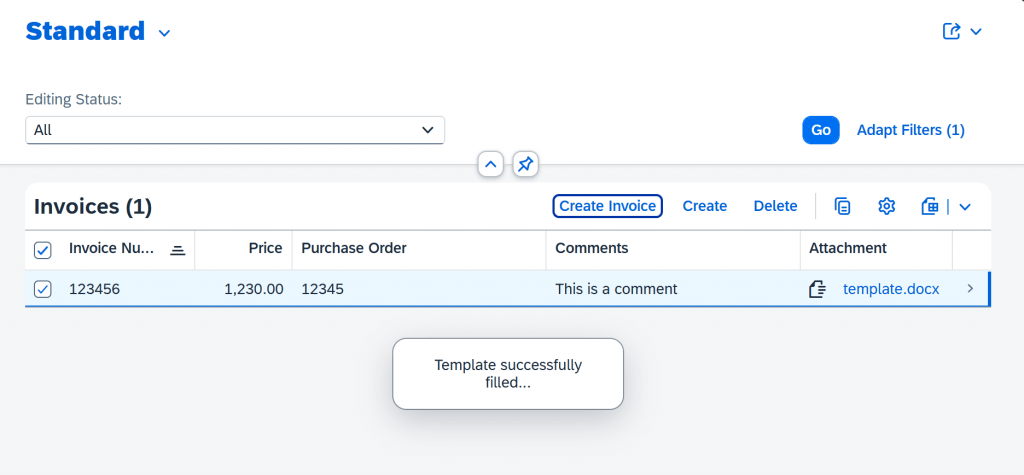
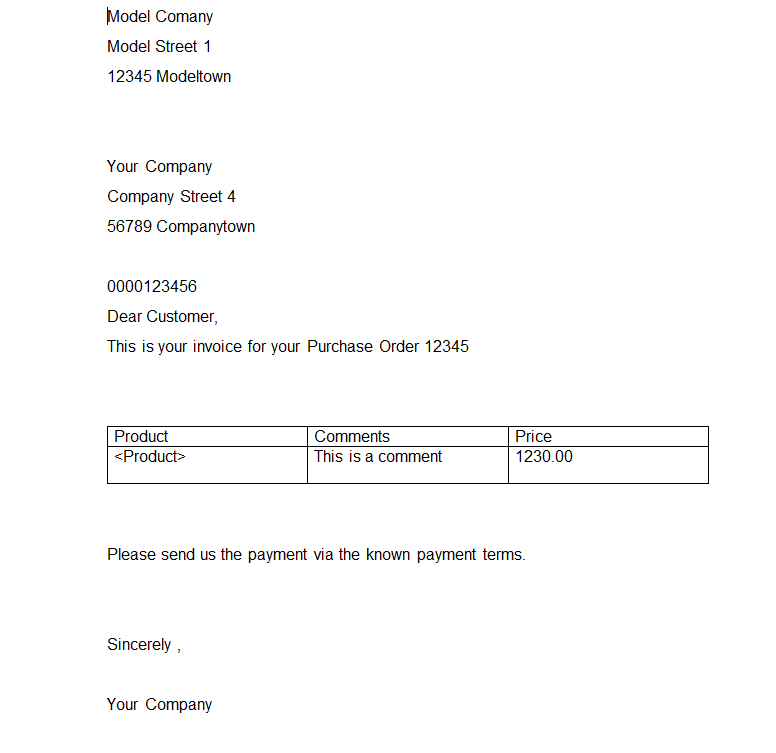
After the success message, click on the attachment (template.docx) and verify that the placeholders have been filled:
